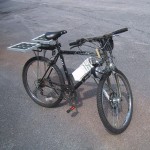
 An electric powered bike makes it easier to go up hills, and can turn a ride to the train station from a workout into a commute. Typically however, the batteries need to be plugged in to charge after your trip. Although electricity is cheap, this does require that you have removable batteries (or wheel your bike into the house or bring a charger outside). I decided to use the sun to recharge my bike, seeing as how I would be parking my bike outside at a train station all day. This way, it can be fully charged and ready for the ride home when I return.

To add solar recharging to my electric bike, I bought two 12 volt solar panels (providing 4 watts each) a rear bike rack, and some miscellaneous hardware. The bike rack attaches to the seat post of the bike. It has two metal rails on either side, and I used 3/4 inch two hole electrical conduit straps (bent into a circle) around the side rails of the rack to mount the solar panels. The panels had their own extruded aluminium frame. I drilled two holes in each solar cell’s frame and bolted the frames to the electrical conduit straps. This allows the solar panels to rotate nearly 180 degrees.
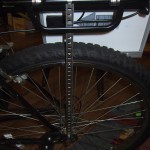
To prevent the panels from swinging into the spokes of the rear wheel while in motion (which could be fun!) and to provide a way to easily prop up the panels when in use, I added two zinc shelf brackets as supports between the rear axle of the bike and the rack. They are bolted onto the bike frame (M6 machine screw) and hose clamped to the rack. I cut some pieces of rubber from a mouse pad and used epoxy to glue them to the solar panel frames where they would hit the zinc shelf bracket to eliminate metal on metal rattles.
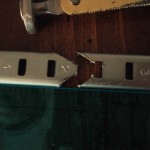 I cut two more 8 inch pieces of the same shelf bracket material to use as struts to hold up the solar panels. By cutting the ends at an angle, they fit into the notches in the supports. By placing them in different notches I can vary the angle of the solar panels (although so far I have simply placed both panels parallel to the ground). When not in use, the struts are attached to the bottom of the vertical brackets using 3 small high-strength magnets on each side. The magnets are small disks that fit inside of the slots in the shelf bracket, and hold themselves on so no adhesive is needed. So far, as long as I line up the magnets so they fit into the slots of both the attached vertical bracket and the 8″ support strut, they have not fallen off going over bumps.
The rear rack cost $17, and the miscellaneous hardware added another $10. The largest cost of course is the $70 for the two surplus solar panels, driving the cost of this solar charging addition to my electric bike to $97. (But, I also get the use of the rear rack.) The total weight of the bike with all accessories is 62 lbs

how did u connect the solar panel to the battery?
Teja,
The solar panels came with diodes (that prevent the batteries from reverse discharging through the panels at night), so I simply connected the two 12v panels in series (to get up to 24v) and then connected that to the batteries (also connected in series to get up to 24v). It would be more efficient to have a maximum power point tracking charge controller, but the added cost and weight wouldn’t make it practical.
Jay
Pingback: Jay’s Technical Talk › Bike Lighting: $15