I’ve been using my DWARF II (Dwarf 2) smart telescope for a few months now and feel like I mostly know what I’m doing. Here are common questions I see on the user’s forum with my answers.
What’s the first thing I should do?
Remove the plastic film that protects both the cameras in shipping, the image quality is better that way. Then put it on to charge before nightfall.
Best first target?
If you are in the Northern Hemisphere, I recommend the M31 Andromeda Galaxy or M42 the Orion Nebula as your first “target”. (Use a phone app such as SkySafari or SkyView to confirm you have a clear view to your target first…the Dwarf app doesn’t really do a good job of letting you know what is currently visible in the sky.)
Both of these targets are relatively large and bright, so you should be able to image something even in city glow. Here is what my Dwarf was able to do all on it’s own, without any post processing (click image for full size):

M31 Andromeda Galaxy, 198 stacked shots, 10 sec exposures, gain 40
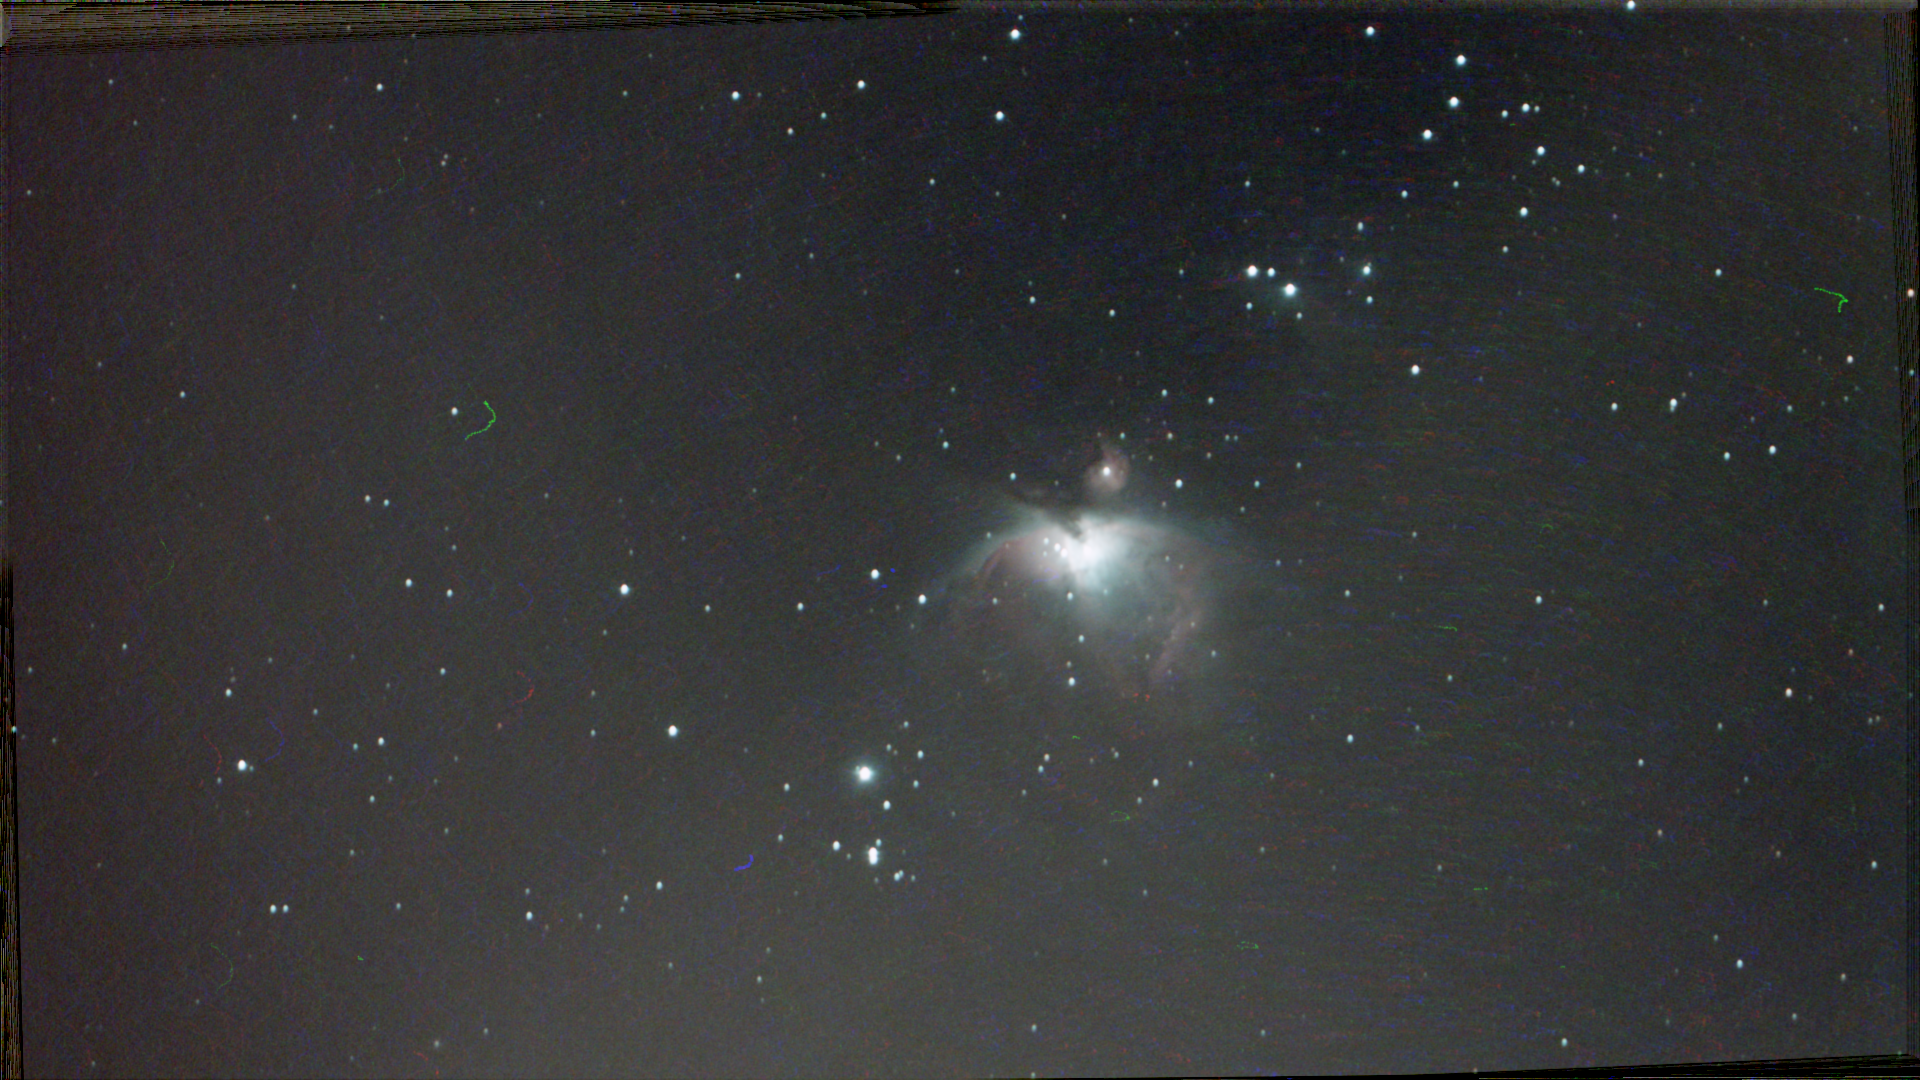
M42 Orion Nebula – 47 stacked shots, 15 second exposures, gain 50
Astro-mode Calibration
For plate solving / calibration to work, the DWARF needs to be able to see a good number of stars in sharp focus. You should check/set the telephoto settings (try 1 second exposure and a gain number that leaves the background still mostly dark, but shows stars well) and then make sure the stars are small dots [using the [+][-] focus buttons, and/or a Bahtinov mask if you like to be super precise….]
NOTE: You MUST remove all filters before using the calibration procedure, as it turns the Dwarf’s tube all the way to the “zeroed” position facing down, inside the body of the telescope, and the filter holder would prevent this motion.
Telephoto aiming rectangle mis-calibration
Because the telephoto lens and the wide angle lens are separated by 4 inches (have parallax) the area inside the rectangle in the wide angle view may or may not correspond to the field of view of the telephoto lens, depending upon the distance to your target.
To fix this, have the wide angle lens view be large (with the telephoto view in the smaller picture-in-picture mode). Then, you can press and hold your finger on the rectangle, and drag to move it around the wide angle view. [I suggest you use the joystick to aim the telephoto view at something that is distinctive in the wide angle view, such as the top of a utility post, or recognizable star.]
This calibration should be “good” for objects of the same distance, but if you calibrate it with a close up object, it won’t match up for “infinite” field of view objects like stars.
MicroSD card “upside-down” orientation
The micro-sd card orientation is “upside down” from what you might expect it to be. Pay very special attention to the icon of the SD card and which way the small cutout on the card is facing when you insert it.
Rubber Micro SD card cover not fitting
If you pull out the rubber cover for the Micro SD card, you will find that it is attached to the Dwarf 2 with a thin cylindrical piece of rubber (attachment string) that comes out of a hole. If you pull it out too hard, the cylindrical rubber bit may not want to go back into the hole, and the rubber plug may not re-insert correctly, which will block the rotation of the telescope tube when the Dwarf tries to calibrate. To fix this, you have to carefully push the cylinder of rubber back into the hole, either by using a pair of tweezers, or by carefully pushing using the rubber plug near the cylinder. Some careful maneuvering should get it to slide back into the hole. Once the cylinder is sliding freely back into the hole, you will be able to re-insert the micro SD card cover.
Polar or Equatorial or EQ alignment
The Dwarf 2 is designed to be mounted on the level, and its two motors act as an Altitude / Azimuth (Alt/Az or pan/tilt) head. [The entire telescope rotates around the small base to provide Azimuth control, and the telescope tube rotates to provide Altitude control.]
It works fine in this configuration, and it uses it’s alt/az drive to track the current object of interest. But if you are taking a large number of images, due to the rotation of the Earth, the subsequent images are slightly rotated from the first image, even if the target stays in the center of the frame. This is called “Frame Rotation” and results in not having a full set of images for the outside edges of your image stack. [And requires any software stacking solution to apply a corresponding “anti-rotation”.]
You can mostly resolve this issue by mounting the Dwarf2 telescope with the axis of the base (azimuth axis) pointing in the same direction as the Earth’s axis of rotation. In the northern hemisphere, the easy way to do this is to align the Dwarf 2 with Polaris (the north star). This can be done with a tripod head that tilts at least the number of degrees of latitude of your location. [There are several 3D printed aiming devices to help you, or you can just tape a drinking straw to the side of the Dwarf.] If you want to know how to do this, I recommend this video: https://www.youtube.com/watch?v=X9rIk6skTU8
The questions are then….but will the DWARF work correctly in this “non-level” configuration? Will this hurt my Dwarf, or void the warranty?
Many people, including myself, are using the DWARF 2 in polar alignment successfully, so it does work and helps to reduce field rotation. So far I have not heard of any reports of a DWARF 2 failing because it was used in polar alignment, or of DwarfLabs denying a valid warranty claim due to usage in polar alignment.
However, you should know that early models of the DWARF 2 had an issue where the base plate could break off of the base. As the base plate is where the tripod nut is mounted, this could cause the entire rest of the telescope to fall to its doom. [Dwarf Labs has published a technical note explaining how to fix this yourself if you have one of the early models.] This is due to a design flaw (the plastic that the base plate screwed into was not strong enough for the potential forces). The factory has “fixed” this issue by using a glue to adhere the base plate to the bottom of the Dwarf as part of the assembly process. However, I am still suspicious of the overall strength of the tripod nut and base plate, so I use a 3D printed “support bracket” with my Dwarf. It is called the “Dwarf 2 Base Plate Saver“. With this bracket, which distributes the load around the entire base of the Dwarf, I do not worry about mounting it in polar alignment.
The azimuth motor has worked perfectly fine for me, even with my Dwarf at a 28.5 degree tilt. As the weight is nicely balanced, I expect it would work very well, even with the dwarf at a much more inclined angle, so motor strength does not appear to be an issue. There is a potential issue of the axis bearings not being designed for off-level operation, but so far I have not noticed any issues that I can attribute to non-level mounting.
Post Processing Software for Linux
If you want to spend money and get the best result, Pix Insight (and related plugins that cost more money) is the way to go. (There are a few other paid software that only work on Windows, but at least Pix Insight is cross platform.)
I have not spent any money, and am using the Open Source SIRIL software instead.
There are a lot of videos about how to use SIRIL on YouTube…but this one is Dwarf 2 specific and also shows off Pix Insight.
Both pieces of software have a steep learning curve, but post-processing off of the DWARF can improve your final result significantly. For example, here are my results post-processing data from the two example images above using SIRIL (click for full size):


")


I can’t get the microSD card to snap into place. I insert it correctly as per the illlustration next to the slot, and push it as far as it will go, but it springs out again. Many tries without success.
I contactedc DwarfLabs and got an auto-reply that they would contact me within a few hours. It is now a few days later.
Any secret tip I should know? Is the cared required to operate the Dwarf 2?
As long as it is oriented “upside down” it should just push in and click. (You might need a small flat object to get it far enough in, as the slot is recessed inside the body a bit.) I believe the micro-SD card is required to take any photos or stack any images, but I haven’t tried using the dwarf2 without it installed.
I had the same problem and “fixed” it by wedging a toothpick in the slot with the card while the card was pushed in all the way and then breaking off the tip at the end of the toothpick in the slot so that that card remains seated. Pain in the ass but that’s the only way I could get it to workl
Hello, I am learning all thtbe bells and whistles of the Dwarf 2, ut have not successfully just focus on the moon and get a clear sbot. Like you pit has a regular telescope. Can you give some advice?
I’d suggest you watch a few YouTube videos on how to get it set up and use it. Some suggestions:
https://www.youtube.com/watch?v=ApWd9mOqEeU
https://www.youtube.com/watch?v=PKWVpp83sWg
As someone who had the base fail on the first day I received it merely by picking up the unit with the desktop tripod attached, you are right to be cautious and untrusting. I have applied the scotch weld solution they recommended and even paid for, and they were very helpful with instructions on how to do so, but I am hesitant to try it in polar alignment as a result. It’s nice and solid in it’s level configuration, but once burnt twice shy.
It sounds like you might have had the original base (before they started to glue it at the factory). Yep, lots of early adopters are understandably weary….
I live in an area where there is light pollution, houses and trees nearby and I can’t get the telescope to calibrate. Any suggestions?
Also I would like to know the best settings to use the astrophotography feature
I would appreciate any suggestions as I am new to this. Thank you
You will need at least 20-30 degrees of “sky view” along the AZ (‘left to right’) axis to calibrate. Manually point the Dwarf2 in the exact center of your biggest open spot, set the exposure to 1 second, the gain to 80, and make sure you can see stars. (You may need to focus first by pointing it at the moon or a bright star manually). Then hit the calibrate button, and watch the screen and the dwarf.
It should swivel all the way around, then come back to about 10-15 degrees “before” where you started it at, and take the first calibration photo. If you don’t see stars in the calibration photo, it won’t work. It will keep moving 5-10 degrees to the right each time it takes a new photo…it needs to be able to see stars in 3 photos to calibrate successfully. [If you don’t see stars in the images it shows when it is working…it won’t see them either…]
If you can’t get it working at your location, find an empty field (or unobstructed rooftop) to try it in to see how it works when there are no obstructions. (Turning the wide angle view to 1 sec exposure and maximum gain also will allow you to get a feel for where the obstructions are in relation to the aiming rectangle.)
I have the DWARFLAB 2 telescope and would appreciate any help on settings for astrophotography and using it in the city
I did find a spot but there was traffic going by and the headlights from the vehicles caused a plate failure. This telescope is so sensitive to light it is frustrating. I did get it to work though but I had gotten it to use in my backyard
I am wondering if there is a way to magnify the image that you see as it is so tiny on my tablet screen I can’t even see the rings of Saturn
Also how to you turn on the dew heater please
Thank you
You can calibrate the Dwarf2 using a relatively small patch of sky, but only if you properly aim it before hitting the calibrate button so that it can capture 3 images in the clear spot of sky. Using the wide angle “aiming” camera in picture-in-picture mode (set the wide angle camera to 1 second exposure, maximum gain) will generally allow you to see obstructions like trees and buildings and get that initial start point correct.
I’ve also seen people use 1/4-20 bolts to mount the Dwarf to the end of a piece of wood sticking out a window, or on top of a fence just to get it up and clear of obstructions so that it can see more of the sky (but you need to make sure that it is stable so vibrations won’t ruin your 10-15 second exposures).
The Dwarf has too large of a field of view to be used for planetary imaging. About the best you can hope for is to see the moons of Jupiter or Saturn as dots of light around the brighter dot of the planet.
It is really designed for larger deep sky objects. You can do a “two fingered” zoom gesture on the GUI to expand the image to some extent, but looking at them later on a larger monitor is the easiest way to see all of the detail possible.
As with any telescope, it is sensitive to off-axis light from terrestrial sources. I use a 1.25″ screw in telescope eyepiece extender as a “light shield” in the magnetic filter holder to block IR light from security cameras. You can also set up tarps, shadows of trees, etc to block light from unwanted sources.
The Dwarf doesn’t have a dedicated Dew Heater, but the original application had a setting called something like “performance mode” which would turn the CPU speed up to maximum, which generates a lot more heat (and uses your battery faster) and that would keep the whole optical tube warm enough that Dew should not form).
Thank you for this great article and helping others!
Two Q’s: 1) I have annoying neighbors with bare bulbs shining on my backyard half the night. Can you tell me more about this screw in “light shield”, maybe send me a link to one? It’s a big hassle to set up an umbrella to block the neighbor but not the sky, and D2 is all about low hassle!
2) Have you experimented much with gain and exposure settings? I’d like to optimize. Any reason to prefer 10 (or shorter) vs. 15 seconds? (I’m thinking shorter for tracking, possibly bright objects saturating their pixels, but maybe I’m just wasting time and adding read noise by going shorter). What about gain? From something I found on cloudynights, it would seem read noise is minimized at gain 80+, but we are going to saturate pixels with bright objects quite easily, and maybe we are increasing background noise ? I know I’ll have to take much more total exposure time get the same SNR with lower gain settings, but if the background is better, the result will be better I think…I’m in Bortle 6, and feeling like I’m going to end up with only a few really great objects for D2, but it will be fun to collect hours and hours of integration time on them b/c what else am I going to do – so I want optimized settings. Thanks for any advice you might have.
This is the screw in tube I bought to use as a light shield: https://www.ebay.com/itm/224359606055
(You can do something similar with some masking tape and a piece of toilet paper tube….)
I generally use 10 seconds in the hope it will reduce any tracking issues, but if you can get sub images without streaking at 15 seconds go for it. I generally pick a gain such that the background looks black for single exposures. I don’t know if this is a good way to do this, as I haven’t experimented with it much.
For the light shield, I tried several products. I did not like placing the filter at the top of the light shield (because of dew). I may try the masking tape and a tube (or velcro).
Love these tips. Thanks for the info.
After having set the D2 in polar alignment using a straw and aiming at Polaris, can I move the telescope (az) and lens (alt) to a clear sky position before calibration? That is, so long as I keep the base as polar aligned, I will be ok?
Yes, as long as the “vertical” axis keeps pointing close to Polaris, you can turn the telescope around the axis (and also change where the “drum” is pointing) to calibrate elsewhere or shoot images of items in different locations around the sky. The main advantage of polar alignment is that the “vertical” axis will rotate around the same axis that the earth is, greatly reducing field rotation.