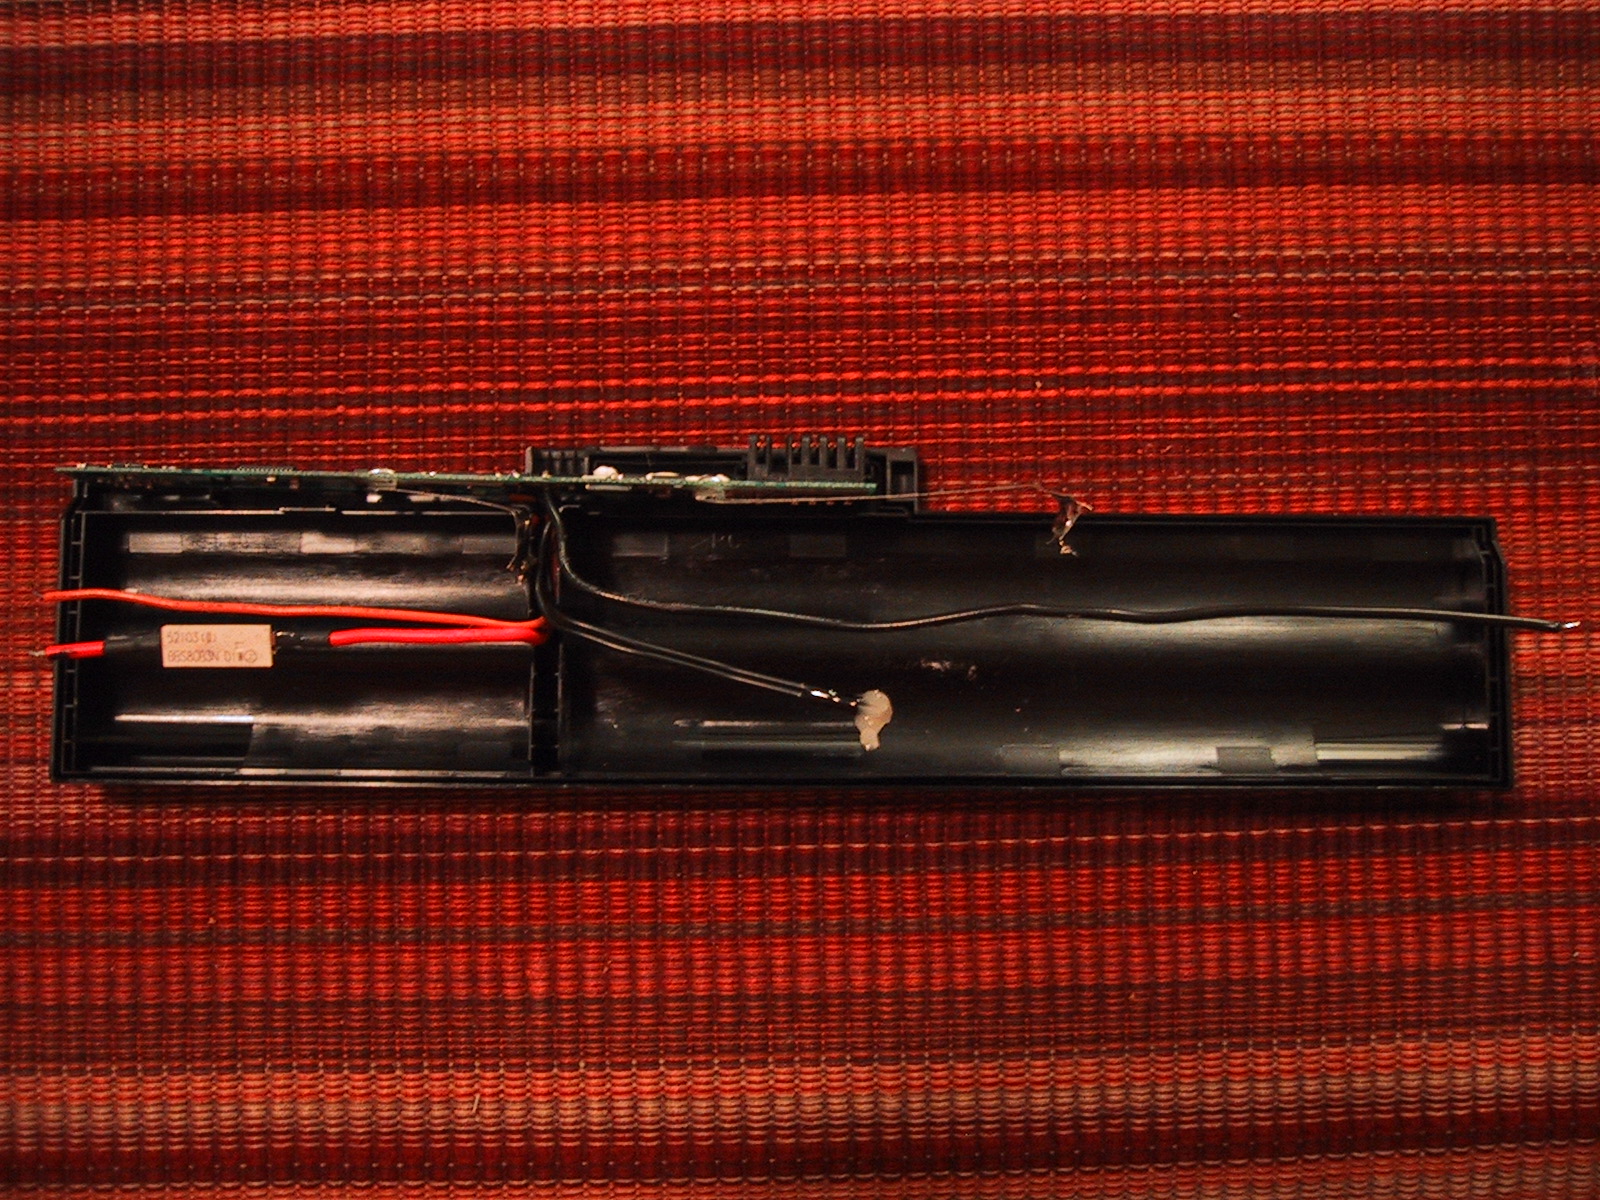
This is a picture of the battery case and charging electronics after I unsoldered the original li-ion cells.
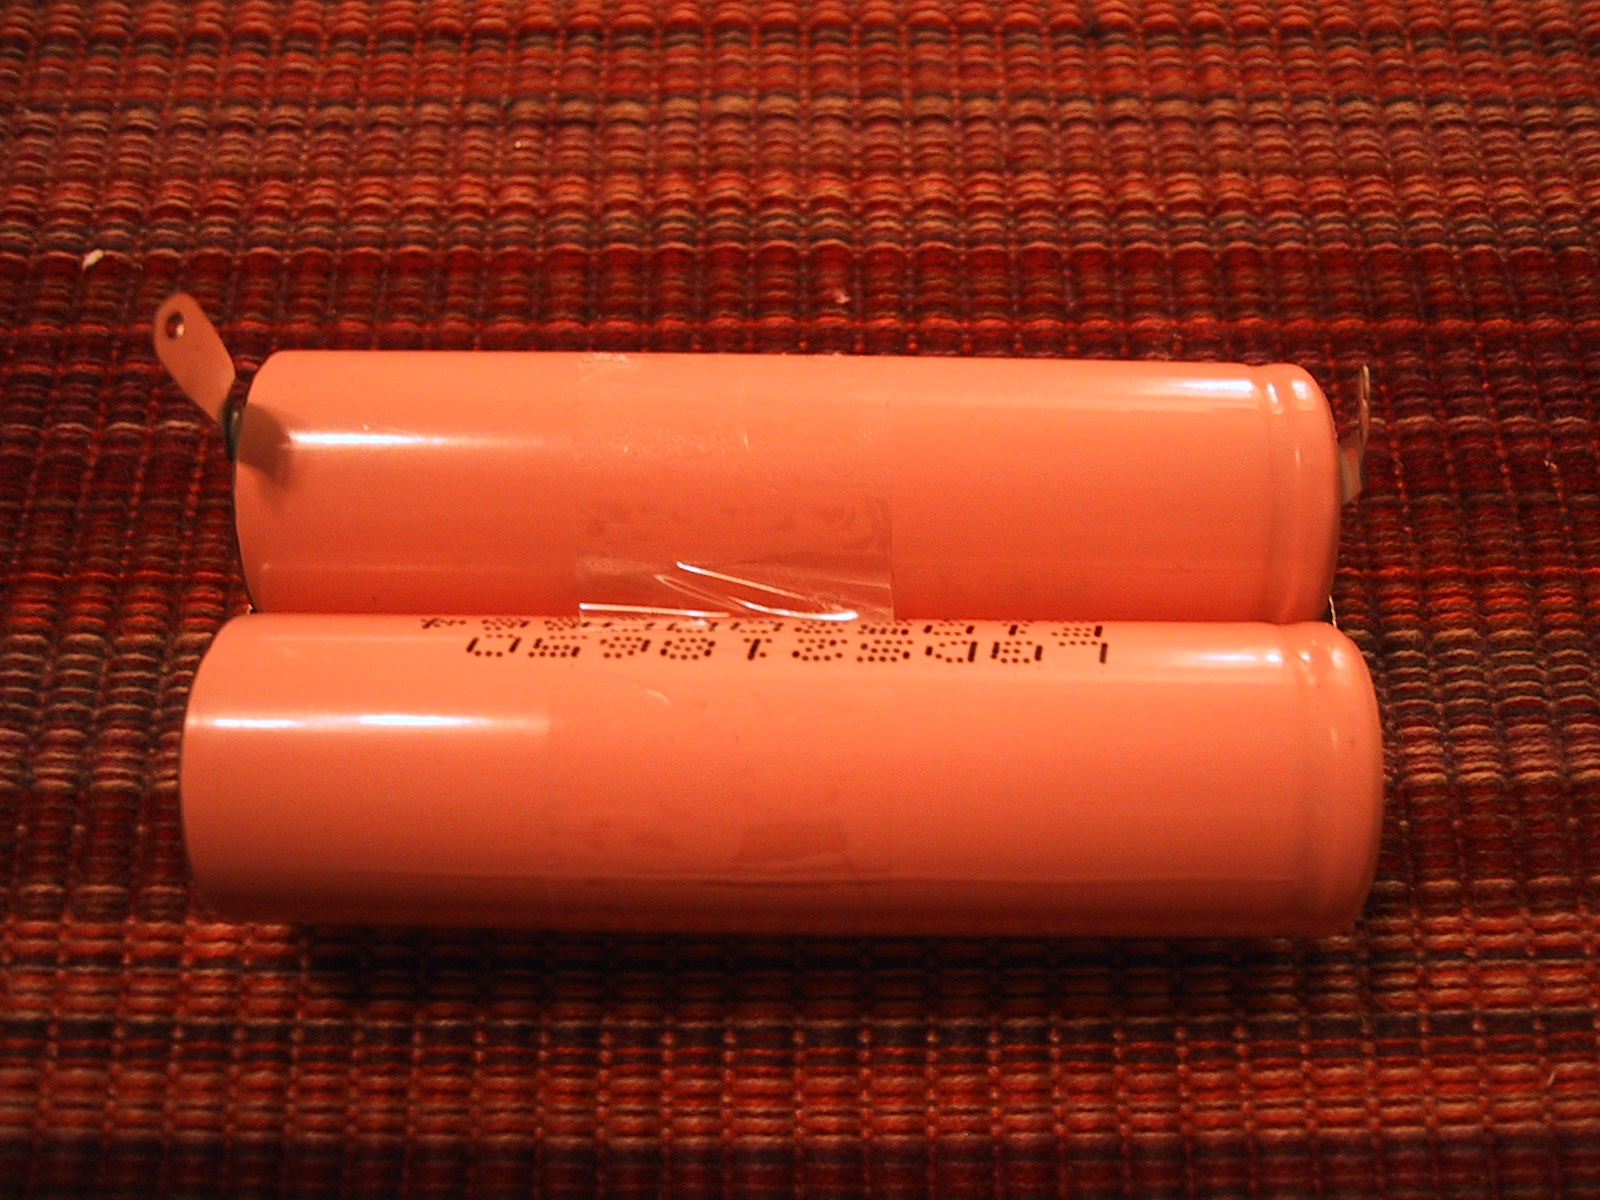
Here I have two Li-Ion cells ready to solder together into a parallel pack. The technique that I found to work best was to insert a coil of small electronic solder between the tab and the bottom of the next battery, making sure that the solder never overlapped, so that their was always only one thickness of solder thick at any particular place. Then, I'd hold down the end of the tab with a screwdriver (to make sure it didn't bounce back up while the solder was still hot) and heat the tab with heavy downward pressure from a heavy duity (stained glass) soldering iron for a few seconds. I'd press down until the solder visiblely melted (usually accompanied by a puff of resin smoke) and the tab settled down. Then I'd remove the iron while keeping pressure with the screwdriver.
Important safety note: At the factory, tabs are welded to li-ion cells very quickly. Li-Ion cells will catch fire explosively if they are overheated. It is very important that you do not leave a soldering iron on the cells long enough to raise their internal temperatures to dangerous levels. Heat the tab, melt the solder, and then remove the iron.
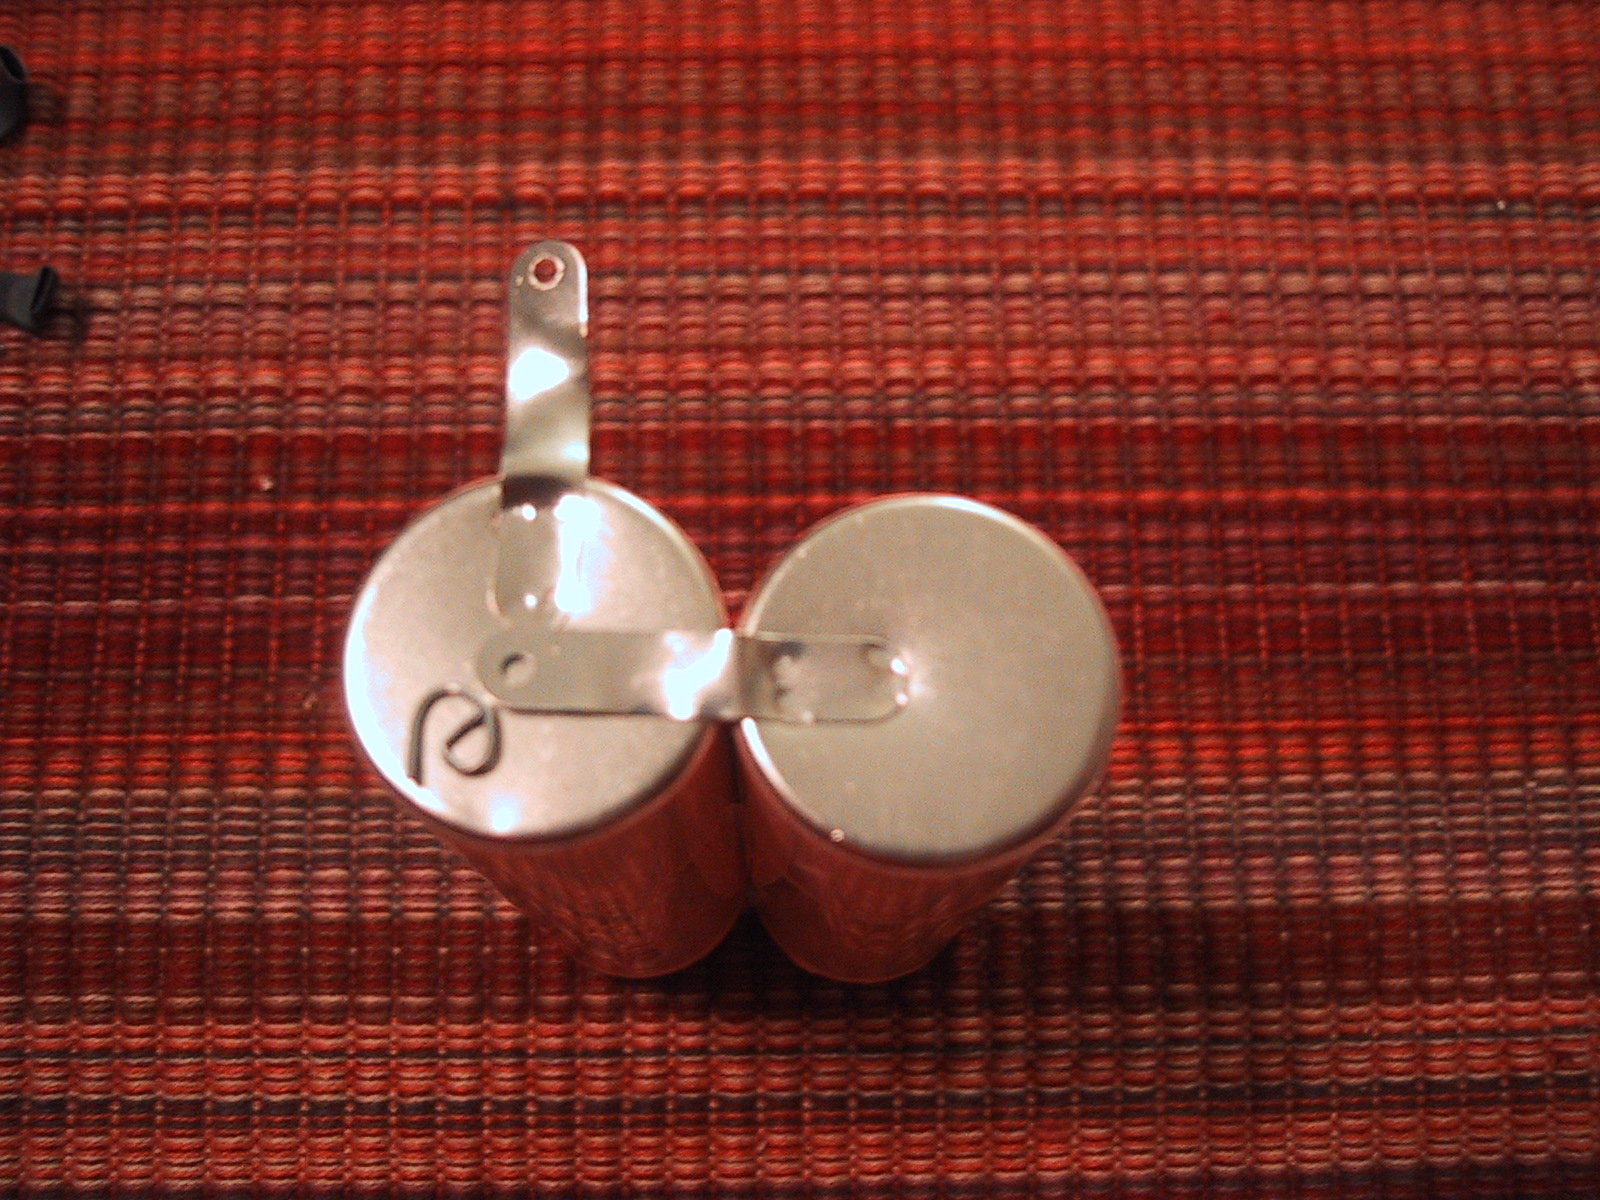
You will note that I used one set of tabs to attach the two cells, and the other set of tabs was positioned 90 degrees off axis, to be used to connect to other packs of cells. Note that I'd use tape to hold the cells closely together while soldering them, but would remove the tape later to make them fit into the battery holder.
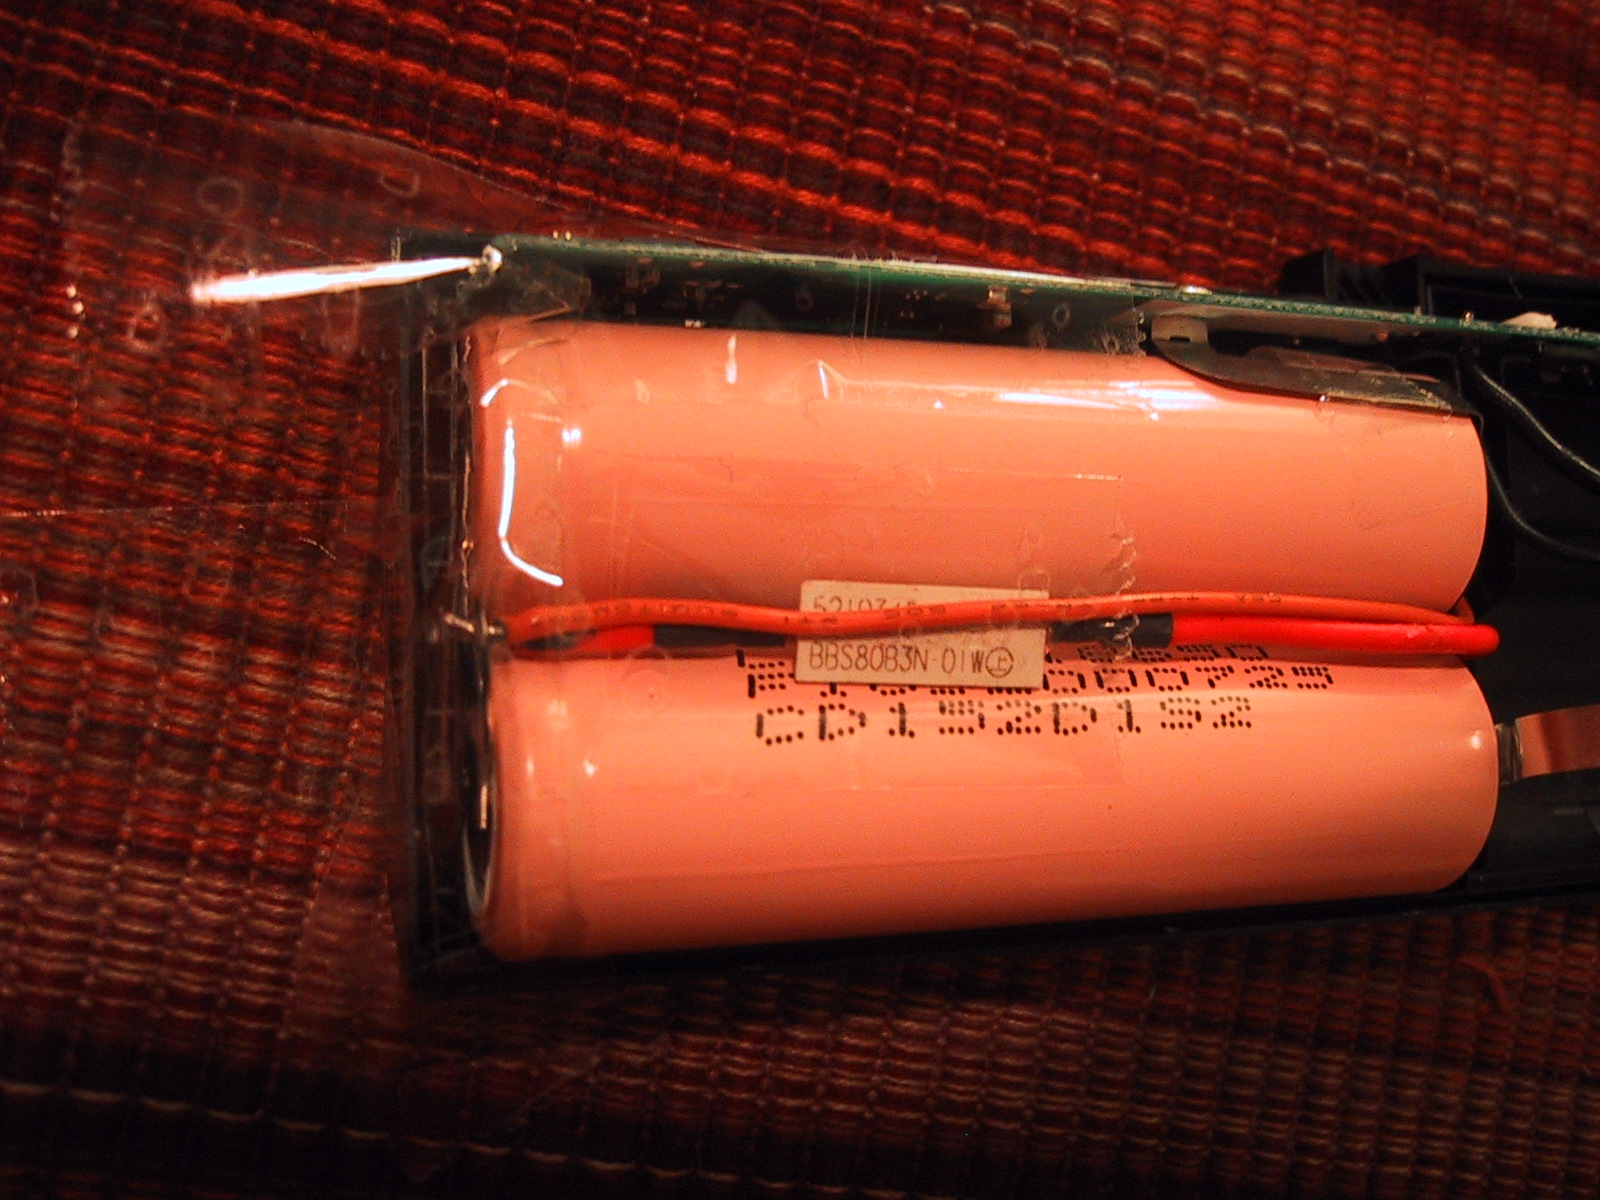
Here is my first pack, soldered to the charging electronics. Note that I have temporarily covered the exposed positive ends of these cells with clear plastic tape. This tape insulation is very important! It keeps this pack of cells from accidentally shorting through the pack of cells that I will add next. The process involves laying the cells on top of each other while soldering, and it is very dangerous to short out li-ion cells. (All of the charging electronics and fuses in the battery are designed just to keep that from happening.) Note that other things on your workbench can short out li-ion cells. For example, a coil of solder conducts electricity very well, at least until it melts. So do screwdrivers and pliers, and they are less likely to melt. Li-Ion cells are usually stored and shipped 40% full to prolong their life, and the ones I had certainly did spark a few times. A small spark here or there won't hurt anything, but if you short a cell for longer than a moment, it will begin to overheat and you could get into a runaway situation where it eventually catches fire explosively. Don't do that!
Once I've safely insulated the ends of these cells, I add the 2nd pack and solder them together.
After the tabs are soldered together, you can unfold the 2nd pack and lay it down flat.
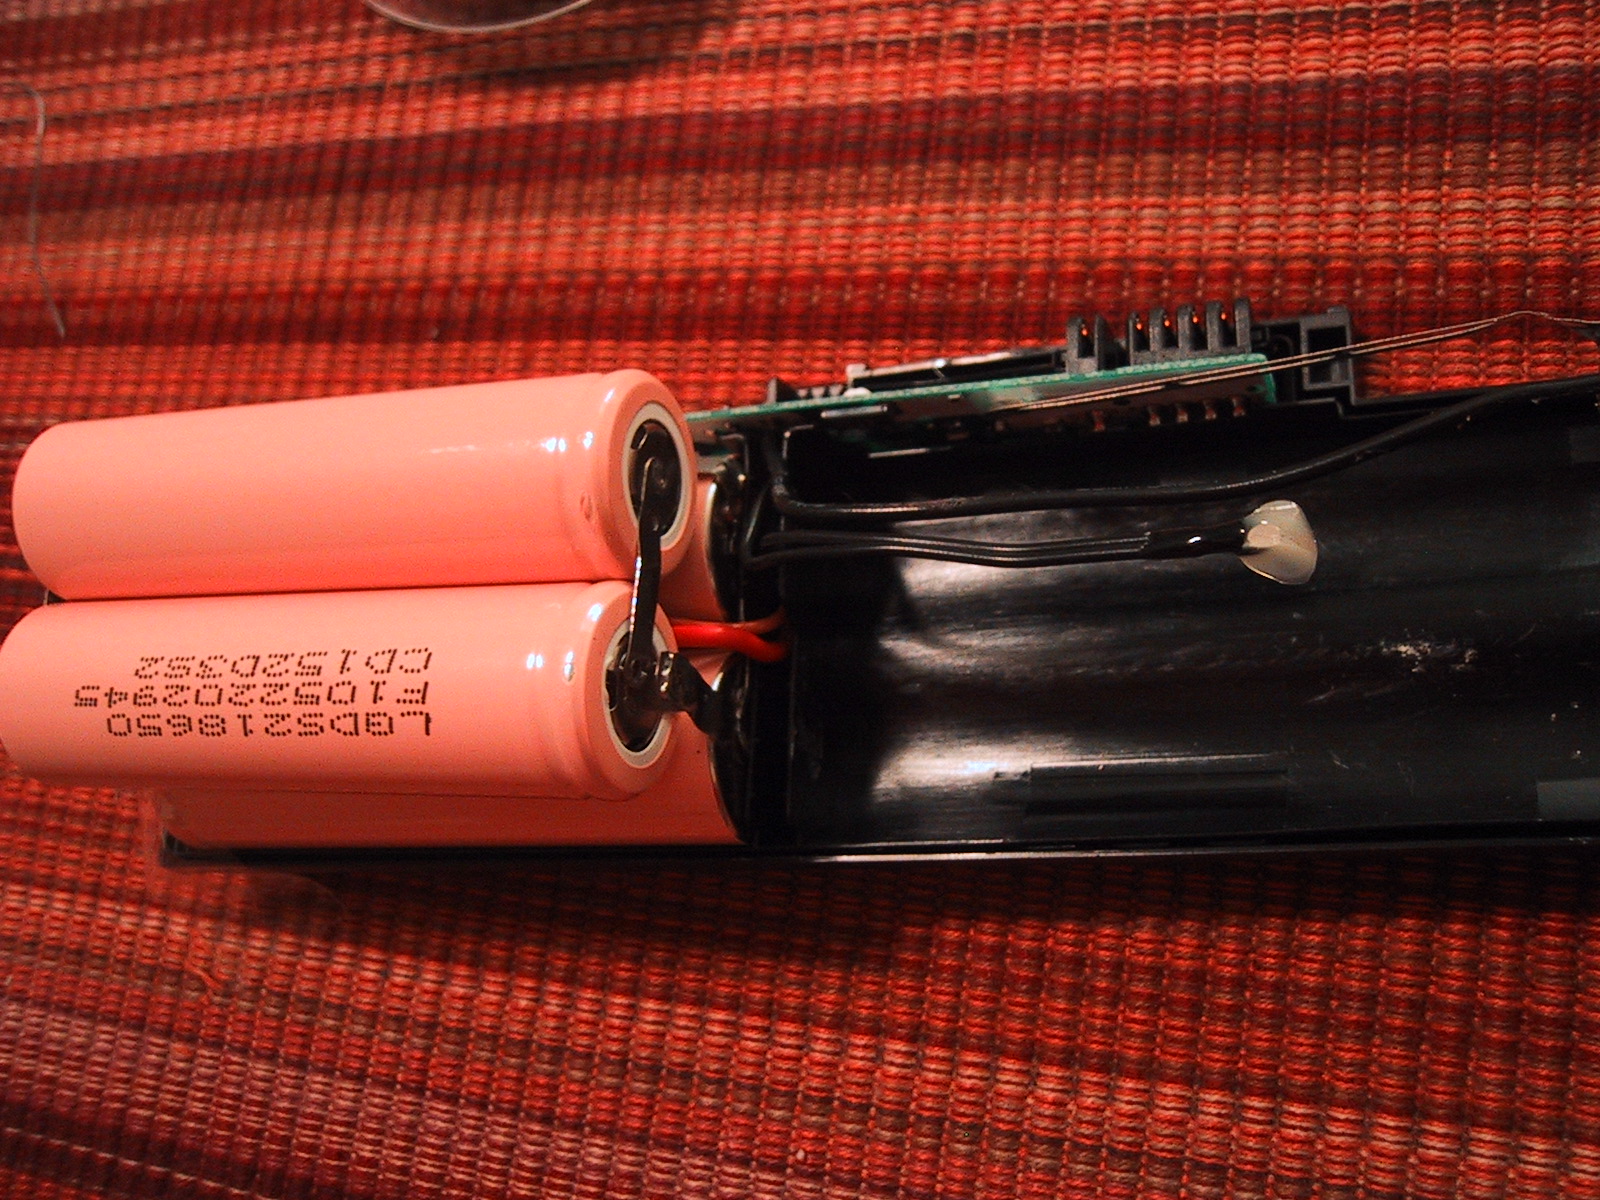
When soldering existing metal tabs from the charging electronics to the cells, I found it best to coat the tabs with solder first, and then attach them to the cells. Below you can see a pre-existing tab that I pre-soldered before attempting to attach it to the back of the cells.

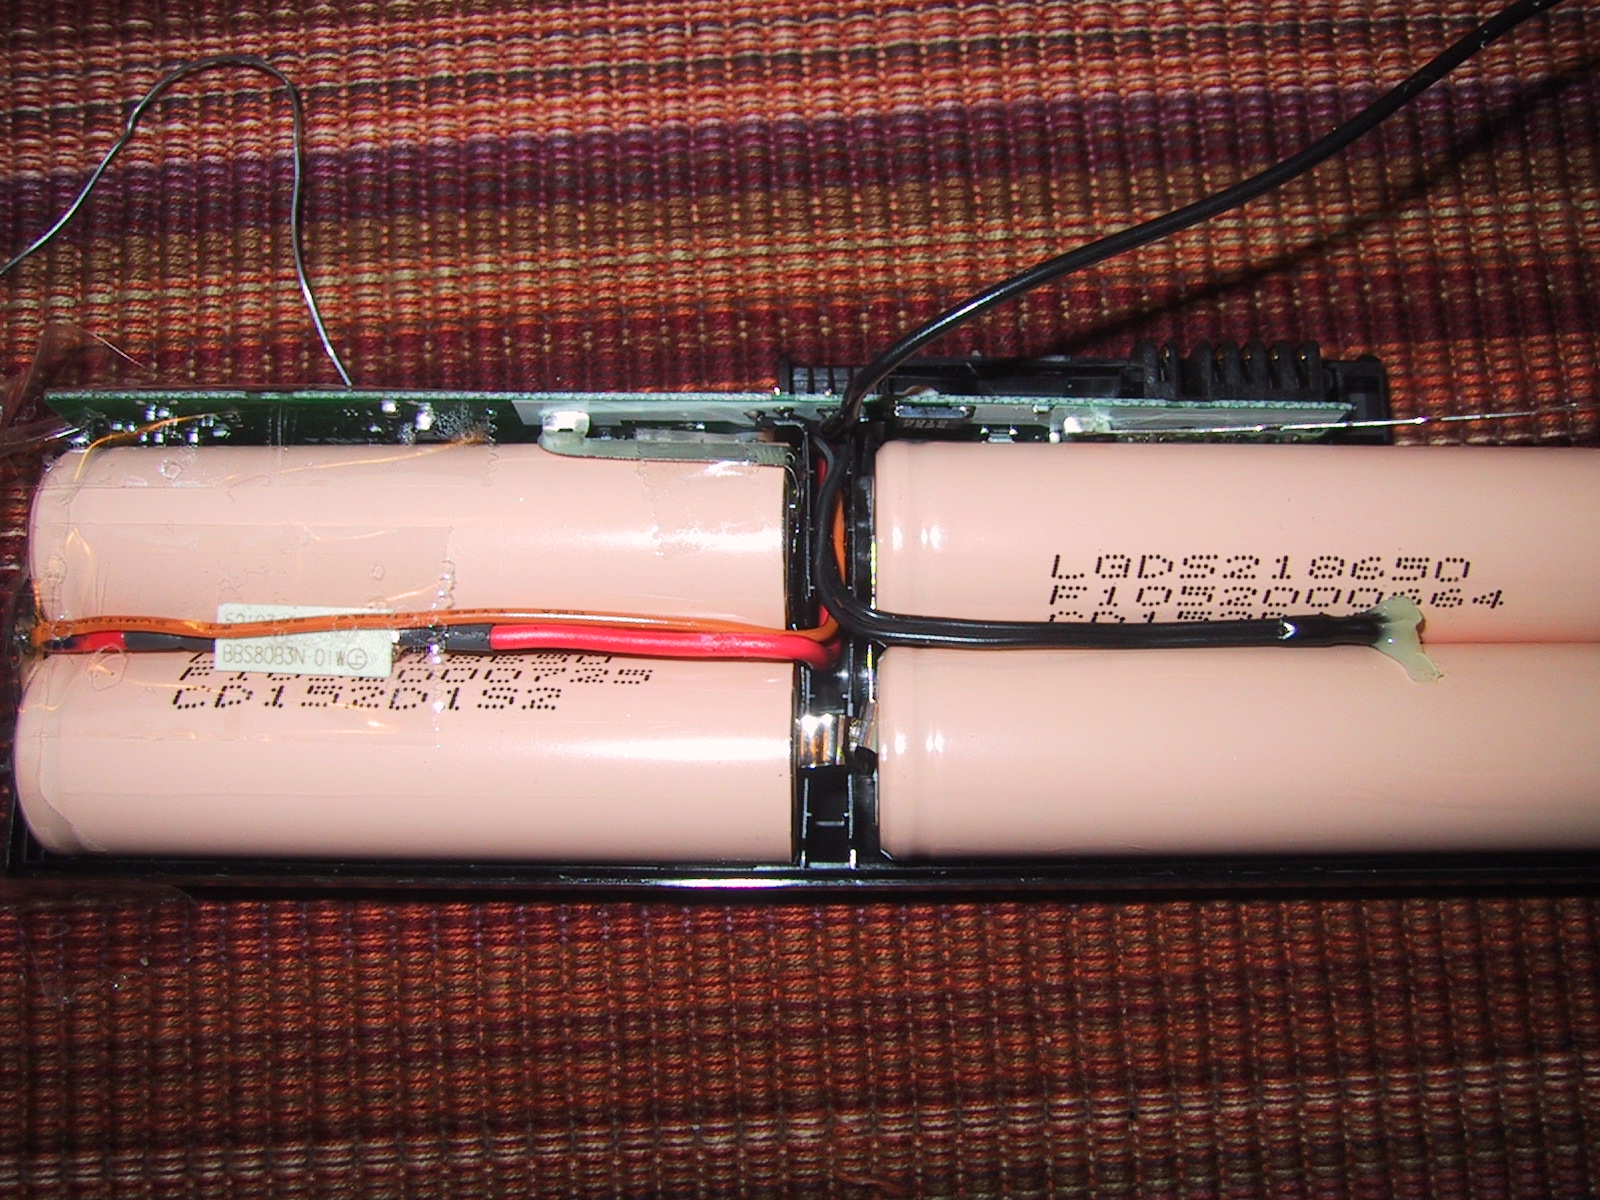
Note that the first and second pack have a good space between them (by design) in the battery holder, which leaves plenty of room for the solder tabs to be folded between the two packs of cells. However, the second and third packs must be mounted much closer together. Because I did not have a custom manufactured set of solder tabs, I found it easier to just butt the batteries up against each other and join the solder tabs above the cells.
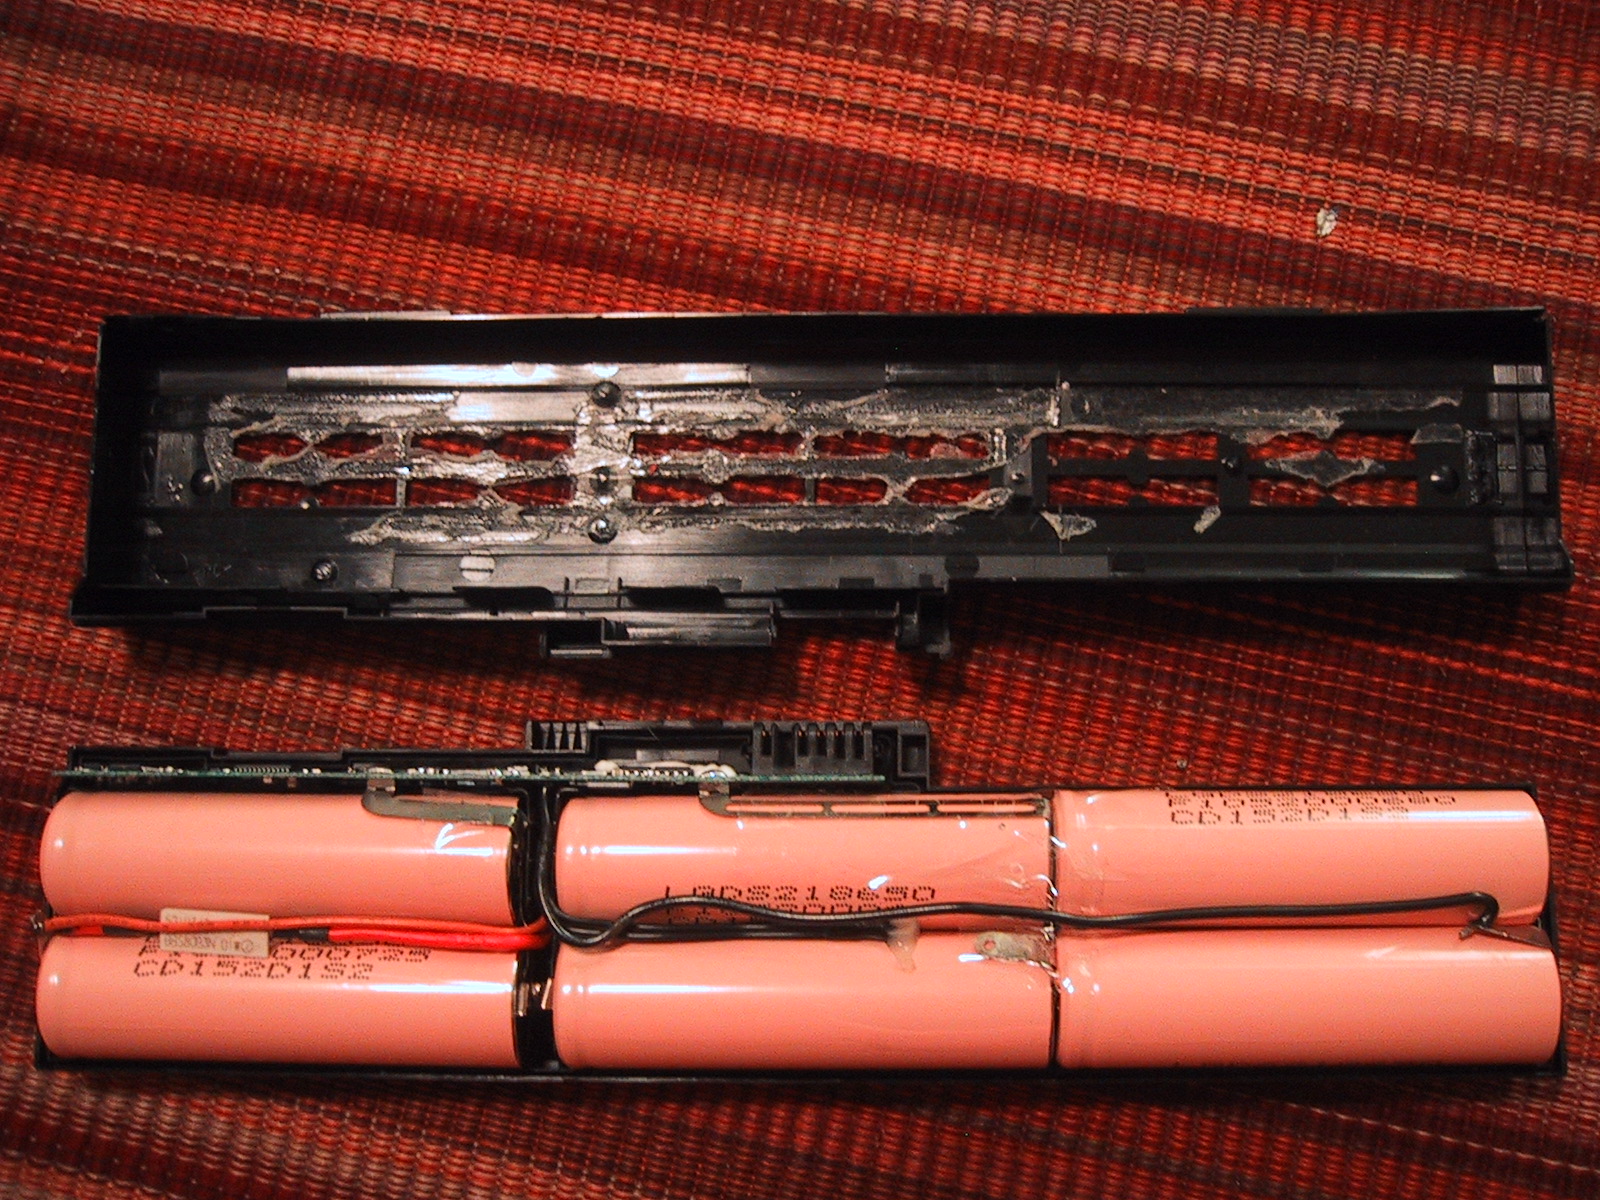
Now, I have all three packs connected in serial, and to the charging electronics. All that remains is to find some very sticky double-sided tape to affix everything to the interior of the battery case. I suggest you use carpet-tape (designed for tacking down carpet), which appears to be about as strong as the original tape I removed from the case when disassembling it.
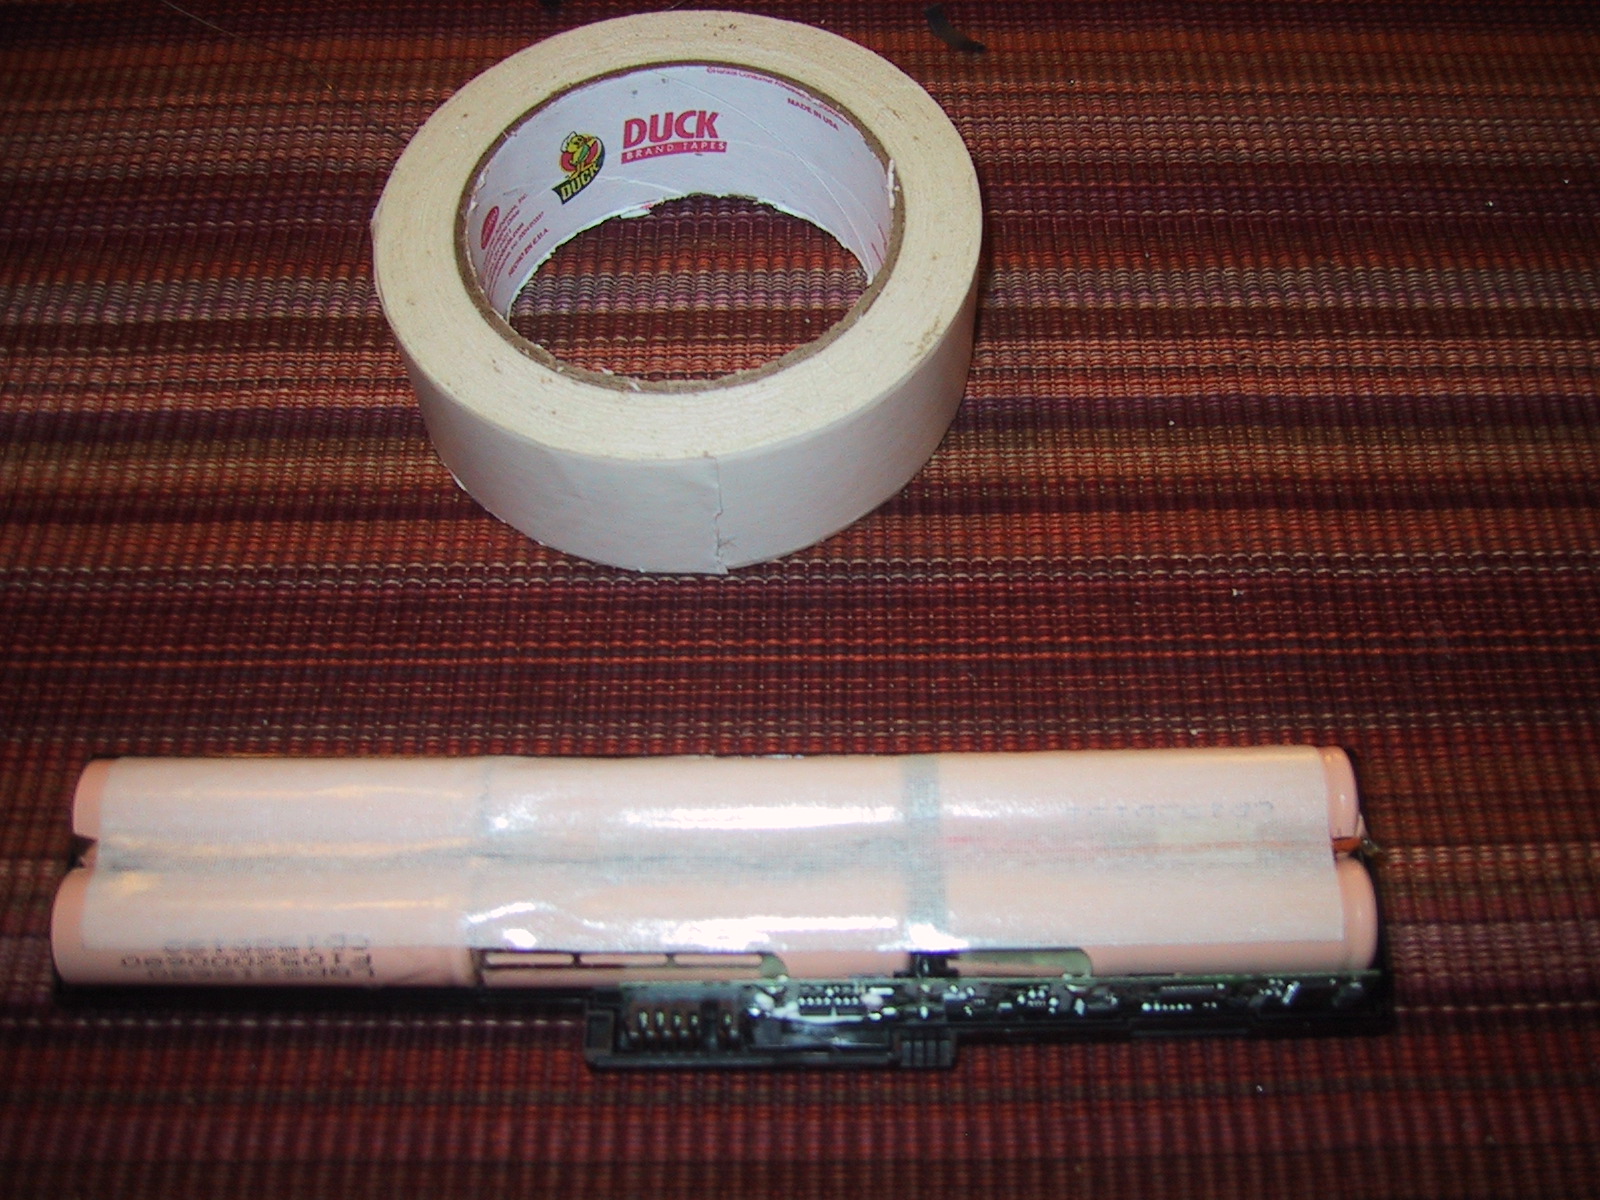

Once the tape is in place, all that remains is to snap the two halves of the battery case together, being careful to get all of the tabs in the right slots. Everything snaps together with a satisfying "clicking" noise, and the battery is as good as new. If you do not remove the manufacturers sticker (as I did) and are careful to use a plastic tool and not leave scrape marks when prying the battery apart (as, once again, I did) the battery will look practically like new.
But how does our existing charging charging circuitry deal with the brand new li-ion cells?
UltraFire BRC 18650 3000mAh 3.7V Li-Ion batteries – 887mAh! – YouTube
http://www.youtube.com/watch?v=mbaSAyqhzxc
Good to know! Thanks for doing the testing.
I have dell xps l502x laptop. The orginal battery died a few days ago. so instead of buying a compatible or genuine battery pack i decieded to rebuild it .I opened the battery case & found that there were 18650 lithium ion cells from sanyo 1000mah each . I serached on numerous websites and finally got panasonic 18650 3100mah battery. I installed them & then charged for nearly 2 hours (till the charging led switch off) but when i use it on battery it drains really fast just the same back up that i got with old cells…..any idea / suggestions please
It may be that your BMS system hasn’t figured out that you have a new cells. So the percentage battery life goes down very quickly until it hits zero. BUT, after that, your battery actually still has 70-90% of it’s charge, and the laptop will continue to work for hours while the BMS keeps reporting 0% charge left. (this happened on my laptop).
If you keep running the laptop down until the battery actually dies and then recharge it and do it a few more times the BMS should hopefully “re-calibrate” itself.
Jay thanks a ton for answering my query. One more thing i want to ask is that as i installed cells with (3100mah) more than double the capacity installed before (1000mah) will the BMS system able to charge these cells upto 3100mah or it will cut down charging after say 1000mah charging for each cell is done…?
Each BMS system is different, but in general they will use voltage to recognize when the cells are “full” so larger capacity cells will be charged until they are full. (It could take longer to charge them than the original cells, as the BMS may limit the total input current based upon it’s assumption that you have smaller cells in the battery still.)
Hello Jay, great work you have done with your battery pack.
I have a dead IBM T43p 9cell battery with 7200mAh capacity. I recently cracked open it and decided to follow your procedure. I will definitly dodge the Ultrafire cr@p and buy decent ones. My question is the following: Obviously I should be looking for 2400mAh batteries and buy 9 of them. I know I can buy 2600mAh batteries and have them installed, but what the highest mAh rating can I buy and install? Can the battery electronic board hold for example 5000mAh batteries?
Thanks
Dan
Your batteries circuit board should have no problem with you increasing the capacity of the cells (the voltage says the same). It will of course take longer to charge the cells (and longer to discharge, which is the point). Your main limitation will be how much capacity you can fit in the space, as you are limited to cells of the same physical dimensions as your original cells. I doubt you can find 18650 cells that actually have 5000mAh capacity, regardless of what their packaging says.
Hello Jay, thank you for your reply.
Yes my bad, I was just googling the reviews on the 18650 batteries and I understand now that the TRUE highest available is 3100mAh.
Need to show you a picture of my battery core and ask you about something related to it. Tried to email you but didn’t get through. How can I do that?
Thanks
Dan
You should be able to send an email to me at the email address on my main contact page (firstname at lastname.com), make sure you spell my last name correctly (without an “i”). If you are unable to attach the image, you can use a free image hosting service such as postimage.org and send the url instead. (Or, you could do that and just submit your question as a comment here…)
Not worth the bother.
After having done it, yes, I agree ;> The only situation where the labor is worth it is if you simply can not find replacement batteries for sale on the market, or you can’t find replacement batteries using the largest capacity 18650 cells and you absolutely need/want the best cells in your battery.
Has anyone heard of someone who will take your old laptop battery pack and do this for you? There must be someone.. Seems that would be an excellent business opportunity, I have tried the aftermarket crap and its pretty poor, using the manufacturers controller appears to be the hot setup.
This site is very inspirational, but something is really boring me.
OK I understand some battery pack when you unsolder the cells from the battery pack it is not guarantied to the chip to kill him self or not.
But I ask myself is it the same thing when:
1. the cells was dead and have a nice 0V voltage, and
2. I unsolder the cells from the battery pack?
I understood one thing, the chip to be working must have some voltage and some current, when all batteries are dead, there is no voltage and no current and for the chip is absolutely the same thing you do the one way or a hard way.
Another thing, If you want to parallel two batteries one dead and one good replacement, it is not always possible to get up voltage to the dead batteries close enough to the new one. In my experience which is not absolutely big, I tried something with dead and not dead old batteries 18650.
I tried to charge them and to shock them like they suggest with NiMH when they are dead. The voltage was 5V, 12V, and 18V with some resistors of 2,7 Ohms and 5.6 Ohms 7W. The measured currents for the two batteries in parallel (both dead) was something like 400mA, 1.2A and 2.4A. Because I don’t know for sure what is the allowed current to charge and beside thing i was wanted to shock them I started with higher voltage and current from 4.2 suggested. And for the big current I was charged for a 5-10 seconds.
And I was afraid of boom explosion, but nothing happens not just worm up nothing cold like I didn’t charge at all. But The voltage was enough and after one week the old good batteries was OK good and the dead was but but better one good, but not enough to be like old one good 1.5V or 180mV, yes they was bad OK.
The opening battery pack: believe me it is not for everybody the hand is on a thin ice to be sliced from the screw driver or pierced and must have a strong hand both to control battery pack not to slip out from the hand. It is not for everybody.
Another battery pack I opened up the new one laptop (sorry for a both I don’t wrote the laptop model number) all batteries have a voltage 10mV or a zero.
And you suggest me to charge them up to voltage close enough to the 3.7V. OK But How? I think If original charger board failed to charge them up How can I will succeed ? OK I was unsolder them battery cells, guided with my logic that the chip is already dead not because i unsolder the cells but because of low voltage of the cells. OK I tried the same thing with the first one old batteries to charge them up. But This time success was failed completely. The current was almost 0mA whatever voltage I started and it was the end of the test. Please I want from you to confirm or to explain me am I in right with logic’s outlined hear or not.
Because I have my opinion. Thanks in advance.
If your existing batteries are already at 0 volts, the BMS system is probably shut off already. In that case, I don’t see any benefit in trying to bring them up to the voltage of your replacement batteries and soldering them in parallel. You can probably just cut them out and then solder in the new cells.
Jay,
My laptop battery meter shows the following. Design Capacity – 48840, Last Full Charge – 5740 and wear level at 85%. It is not charging to the full extent. So I am trying to replace my sanyo as09c31 battery with new cells. I opened up the casing and checked the current voltage in the cells and its shows 10.8 V. Is it a battery issue or something else is not correct ?
10.8 volts sounds like a 3 cell battery (or 6 cells, 3 sets of 2 parallel cells, or 9 cells, 3 sets of 3 parallel cells) That voltage is normal for a set of 3 LiIon cells in series. It sounds like your cells are just old, but still provide full voltage, even if their capacity is only 15% of new. You can probably swap them out for new cells and get a lot of your capacity back, although you may need to jumper in the new cells before you remove the old cells to keep the charge controller chip from realizing that you removed the old cells. (Some chips disable themselves when/if they detect zero voltage.)
It is 3 sets of 2 parallel cells. Pls explain what is jumper ? Is it like replace cells without disconnecting the circuit.
Set up your new cells in a 3 set of 2 parallel cells as well. Make sure the new cells are also at 10.8 volts (same as the old cells) so that not much current will flow when you connect them. Then, connect the new cells in parallel with the old cells, including any connections between the 3 sets of cells. (The BMS uses connections into the middle of the pack to monitor voltage and charge levels for each set of 2 parallel cells individually.)
Once you have the new cells electrically connected, you can disconnect the old cells, and the BMS module will never know that you replaced the cells….except that the battery cells will miraculously start holding more and more capacity than they used to ;>
Jay, HP technical support told me that if I replace my orignial 4 Ah battery by even say +/-.5 i.e. 3.5 or 4.5 Ah then it may possibly crash laptop. I guess its not correct and I should be able to replace with 8800mAh battery -or do you I should better prefer buying 4.4 Ah, since original 4 Ah battery is not available and I may not feel easy replacing cells, specially soldering etc. Another question, does compatible batteries are safe to buy ?
HP Engineers would be able to tell you for sure, as I don’t know much/anything about the specific HP laptop you have. However, I doubt that your tech support contact knew what they were talking about. Unless the software/firmware on the laptop was badly miswritten, it will work with a higher capacity battery. It is possible that a particular BMS chip in a specific battery is programmed to expect cells of a certain AH capacity, but at least with the battery that I used (which was a generic battery, not an OEM battery) the BMS adjusted to the higher capacity cells.
Buying a replacement battery will always be easier and more cost effective (if you consider your time worth money) than replacing cells. Many replacement/generic batteries are as good as the OEM equiptment, but some brands are made with sub-standard cells and are not as good. Read reviews, try to avoid deals that look too good to be true, etc…
Perhaps you want to buy a generic laptop battery and use that for another year or two, and if you need another one, replace the cells in it with higher capacity cells. In my experiance, the OEM batteries have more restrictive programming on their BMS chips, which in some cases mean that if you remove the original cells the BMS refuses to charge new cells. (If it detects that a cell has “died” by going to zero voltage, it refuses to charge again.)
Hello Jay, am using Lenovo 3000 Y500 as my laptop battery dead in stage. It contained 10.8 volts, 4.8AH (6 cells, 3 sets of 2 parallel cells). As I saw the reviews on internet regarding refilling of Laptop battery, I had been working on it. I had opened the battery pack safely, and replac the old one with new one as they are before. After that I connected to my laptop. It is showing ” 0% available (plugged in,not charging)”.
Can you help me regarding this problem….
Thank you…
I’m afraid I don’t have any specific solution to your problem. I recommend that you shut down your laptop completely, remove the battery, and re-insert it, and then leave it plugged in overnight. That may re-set the BMS chip. Alternatively, it may be that the BMS chip will never allow you to charge the battery as it detected that the cells “died” and doesn’t realize that they were replaced.
I’m experiencing the same than #137 with my 3×2 CGR18650CG cells powering a HannsNote 10″, when the + current is not passing thorugh the PCB. I discharged the bateries by using a lamp and charged them later with the notebook, without problems (well it took something like 9hrs for a full charge). Anyway the full charged set was not feeding/recogniced by the notebook. Any improvements within this time?
hi there , can you please advice the precautions to be thought about the “old battery memory stored in BMS chip and the connection of the new cell jumper with old….. something like this” my is sony vaio -VPCEG 6 cell, i know every steps to well handle the assembly, just herd the old memory and BMS totally dying while removing the old cell. kindly please help any one will be great help tnx
To convince your BMS chip that you have never removed the cells, you need to always have working cells providing power to the BMS chip. To do this, you need to solder the new cells to your BMS chip before removing the old cells. Be careful when you do this, as if the voltage of the new cells and old cells are differnet, current will flow into the lower voltage cells from the higher voltage cells, potentially causing an overheating situation depending upon the voltage difference. To prevent this, make sure your old cells are charged up, and the voltage on the old cells is very close to that of your new cells before attaching them.
thank you jay for quick reply,
my is sony viao VPCEG series it have 4 connections of wire coming out from cells( 2cellsx3 . total 6 cells) in parell to BMS chip,two are B+ and B- other two are B1 and B1 , . what i have plan is to take 6 same identical new (2200mah was old now i will use 2600mah new cell 3.6v) cells and do the welding same as old and then connect the four (B+,B-B1,B2) , after sucessful connection i will cut the old one , is it ok?
i just want make sure as you told the old batteries must be fully charged to maintain 3.5v? and what about the new batteries do it also need to be charged fully. the old battery connections are already supplying 3.5v if i connect the new one at same time will it be doubled? like 3.5×2=7 or its in parell remain 3.5v .. thanks , ravi
The cells in parallel remain at 3.5 volts, but double the capacity. So your entire battery is 3.5v * 3 packs of 2 cells, or 10.5 volts.
Your plan to put two sets of cells connected in the same way to the BMS (and then cut out the old cells) is sound. Just make sure that both the old cells and the new cells are at 3.5 volts and you should be fine.
Note that your BMS will probably report that the new cells are “running out” well before they actually do run out, as it will think you are still using the old cells. So your OS’s battery remaining indicator may hit 0% around 1 hour, but the cells will continue to power your laptop for quite a bit longer.
If the BMS is good, it will gradually re-calibrate to the new cells.
my old cells are still giving power for almost a bit more than a hour but i need more backup so plan to changed with new cells , they are in good condition, so i guess there won;t be any problem of lower volt, none of old cells are damaged , should i recharge the old batteries fully before connecting new cells . at present the battery meter don’t move up remain at 92% all time and and says plugged in charging charging.since i bought i haven’t refill the cells and i have used this battery pack for almost 3 years
As long as the new cells and old cells are both at the same (or very close to the same) voltage you can replace them in parallel. The actual voltage doesn’t matter much, as long as they match.
bingo. it worked every thing is fine and working perfect , thank you very much jay for your help, just a small problem with battery meter calibration don’t shows actual readings.
Glad to hear it worked for you! If you are lucky, your battery meter will self calibrate itself after a few full discharge cycles. If not, you’ll have the extra capacity, but not be able to know exactly how much is left….
thanks you are great for so good response and guidance . after doing it i will give you the update till now finger crossed.
Hello!, thanks for this blog. Little explain, here in Argentina trying to get a replacement battery of a notebook which was imported when things could pass customs is impossible, today we have shutted off customs, so i need to renew the cells of my Gateway NV42 laptop. I have only one doubt, how do i (soldier? weld?my language is spanish sorry) the batterys? in other way, can i use my normal Tin-lead soldier?, once y tried to weld to alcaline batterys and the tin never stuck the nose of the battery (am i getting the point?) some advice?
I will try to do the change and get you up with the news. Thanks again a found this blog and info! regards!
Ideally you can purchase new cells with “tabs” already spot welded onto them. Soldering to the tabs is much easier than soldering to the batteries themselves.
However, if you just have the raw battery cells without tabs, you CAN solder to the ends of the batteries if you have a larger soldering iron (80 Watt). The goal is to heat up the top of the battery quickly, solder the wire, and remove heat as soon as you get a good solder connection. Obviously, if you heat the battery up too much, you will damage it, and risk a fire, so do this in a safe location.
hi again ,with your guide and help i have successfully replaced my old cells with new higher MAh .THANKS AGAIN (old 2200mah new 2600mah) and have been working fine since 5 months. what now i am thinking is my old cells were still powering my notebook for a hour and are yet healthy 3.5 v.
now i wonder if i can use those of three old cells and make a detachable battery pack for my laptop . what i have plan is to bring two phase connection out from the PCB and make a small hole in the shell and attach a small DC jack or USB hub so i can attach the battery pack when needed and if not needed will dis attach it . i need your guide how to do it? where should and how should those three cells be attached . PCB have 4 attaching points( from left to right B+ ,B1,B2, and B-) 3 sets of parell cells goes individually in each. hope i make it clear thought its too confusing sorry.
To do this safely, you will probably need to wire up each cell in the “detachable” battery pack so that they are in parallel with the existing cells in the main pack. (So that the BMS can monitor the voltage level of each parallel pack of cells.) This would also allow you to use the laptop to charge/monitor the detachable battery pack (in parallel with the main battery). (So you would need all 4 wires, not just two.)
To do it unsafely, you could just wire up the positive and negative wires of each pack….but this does not provide protection in the case of a short, and would overcharge the detachable pack if you left it connected when charging (leading to a fire).
i had also planned the same as your first instruction . so for it i need to make two holes for the DC jack connector in the battery shell. thanks jay you are the best guide. and very smart you always help people. thanks again
Dear,
I have VPCEB26FG sony vaio laptop with VGP-BPS22, 11.1 V/ 3500mAh / 39Wh battery. In windows 7 it show “0%, charging” message. It never charges nor the laptop switches on on battery. Everytime I need to plug charger to the laptop. Hence, I’m confused whether the cells are bad or the controller PCB circuit is bad. Please guide me how to to proceed. By replacing cells my problem will be solved or not.
Regards
If the battery used to work, and gradually got worse and worse until it stopped working, it’s probably a problem with the Cells.
Dear Jay,
Thanks for responding quickly. You mean I should replace all cells. I have not yet opened existing (original) laptop battery. This is the first time that I will be trying to replace cells in a Laptop battery. In that case, I have few questions for you. 1) Is it necessary to solder new cells in parallel to BMS chip before removing the old cells? 2) How to measure the voltages in the old cells individually without soldering new cells in parallel, if necessary? 3) If yes, what precautions should I take and what worst may happen if new sets of cells not connected in parallel? 4) Will it help me, if I purchase higher capacity cells than the existing one, to extend my standby time on Laptop battery? Would you mind providing me step by step procedure that I should follow to avoid any mistakes from my end? I understand you must be busy to explain everything. But please”¦”¦
Regards.
In general, it is usually easier to just buy a replacement battery than to replace the cells yourself. It may also be cheaper, depending upon your source of replacement cells and the cost of replacement batteries for your laptop.
To answer your questions:
1) If the BMS chip is one that will “shut down” if the cells are removed, you need to connect the new cells in parallel with the old cells before you remove the old cells. (You won’t know if this is the case until you try it, or unless somebody else has tried it, so you may need to do it just in case.)
2) You can measure voltage of the old cells using a multi-meter. I expect they should all be close to the same voltage.
3) If you don’t “hot swap” the old and new cells, the BMS chip may refuse to allow you to charge the cells, essentially ruining the battery case and BMS for future use.
4) Using higher capacity cells will typically give you a higher capacity battery. Most BMS systems charge until a specific voltage is reached, and do not limit based upon input current capacity.
If you are not sure of how to electrically connect the new cells before removing the old cells (which is a somewhat involved procedure) you will probably want to seek advice from somebody who can help you in person.
Dear Jay,
Thanks once again for your quick and educative response. I stay in Mumbai. However, the original battery here is very expensive. I have tried few compatible batteries available in the market but do not work and the quality cannot be relied on. Basically, Electronics is my passion and hobby. I have successfully completed few “you too can do it” projects on my own. I believe, with your expert advice I should sail through. Once again thanks for your expert advice.
.
It is suggested to follow the steps as under assuming that the voltage across old cells of my battery already connected to BMS must be zero, as message displayed is “0% available, (plugged in, charging)”. Moreover, on battery, Laptop does not switches on. 1) Take 18650 new cells physically identical to old cells but of 2600mah/3.7v (as overall battery rating is11.1 V/ 3500mAh / 39Wh). 2) Discharge all new cells without shorting +ve and —ve terminals but by connecting a 12v DC fan/bulb to bring down voltage to zero. As a result there will be no or negligible potential difference between old and new cells. 3) Solder battery terminals exactly as old ones. 4) Using new connecting leads connect (+B,-B, B1, B2, etc.) to the terminals of new cells exactly as in old cells and then connect the other ends of new connecting leads to BMS in parallel. 4) Disconnect old cells by unsoldering both the ends of (old) leads connected to old cells terminals and BMS. Is this correct, please suggest.
Dear Jay,
Thanks once again for your quick and educative response. I stay in Mumbai. However, the original battery here is very expensive. I have tried few compatible batteries available in the market but do not work and the quality cannot be relied on. Basically, Electronics is my passion and hobby. I have successfully completed couple of “you too can do it” projects on my own. I believe, with your expert advice I should sail through. Once again thanks for your expert advice.
.
It is suggested to follow the steps as under assuming that the voltage across old cells of my battery already connected to BMS must be zero, as message displayed is “0% available, (plugged in, charging)”. Moreover, on battery, Laptop does not switches on. 1) Take 18650 new cells physically identical to old cells but of 2600mah/3.7v (as overall battery rating is11.1 V/ 3500mAh / 39Wh). 2) Discharge all new cells without shorting +ve and —ve terminals but by connecting a 12v DC fan/bulb to bring down voltage to zero. As a result there will be no or negligible potential difference between old and new cells. 3) Solder battery terminals exactly as old ones. 4) Using new connecting leads connect (+B,-B, B1, B2, etc.) to the terminals of new cells exactly as in old cells and then connect the other ends of new connecting leads to BMS in parallel. 4) Disconnect old cells by unsoldering both the ends of (old) leads connected to old cells terminals and BMS. Is this correct, please suggest.
Regards,
Yes, that is the correct general idea.
You can discharge the new cells slowly using a light, fan or appropriately sized resistor, but keep the current draw low so the cells do not overheat. DO NOT BRING THEM TO ZERO, as that will damage them.
I expect that your existing (old) cells are not actually at 0 volts, but are instead at a low voltage which the BMS considers to be zero remaining capacity. Use a multi-meter to measure them. Discharge your new cells to close to the same voltage to prevent a lot of current flowing when you connect them into the circuit (but you should not discharge them to zero, as that will damage them.) [If you have a current controlled power supply, you could also use it to manually try and re-charge the old/existing cells at a low current rate (say…100-500 mA) to see if their voltage can be raised, which may let you keep your new cells at a higher voltage level.]
Dear Jay,
Once again thank you for correcting me in first para of your educative reply and has seriously noted it. I shall connect multi-meter to make sure that current drawn is not more than 100-200 mA while discharging new cells to avoid overheating.
Today I opened battery. There are 6 cells (SE US18650GR-T 6EC2XSD24F-Sony 07). As expected 3 pairs of cells (A, B & C) connected in series. Pair (A) connected to pair (B) and pair (B) connected to pair (C). You rightly said that there would be voltage across the old cells connected to BMS. Voltage measured (by multi-meter) across pair (A)=2.67v, pair (B)=2.51v and pair(C)=2.67v. Whereas, overall measured Voltage across A to C = 7.83v. But mathematical sum up is 7.85v. Should I go ahead with the replacement of cells? If yes, please suggest cells with make and number with more capacity than the existing one.
As mentioned in your 2nd para regarding charging of old cells. I have a SMPS delivering output 12v & 5v DC with 500 mA. Therefore, at what DC voltage the cells need be charged as three pairs of cells are directly connected in series to BMS delivering 11.1 volts. As the SMPS is not current controlled, will it be correct to connect a multi-meter in series at supply end of DC voltage of SMPS to monitor current drainage by manually switching SMPS on/off. Secondly, as the old cells cannot be disconnected from BMS, what precautions should be taken to protect BMS from damaging, when I connect DC supply of 12v or 5v directly to cells? This project is very interesting and source of enriching knowledge because of you.
Regards.
You can probably get away with using the 12 volt 500mA power supply to charge the string of 3 series (2 Parallel) cells. Watch it with a volt meter and turn it on. If the cells can draw 500mA or more, they will reduce the voltage of the output down to a safe level. As long as the voltage is below 11 volts, the BMS won’t be harmed. I would suggest only charging until the voltage reaches 3.2 volts per cell (9.6 volts total). Then discharge your new batteries to 3.2 volts as well to match.
Alternatively, you could find a large resistor to be wired in series that could be used to drop the voltage and limit the current. Say a 6-10 Ohm resistor capable of 2-4 watts.
I don’t have a recommendation for specific replacement cells, especially not for your location. I suspect they are standard 18650 cells, and if they are, basically any generic laptop cells of similar or higher capacity should work for you. Obviously, the higher quality the cell, the better the performance and the higher the price.
Dear Jay,
I “hot swap” batteries with data hereunder;
1. Measured voltages of 6 new cells (without connecting), A=3.8v, B=3.77v C=3.77v, D=3.73v E=3.77v, F=3.8V.
2. New 3-pair of cells (before connecting to BMS) were discharged till each pair showed 3.23 volts and overall 9.75v [voltages measured without load (bulb) was connected].
3. Old 3-pair of cells with BMS connected, were charged to 9.65v [voltages measured without load (bulb) was connected].
4. Old cells were hot swap with new cells as discussed earlier.
5. Now after charging battery (with new cells) through laptop for 13 hrs., voltages measured are; across pair (A)=3.31v, pair (B)=3.28v and pair(C)=3.23v. Whereas, overall measured Voltage across A to C = 9.83v with is increased from 9.75v.
6. After connecting the batter to laptop it does not switch on with battery connected. However, after connecting charger it shows the same message as “0% available, (plugged in, charging)”.
7. Should battery be charged externally? To up to what voltage?
8. Alternatively, should battery charged through laptop for extended number of hours?
9. Please suggest.
Regards.
The rise from 9.75 to 9.83v may be due to the natural voltage rise of the cells over time after you discharged them. I would do both: First, leave it plugged into the laptop (with the laptop off) for another 24 hours. If that doesn’t improve it significantly, I would charge the battery (externally with your power supply) until the voltage is where it is supposed to be, and the try plugging it into the laptop.
It is possible that the BMS has decided that the cells are bad (even before you replaced it) and will never allow them to power the laptop again, but it is likely that it will gradually realize that the cells are good and start allowing them to power the laptop. (When I did mine it took many charge/discharge cycles before the BMS reported the accurate capacity of the battery…and my laptop could run for an hour or two while the capacity was reported to be at 0%). Of course, I was able to start the laptop on battery power alone, so you need to get to that point.
Dear All,
I see many interesting and useful comments here so I hope someone could perhaps help me.
I had a 10.8v 6 cell toshiba battery with original charger that I received with a used Satellite A100. It never showed charge and when I opened it, 4 out of the 6 cells had chemical leaks. BMS seemed intact and 2 cells can power a lightbulb or a PC fan.
I received another good battery with 10.8v and 6 cells which I used to replace my toshiba battery and reconnected it to the BMS. All connections and connections to BMS are good.
When I turn on (Win7) and plug the battery windows says “Plugged in, charging” but no percentage or time left. I also have the amber LED light on also when the laptop is off or powered on.
My guess is that the voltage is too low so BMS wont actually charge it. OR, BMS wont charge at all because it recognized the previously damaged cells and closed the charging circuit.
Any help would be appreciated.
Dear Jay,
Thanks once again. Up to what voltage the cells be charged by an external power supply?
Regards.
That would depend upon the exact chemistry of your cells. If your manufacturer specifies a maximum charging voltage do not go above it. 4.2 volts per cell is one recommendation, but if you are just trying to get your BMS to recognize that the cells are “good” you may not need to get that high. Regardless, charge them at a low current and watch them if you are charging them without going through the BMS protection circuit.
And if the cells are already in line (3sp2), what would I need to charge them manually? Without disconnecting them to have 3.7v…
Im thinking that the new cells I got might be drained below a level that the laptop is willing to charge, so I would first need to increase the charge level before they could be charged while plugged into the laptop.
thanks
You can either charge the parallel sets of 2 at a time up to 3.7 volts, or charge the entire string of cells (in series) to 11.1 volts (3 * 3.7 volts). As long as you do it at a relatively low current (100mA-400mA) and keep an eye on the voltages of the cells as you do it you should be fine.
Thank you for your advice. Just to be clear: I can charge them by 2 without cutting the series? That would make things easier because I could just use a cellphone charger while otherwise the closest to 11.1v is a camera charger I have but that is 1A.
Thanks again
Yes, you can just tap into the top and bottom of a set of parallel cells and it will just charge those cells.
Hi,
I tried to rebuild a battery from my Lenovo ThinkPad X200t and didn’t realize in time that a circuit was connected to one of the cells before I disconnected it because it was, coincidentally, the only bad cell there. Now I can’t manage to restart the battery, the “jump start” (last cell to output pin) doesn’t work and the computer reports a battery error. I’d really like to get this working, do you have any idea how to restart the damn circuit?
Thanks.
I’m afraid I don’t have a suggestion for you, but hopefully somebody else will chime in…
It’s a very informative post. Thank you for sharing.!!