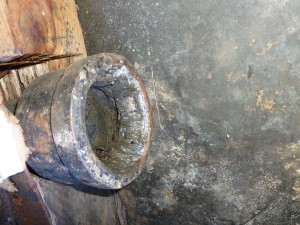
If you have cast iron drain (waste) pipes they are likely joined with a lead & Oakum seal. Oakum is a hemp material coated in tar, it is placed into the joint to seal it (Oakum expands when it gets wet to seal the joint). The Oakum is held in place (and the pipe joint is given some strength) by casting a bead of lead about 1″ thick around the pipe inside the hub/socket. In this picture the cast iron pipe hub is on the left.

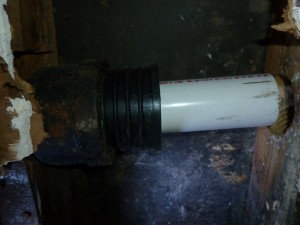
It is possible to remove the lead and oakum. After you have gotten all the lead out and cleaned up the hub, you can place a donut (also known as a compression joint seal) in the hub of the cast iron pipe to adapt it to PVC. (Note that donuts are only usable on non-pressurized pipes, such as waste/drain lines.)
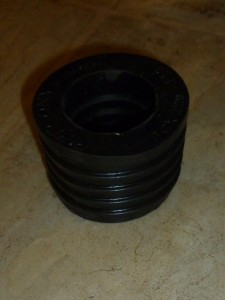
I have manually cleaned out a lead & oakum cast iron joint. It sucks. My recommendation is to cut the pipe somewhere other than at the lead & oakum joint and then use a Flexible Coupling to join it to your PVC. Yes, this introduces discontinuities in the waste water flow, and gunk may collect and build up at these edges, possibly leading to plugged pipes in the future….but that is small price to pay for avoiding having to manually unseal a lead & Oakum joint. For the gory details of how to manually disconnect and clean out a lead & Oakum joint, read on…
If you were a professional, and the lead & oakum joint was well away from any wooden structure, you would have the correct respirator and high output torches that would allow you to simply melt the lead in one go. But this is practically impossible inside walls or for the home handyman without renting some fancy equipment.
If you are reading this trying to figure out how to remove the joint, you don’t have access the the proper respirator, high output torches, or the joint is too close to a joist, stud, or other wooden structure. It is possible to physically remove the lead by drilling into it every 1/4″ or so to separate it out, and then chipping out each separate piece with a 1/2″ or 1/4″ chisel. This takes a long time and a lot of patience and effort. If you do not have easy access to the joint (for example, if it is in between two joists or studs) you will have to use a right-angle drill. Use a reciprocating saw (sawzall) to trim the incoming spigot/pipe that you are replacing about 1/2″ away from the hub so that you can easily drill around it.
Re-evaluate if you REALLY want to keep this joint in place. Why not tear out another panel of drywall and just cut the pipe and use a flexible coupling to join up to it? Really, replacing drywall is relatively easy compared to slowly chipping out the lead from one of these joints with a drill bit. Of course, to break cast iron pipe cleanly requires a specialized pipe breaker tool that you would probably have to rent.
If you decide that due to space or other constraints (such as a concrete pad) you NEED to save and re-use the joint….find the cheapest drill bits you can. Don’t use your fancy titanium carbide drill bits for this job. You want steel drill bits that are harder than the lead, but otherwise as soft and non-brittle as possible. Otherwise, when you are drilling and put any amount of sideways pressure on them, the drill bits will shatter because they are super high hardness (and very brittle). This leaves a solid chunk of very hard to remove super high hardness metal embedded in your lead seal. Don’t use a drill bit as a reamer! After you finally get the lead chipped away enough to remove the inner pipe, the inside of your hub will still have a thin ring of lead all the way around. Remove all of the Oakum using pliers, scrapers or a rotary tool. (Because Oakum will burst into flame if you get it hot and expose it to air, it’s covered in tar after all…)
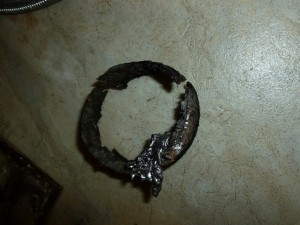
At this point you can use a small blowtorch to slowly melt the remaining lead. Use the torch INSIDE the pipe, and have a fire extinguisher and a bucket of water standing by! Drops of lead will start to fall from the ring. Eventually the cast iron pipe itself will get hot enough that it will melt the lead touching the pipe. Now you can use a screwdriver or chisel to pry the entire ring of lead out of the pipe. (You’ll probably have to hit the inside of the hub with a good scrubbing from a Brillo pad or sandpaper, AFTER IT COOLS OFF.)
Now you have a clean hub connection to fit your donut into. (Don’t you wish you had cheated with a flexible connector now?) Test the fit and make sure everything will line up first.
Then use some cooking oil spray inside the cast iron pipe hub to make it easier to hammer the donut in. Lay a bead of silicon caulk around the donut (it will spread out and need to be cleaned up around the outside once you are done hammering the donut in.) Hammer the donut in using a large hammer (or side of a small hammer if in an enclosed space between studs.)
![]()
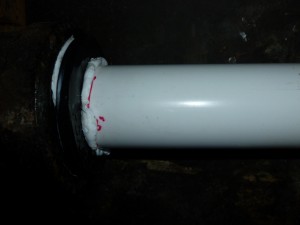
Now you can chamfer the end of the PVC pipe to make it easier to go into the seal/donut. Mark your PVC pipe with inch markings so you can visually tell how far it has gone into the seal. Spray some more cooking oil inside the donut, place a bead of silicon caulk around your PVC pipe, and hammer it in.
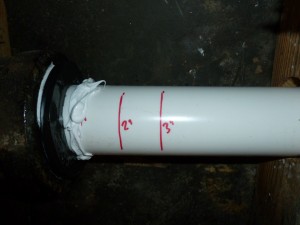
Now it’s just a matter of using PVC solvent and cement to glue various PVC pieces together to reach your drain…

Thanks for the great advice!
I have a joint which, after consideration of all the options, will need to be drilled and hammered out. Thank you for the information that tells me how to deal with a painful problem…..
Is there any danger of explosion when working with a torch near a sewer line? Or is the amount of methane negligible?
I guess that depends entirely upon your sewer line. I had not considered that as a potential danger when I was doing the work (I was much more worried about burning the wooden studs the pipes were routed through) but I guess it is a small posibility. In my case the joint I was removing was above a trap, so gas coming in wasn’t much of an issue.
If you were really worried about it I guess you could place some type of expandable air-tight plug farther down the pipe (with a good cable to pull it back out!), or use some type of portable gas detector before lighing the torch.
it’s safer to delead the pipe with a drill bit. normal drill bits work fine just make sure you go really slow and take your time. drill all the way in until you feel no resistance. that will be all the way through the lead. then drill another hole about half inch away . then tap out lead with a chistle. takes about 30 minutes
when chistling out the lead between the holes you drilled use a very small hammer and a small chistle. tap lightly to avoid damaging the pipe.
after approximately 3/4 of the lead is removed around the pipe (from 3 oclock to 12 oclock) the pipe will move freely and can be wiggled out
drill rotations should be very slow, lowest setting and least torque. speed is approx 2 rotations per second
you should also coat the area with a cutting oil. marvel mystery oil works great for this. clean your bit frequently and if it gets stuck put the drill in reverse and pull out slowly.
when finished use a shop vac to remove detritus from the pipe
Thank you so much for posting this instruction. I went through three drill bits to get a little over half way around. At that point a small piece of lead was exposed enough for me to pull the rest out with pliers and one tug. Thanks again! Saved me an enormous plumber bill, I’m sure.
Yep, 3 bits sounds about right ;>
Thank you for this post. I’m going to be trying this today. One question I have is: is the donut that goes back into the cast iron joint good enough to be buried back under concrete?
We had the plumber out yesterday to move a shower p trap and what was going to cost us $850 jumped to over $2000 because of a bunch of cast iron fittings. The shower p trap goes into a Y Cast Iron joint which then goes into a cast iron t join one end leads to a drain on the other side of the wall) and the other end leads to another cast iron joint which goes another few feet and then I’m sure has another t joint that comes in from the clothes washer. The plumber couldn’t break down why he was charging what he was charging and instead of having more concrete torn up in my bathroom with the likelihood of the costs going up even further we told him we were going to get quotes.
I don’t mind spending the time breaking the lead joint into the Y joint if I can put this donut in to the y-joint and then get the p trap set back up for the shower which will then be reset in concrete.
Thanks for any insights.
I’m not a plumber so I really don’t know.
I’ve seen plumbers use flexible couplings on drain pipes that they bury 10′ underground on the main drain line of a house, so I’m sure the flexible coupling would be fine, and I suspect that the donut is just as good. (Possibly not as long lived as a lead seal…but probably 50+ years….)
After cutting the source pipe pretty flush to the joint using a grinder with a cutoff wheel, I was able to cut the pipe from the inside using a carbide tipped oscillating tool. Once the pipe was split into two, it released easily from the lead and oakum and the lead and oakum was easy to scrape out. This is on a 3″ drain/soil pipe and I used a bosch brand carbide oscillating tool blade for the cut.
I spent about eight hours straight on a similar cast iron pipe which comes up from the slab in my basement right between two load bearing studs. I had to jack the joists and cut out one of the studs to access the pipe. After about five hours I did a quick google search on oakum and some of the results said that it might contain asbestos. My house was built in the 70’s when asbestos was still being used for everything. Since I was drilling lead I was chasing the drill with my hepa vac and also wearing my p100 respirator, but I still don’t like the idea of drilling into asbestos. As with the last poster, I ended up giving up with the drill bit approach (after loosing about eight bits) and cut out the joining pipe. If I had it to do all over again knowing what I do now, I would probably just cut above the joint and used a fernco coupler and just deal with the ramifications.
oakum does not contain asbestos
Very nice post, thank you. I drilled out a plug using the method that you described. Although I never had to melt the lead, because it wasn’t sticking to the iron. Then, I removed a T-section that was below the plug using the same method. Now, I want to put the plug back in where the T-section came out of. So, it is going to be a cast-iron to cast-iron connection. Any suggestions on how to do that using modern materials instead of oakum and lead?
I have never re-connected them, sorry. I imagine a plumbing forum would have some suggestions.
I was able to wiggle the pipe going into the joint back and forth and also hammering into the lead seal with a chisel. The pipe popped out after considerable effort and I was able to pry out the lead/oakum seal in one piece. When wiggling the pipe back and forth, be careful you don’t pry apart joints further down the line. Also, it’s best not to let lead com in contact with your skin so wear rubber gloves. I would not use any source of flame on the seal but I’m thinking of using a heat gun in the future.
It just like soddering copper
Sir I have a leak on the collar joint of a 4 ” cast iron when the the toilet is flushed
If I chisel out the the joint and clean it up , what jointing compound do I use on collar cal I use a mix of sand & cement, thank you
I am not a plumber, so I can’t give you good advice for this situation.
use lead solder and a torch. get it nice and hot, and fillerup..
How important is the white silicone caulking part? I see other manufacturer’s instructions that only refer to the soap (versus vegetable oil) as a lubricant; nothing about an additional sealant(?).
The silicone is probably not needed. The donut should seal the connection all by itself, and the drain line is not under pressure. But since it was going to be sealed up inside of a wall, I decided it was better to be safe than sorry. Soap would also work as a lubricant, although I feel that vegetable oil slides slightly easier. (it is not as water soluble, but the limited amounts used really won’t make a difference to a septic or city drain system.)
Extremely informative discussion. Thank you everyone.
Thank you. I have one other question? Is this lead pipe legal to be in schools or should it be taken out when found??
The pipe itself is cast iron, only the seal is lead. Typically these are only used in drain pipes, so they do not affect the drinking water supply. As long as a kid isn’t digging into the lead seal or scraping pieces out of it they shouldn’t have any negative health consequences.
However, you will have to check the local building codes and any specific laws that affect schools or buildings with children present to be 100% certain that it is legal. (If you are removing the seal anyways, you can easily replace it with a non-lead substitute.)
Just did this yesterday on a toilet waste pipe. My plumber said he could do it. Told me it could take 1 or 5 hours, but that’s the most expensive part. The compression donut is a 6 dollar item! I was using a 1000watt drill/Jack hammer I bought on Amazon to tear up the floor tiles. It is a powerful chisel. Tried it on the lead and oakum joint- Presto- Had the whole thing out in under 15 munutes. That 96$ Jack/drill hammer was money well spent!!
Thanks for every one’s info. I will see if I can get the fitting out of hub tomorrow. Dick K.
really nicely written article- thanks so much!
This is very informative. My situation is this: We tore out our old cast iron bathtub to find a drum trap connected to a lead pipe, connected to the cast iron main sewer hub. So my options seem to be 1.) cut the lead pipe about 2 inches from the hub, at the point where it starts to bulge out, since there is likely a brass nipple under the lead. Then I can use the flexible coupling to connect the brass to the new pvc and P trap. or 2.) cut the lead seal out of the cast iron and use the donut to create the new connection at the source.
The current lead seal still seems very strong, so I’m hesitant to mess with something that’s not broken. But I also want to do the job right. Is the quality of the final product worth it to remove the seal, or is using the coupling a reliable longterm solution?
I am not a plumber, so I am not qualified to give advice on this topic. A flexible coupling will probably last quite a while, and is likely easier to cut the lead pipe. Your final decision may depend upon how hard access is to the coupling if you were to ever need to replace it.
Thanks for that feedback. I’m going to get a third (and tie-breaking) opinion on it tomorrow. I’m not afraid of the work — but who wants to do more work than they have to, right?
Could you heat up the hub with high temperature heating tape like this…
https://www.omega.com/en-us/industrial-heaters/surface-heaters/tape-and-rope-heaters/p/STH-SST-SWH
It can easily get to the melting temperature of lead. You could then pull the old fitting straight out with a pliers.
Would this work?
Anything that gets the entire pipe up to 630F or so (above the melting point of lead) would melt the lead inside the pipe. However, I’d be worried about the heat traveling down the pipe and lighting something else nearby (such as a wall stud) on fire. Using a blowtorch inside the pipe has the advantage that you are heating the lead directly, and don’t have to heat the pipe all the way through from the outside.
Well it looks like I gotta Get The Led Out!
You mean get the lead out of your pants? Lol! So do I!!
Thank you all who posted on this thread. I just went through this today. Reading this gave me the courage to do this myself. I used some cheap 12in drill bits they were kinda “bendy.”. After drilling all around. I tilted the drill to both sides and dug out more lead that way. I did snap 2 bits doing this but it was worth it in the end.
Next I went to harbor freight and got diamond sawzall blades. I made 2 radial cuts from the inside an inch apart. I drove a long pointy chisel along the inner pipe next to the cuts. The pipe split apart and came out!!!!!!
I nicked the inside of the ci pipe a little but I will address that. It wasn’t too deep.
Thanks to the original poster for the detailed explanation. And thank you all for your help
Thank you for this article, I found it quite useful. I am still debating whether to cut my 4″ cast iron pipe or to disconnect it at the hub. On the one hand if I cut it I will need to hire a ratcheting in-place pipe cutter as the pipe hangs ~0.5″ off the wall. If I try to disconnect it I am faced with uncertainty around how easy it will disconnect without affecting other cast iron joints nearby, and then the removal of the lead seal. I am leaning towards a disconnect, and I know you advise against it, but because of your article I at least know what I am getting myself in to. Thanks again
It takes a lot of work, but if your joint is not inside a wall with limited access, you might have an easier time of it.
I have installed a new bathroom in the room behind current bathroom. The current bathroom is going away. I need to turn the case iron T that toilet dumps into. The bottom of the T goes out. The top of the T is the vent stack. I want to spin the existing T 180 degrees so I can just reconnect to it. Suggestions would be helpful. Thanks. Please send to rmellis at g mail dot com
Thanks for the advice! Getting the old pipe out took longer than getting the lead out. I drilled holes in the lead as suggested, then hammered and pried at the old pipe until it came free. Once it was out, I was able to get a flat-head screwdriver between the cast iron hub wall and the lead, and push it away from the hub wall. Once it started pulling away from the hub, it all came out in 1 piece. Total time was under 1 hour labor, and worth it now because now I can start with a nice, clean hub.
Thanks for the method. Took me three hours to carefully drill, chisel, vacuum and repeat until I could eventually prise out a bell shaped brass “adaptor” from the cast iron Y to the copper drain pipe.
Now to try and fine a 3-1/4′ donut compression sleeve. I think I will call the local Fernco rep.
Cheers
J
I followed the instructions got it all cleaned out but there’s section of the hub that has another type of metal soldered to it. It’s very hard and cannot drill through it easily. It’s silver like lead but much harder. Any idea what I can do? Thanks.
Sorry, I don’t know what it is or how to handle it.
Very thorough and detailed. Thanks!