I brought my rostock-mini 3D printer home so that I could take it to a class, and while I had it here, I decided to update a few minor things.
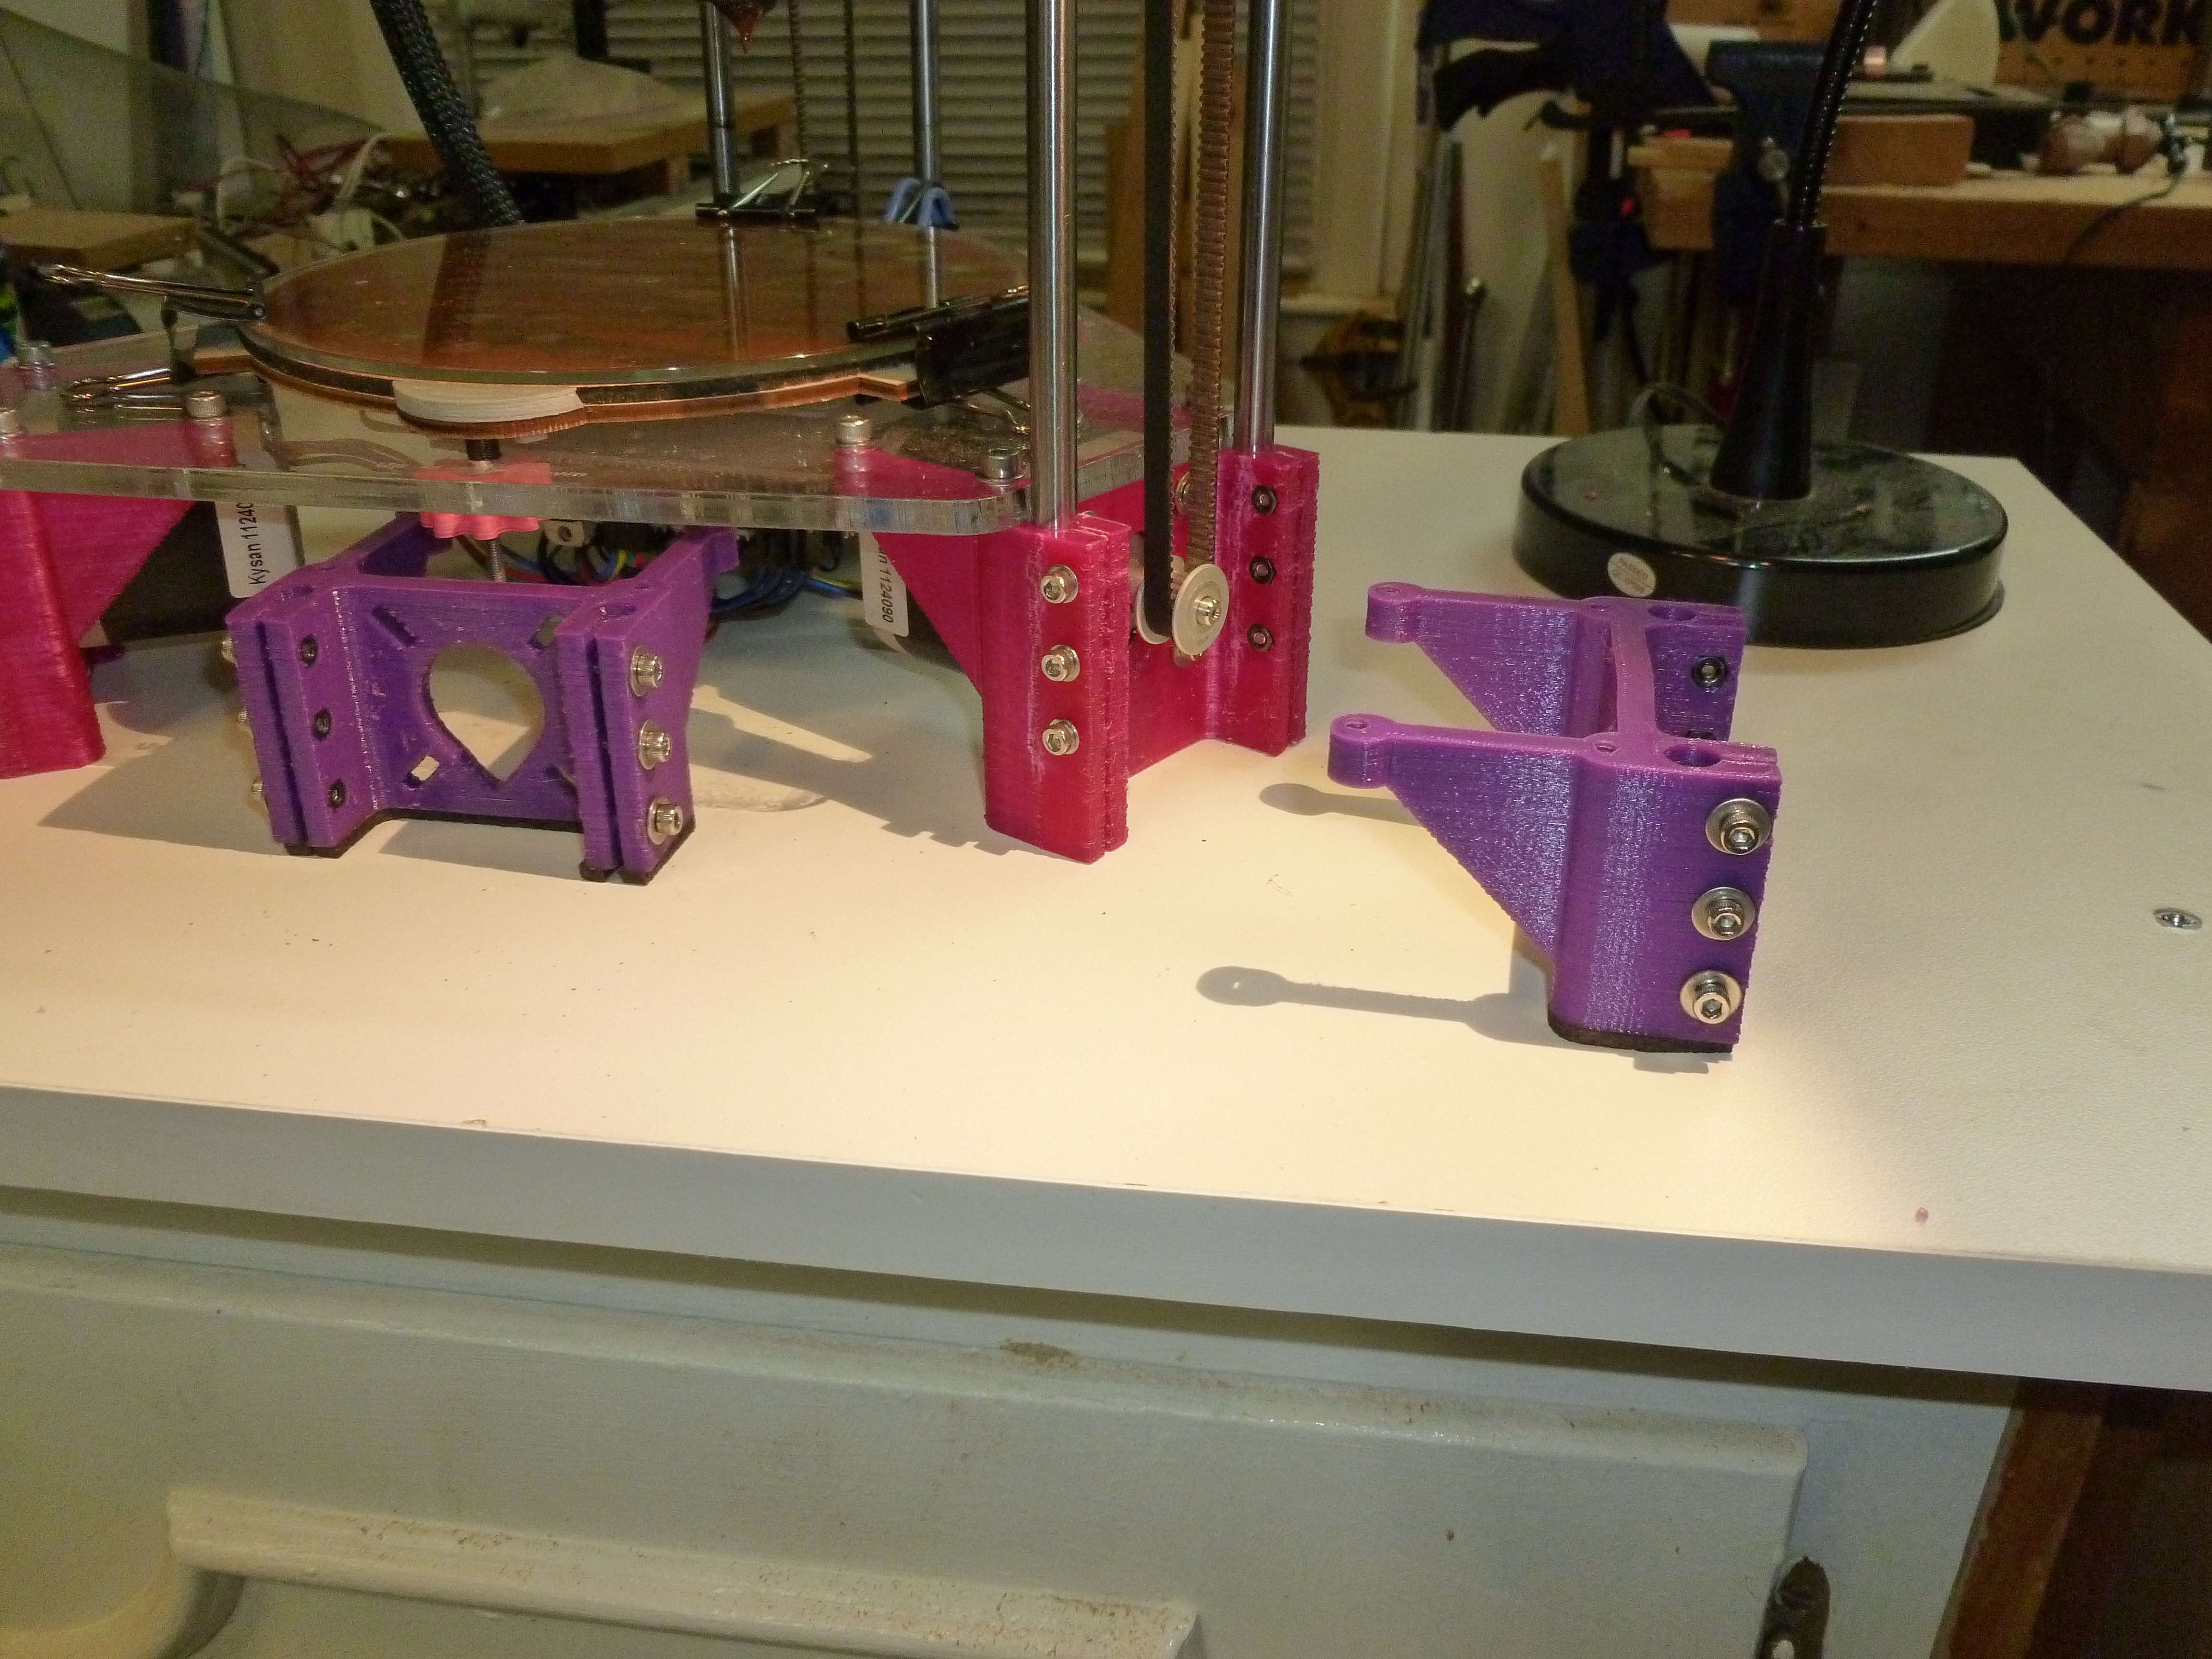
First, I swapped out the stepper motor brackets (which also serve as the legs) with three I had designed and printed that were 20mm taller. I have a full RAMPS board under the base plate of the rostock-mini, and although it fits, the fit was “very close”. I didn’t like the fact that my stepper motor wires would touch the surface the printer was sitting on, and the limited airflow paths. This extra 20mm really helps things out, and also opens up the possibility of installing an LCD control panel under the base plate in the front. (If I can figure out how to avoid my bed leveling knobs.)
Second, I upgraded the springs on my adjustable print bed to some that were a bit taller and a bit stiffer. My overall build volume was shortened from 187mm to 185mm, but now I have a lot more range for adjustments and the bed is more rigid (while still allowing the print head to push the spring loaded bed down if it crashes horribly).
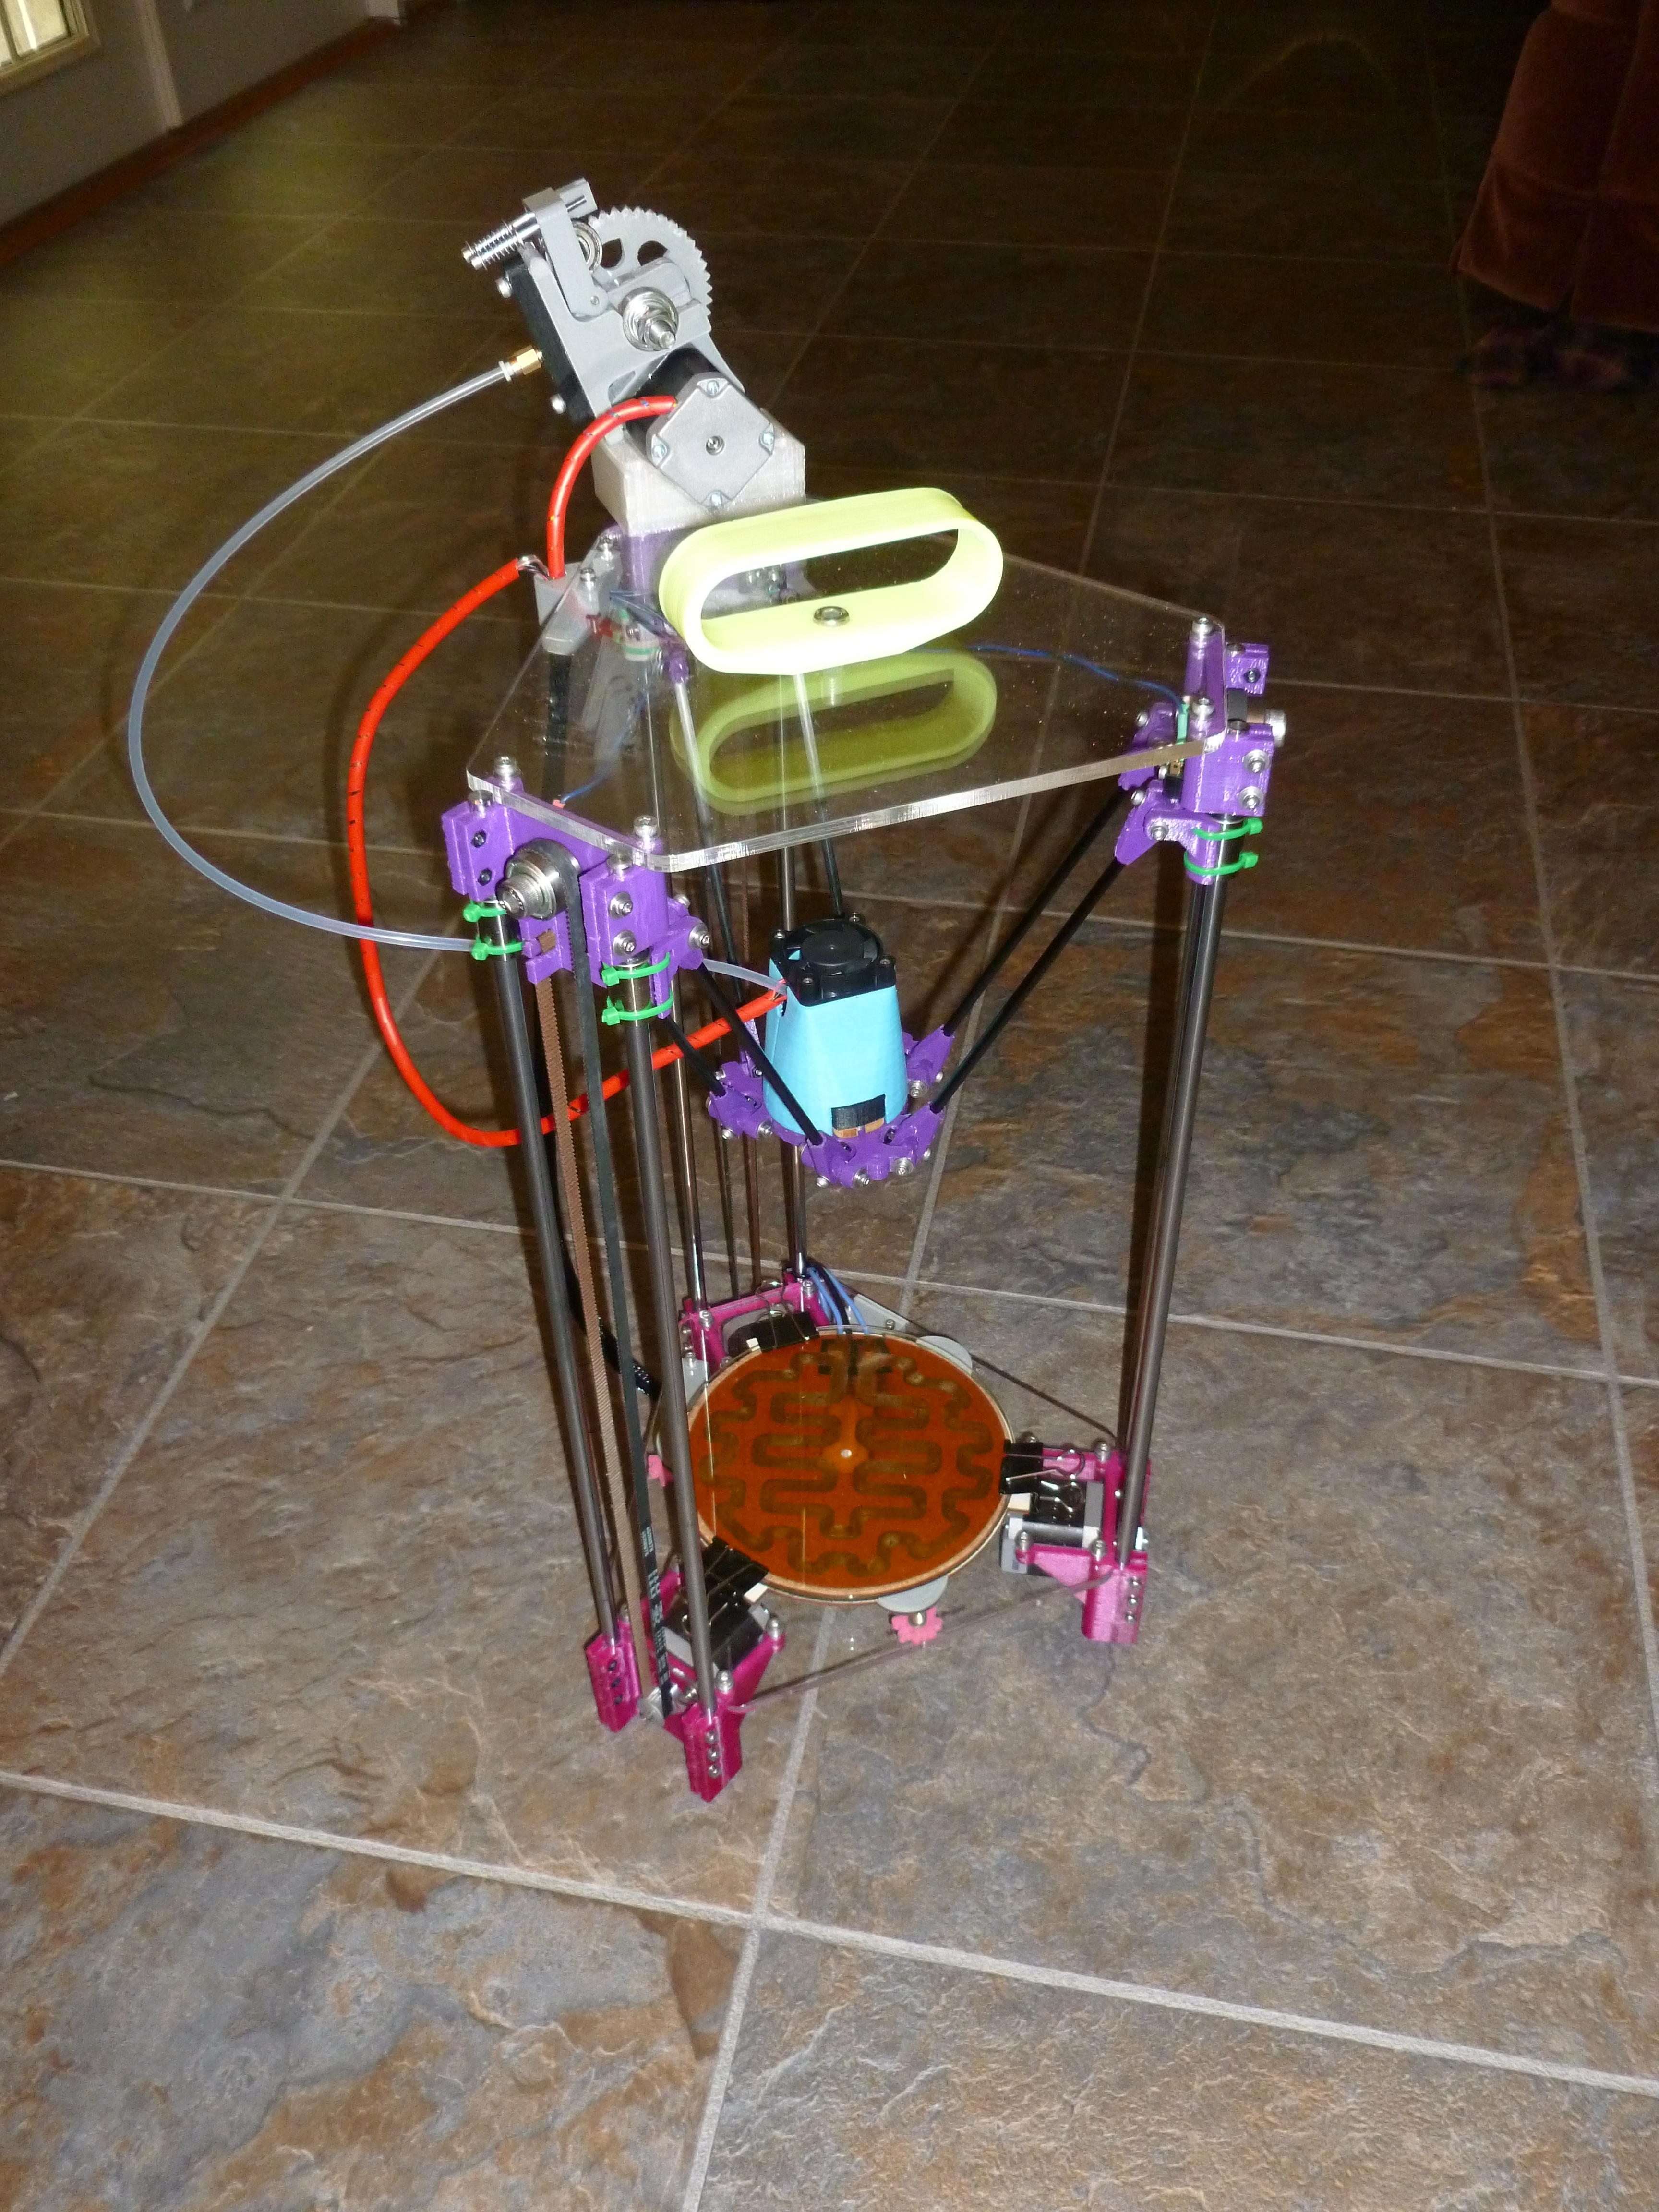
Third, I wrapped some plastic spiral wire harness wrap around the wires leading down to the print head, to give them a better visual appearance.
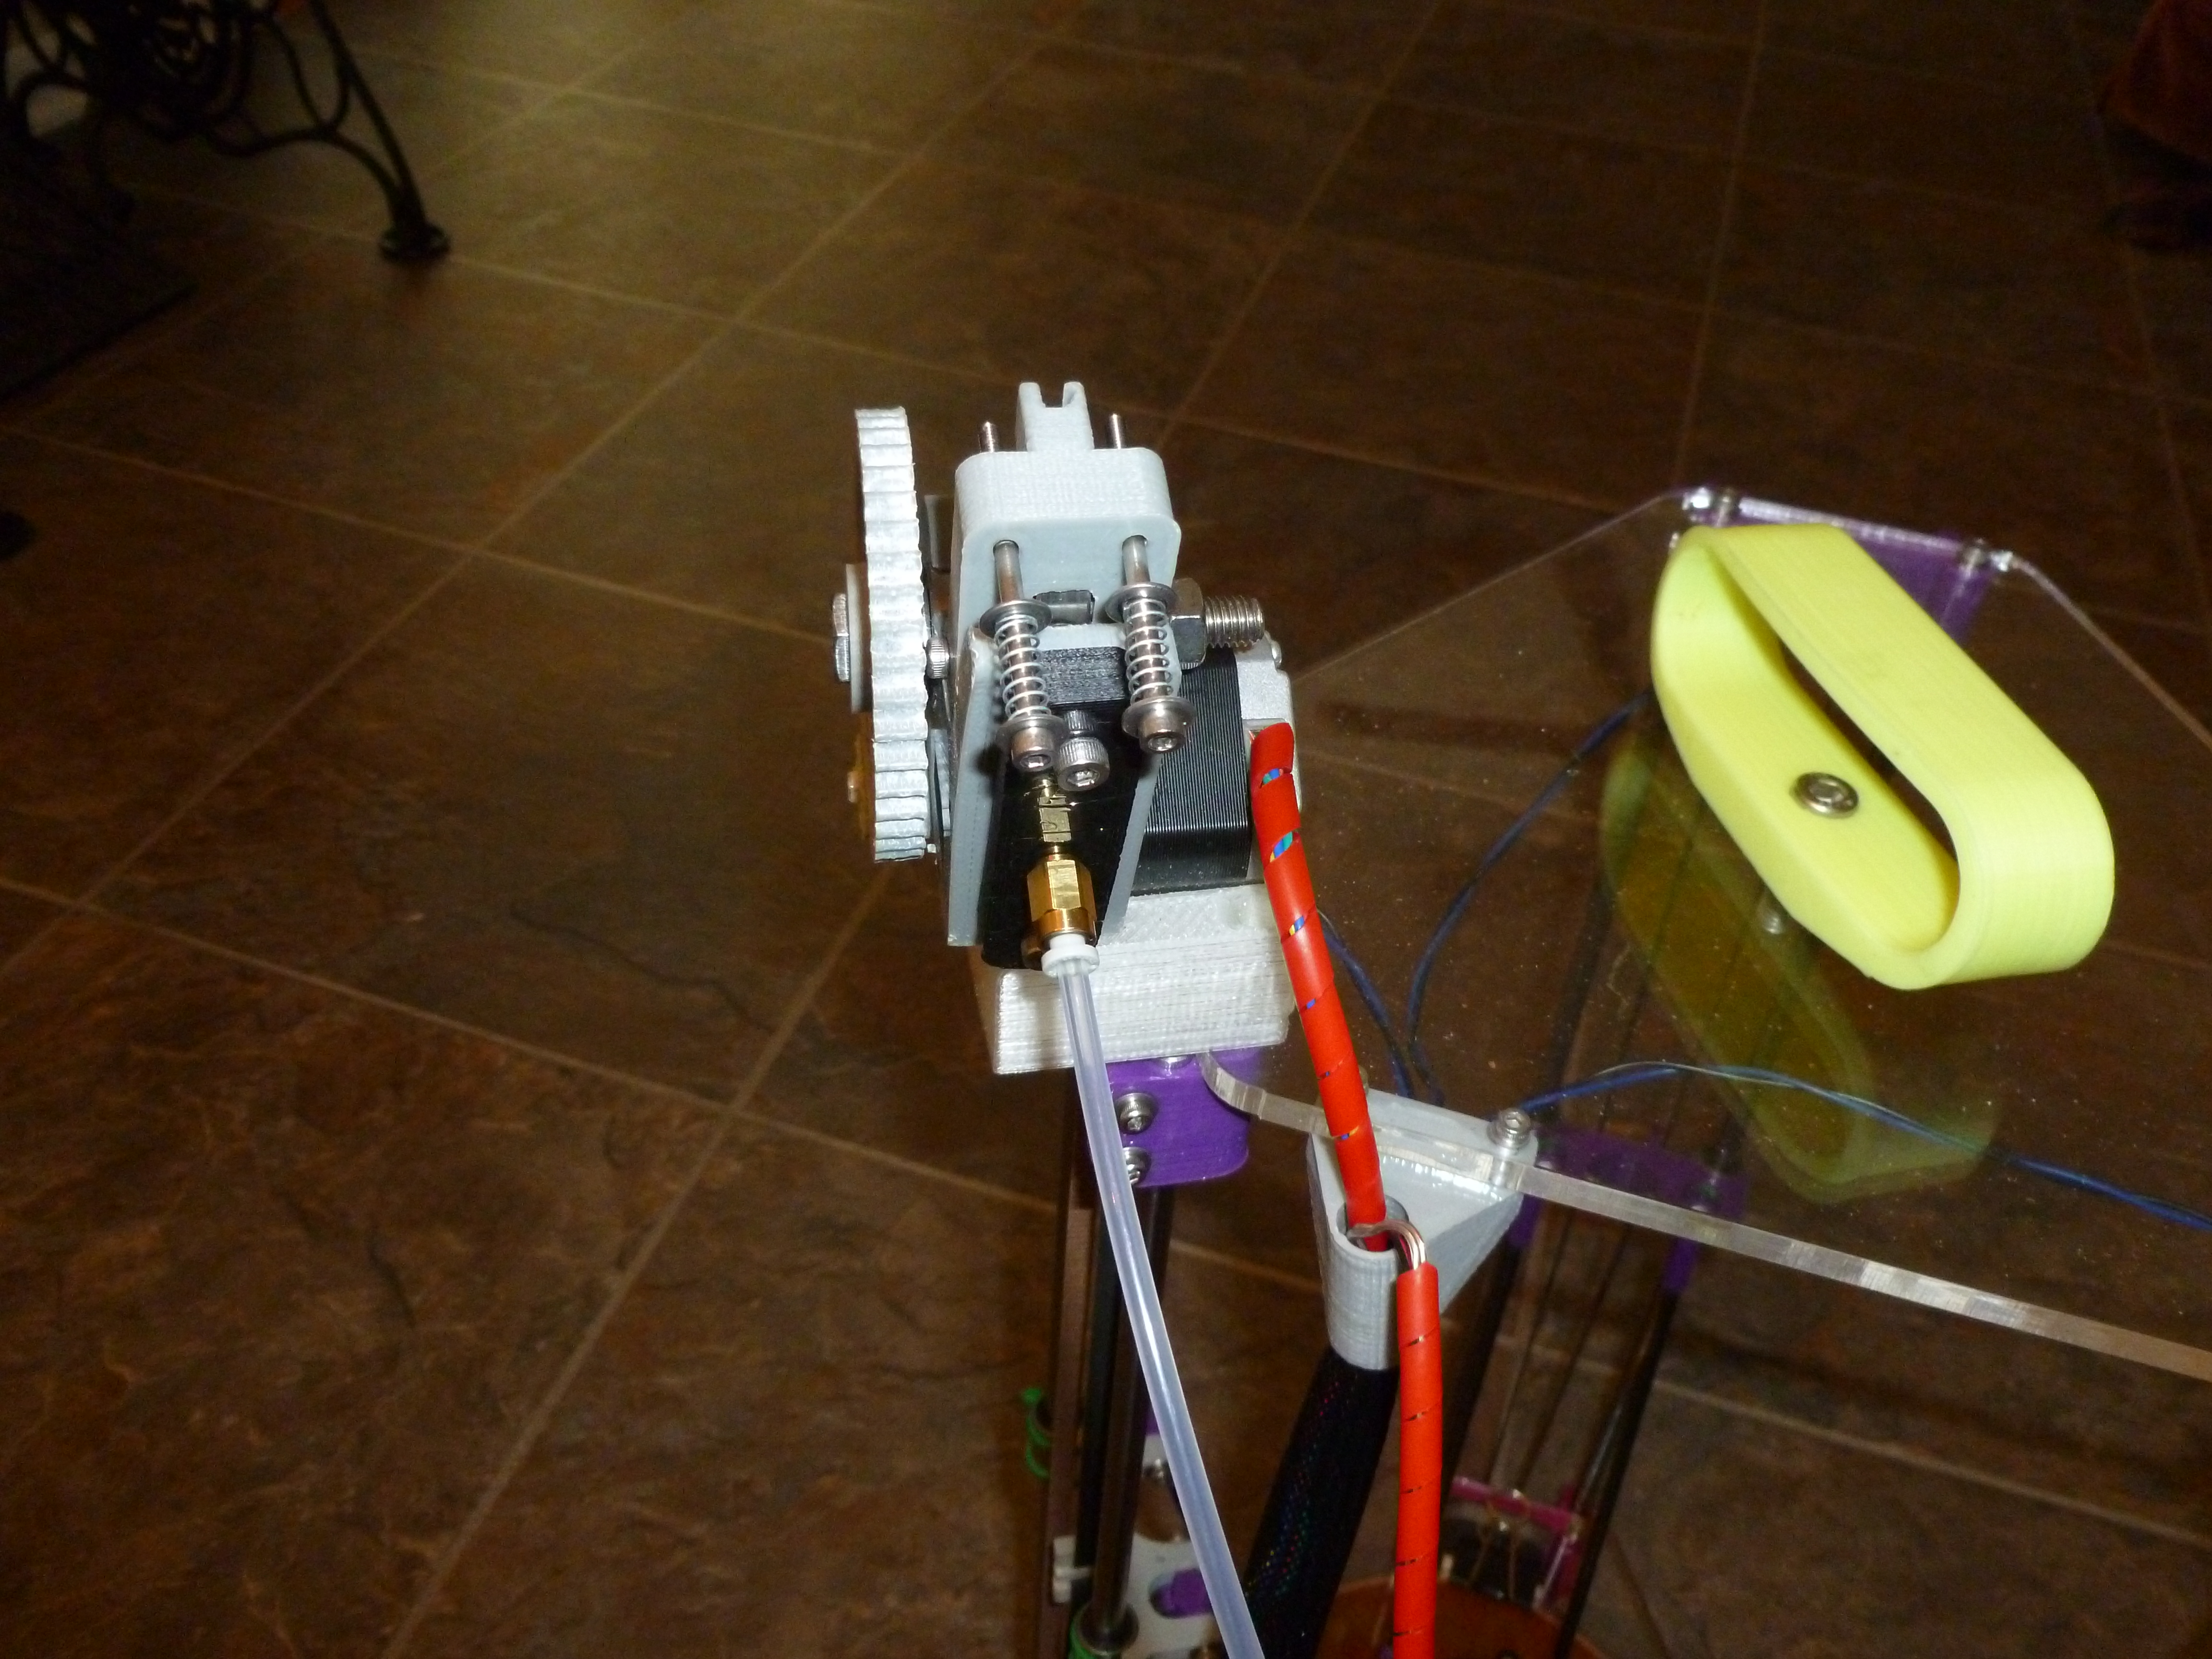
Finally, I changed out my bowden tube from using M4 nuts to hold the tube to using screw in Push To Connect adapters. The goal was to allow me to remove the tube from either end without having to unscrew the plastic part holding the nut in place. However, the cheap PTC adapters I bought appear to be single use, in that they don’t release the tube reliably without breaking, so basically it just makes the bowden tube look slightly more professional.


Hey Jay!
Currently I am printing the Rostock Mini. I really liked the design but at some point I read the comments on the original models and Bwevans said that he was not happy with how the printer worked.
I see you got one too. Are you still printing with it or did you encounter some severe issues ?
Just printed the 2 carriages, the platform and the 3 idler_ends. Ordered some bearings and belts.
So, how are your experiences with the Rostock mini ??
Still new to 3d printing. Got my QU-BD TwoUp and after 3 weeks I finally got the hang of it…slowly.
Your answer is much appreciated
Cheers
Sebastian
The mechanical design (from the original .STL files) is perfectly fine. Motion is plenty accurate and fast and the platform is plenty rigid (as long as you use 1/4″ acrylic….the 1/8″ plywood I used initally for prototyping until my acrylic arrived was way too flexible!)
Most of my problems stem from the extruder (both cold and hot end). The one specified in the original design was too weak, so I ended up using a Greg’s Wade derivative with an adaptor to make it work with a bowden tube.
https://www.summet.com/blog/2013/04/04/gregs-wade-bowden-extruder-for-rostock-mini/
I also have intermittent issues with the hot end jamming, mostly due to me heating it up too much without enough fan speed. This can in turn cause problems with the bowden tube (I’ve had tubes pull out of both ends….) I am using a relatively short tube extruder originally from a makergear, now a MG Plus, but am going to be changing out to something longer, perhaps with dedicated heat-sync and forced air cooling.
The bowden tube arrangement does lead to more “stringing” from oozing than my makergear (with the extruder directly over the hot end), but this is to be expected with just about any bowden tube arrangement.
So overall, I’d say the mechanical design is sound, but you will have to come up with a good extruder (either a small one that fits above the platform, or a bowden tube arrangement if you want full speed) to make it work well, which is the same for just about any printer.
Just wanted to tell you this site is the most valuable resource I’ve found regarding a Rostock build and the details on your speed testing, tweaks, etc.
Thank you for taking the time, it is much appreciated.
I’ve just built a rather large rostock as my first, printing parts from my printrbot simple. Since the build volume should be 12x12x20 inches, or there abouts, I was especially interested that you got up to 275mm/sec… that is amazing, as my printrbot is set to 60!
I suspect my design will not quite do the volume I intended, given that my rods are only 37 centimeters long. Your’s look much longer compared to your build size…
I’ve used carbon fiber rods, which… should have been tubes, but I couldn’t find any fast enough, so my weight may be too high to get the speed you got also. Shockingly, the ones I made of wood dowels were half the weight… but sadly I missed the fact that the jaws were slightly off, so it wouldn’t be accurate.
Anyway, thanks for the awesone site/blog. Top notch stuff.
Hey Jay
I have just finished most of the Rostock’s Mini mechanical part and started to experiment with the firmware but I encountered several issues. These are commonly known in several forums and blogs but no one really gives a usable solution. I think it is mostly because of the endstops. I followed the Rostock Mini Pro instructions on http://3dprinterczar.com/shop/3dprinters/rostock-mini-pro/ but all the software instructions there lead to a non-working controller board. Baud rate; cache size; ping-pong communication, everything they say in their instructions does not work with the Arduino+Ramps board. They also provide a Rostock Mini customized repetier firmware but I had no luck with it either.
1) I think I messed up something on the endstops and their wiring.
The motors do not stop when hitting the switches. They are connected as ‘Normaly closed’ and because of the messed wiring the motors act strange as well.
I connected the endstops with only two wires and without a pullup resistor. I wanted to use the interal resistor of the Arduino.
2) I think I killed some stepper drivers because once I insert the extruder stepper driver the Arduino is not recognized by the PC. If I remove it with just the X Y Z stepper driver installed the Arduino is recognized just okay.
So in my darkest hour of desperation and being close to throwing this thing out of the window I seek your advice. May you be so kind and upload your firmware somewhere and take a picture of Ramps wiring ? Especially the endstops. I will really appreciate this. Thank you !
Hi Sebastian,
I uploaded a snapshot of my firmware (based off of the Marlin firmware with rostock/delta additions) on the blog, here:
https://www.summet.com/blog/2013/03/17/rostock-mini-firmware/
That is a year or more out of date, but it’s working for me now. But you might want to upgrade the firmware after you get it working….
Nothing special about my endstops, but what you need to do is use the gcode commands to print your endstop states (M119) to verify they work correctly before trying to move the system under stepper control.
http://reprap.org/wiki/G-code#M119:_Get_Endstop_Status
I do remember that the endstops needed some tweaking before everything worked for me, and I HAD to use the “HOME” command (for all 3 axis at once) the very first motion I did. If I tried to move just X/Y or Z or even the extruder motor alone the system would go crazy if I had not used the “HOME” command as the first stepper motor motion. (I think my firmware depends upon that initial zeroing for the x/y/z/ to delta math…)
Good luck,
Jay
Thank you ! The firmware did the job. Just had to invert the endstops, enter some reasonable values for steps and all went perfectly fine.
Glad to hear you got it “moving”. You might want to check out my post on using a machinests dial indicator to measure your Z axis accuracy (useful to get rid of dishing errors in the coordinate tranform if your parameters are slightly off) next…
https://www.summet.com/blog/2013/04/10/rostock-mini-z-axis-accuracy/