Using a Raspberry Pi as a RepRap print host with webcam

I set up a Raspberry Pi as a print host for my RepRap (using the Pi Camera Board as a webcam to view the print status). Here are my summary steps:

  1. Install Rasberrian and update it.
  2. Configure your system to enable wifi (if used) and camera board (if used) and enable the SSH server if you want to remotely administer the pi board using the “sudo raspi-config” command (you may also want to tweak your overclocking settings here, I’m using “Moderate”)
  3. Install OctoPrint following directions here: https://github.com/foosel/OctoPrint/wiki/Setup-on-a-Raspberry-Pi-running-Raspbian
  4. If you have a camera board, you may need to update your pi firmware (sudo apt-get install rpi-update; sudo rpi-update)
  5. To get the camera board set up as a streaming webcam, install mjpg-streamer experimental version from here:
    “git clone https://github.com/jacksonliam/mjpg-streamer”
  6. You can compile it on the Pi using these instructions:
    http://www.instructables.com/id/Create-an-internet-controlled-robot-using-Livebots/step5/Get-the-webcam-streamer-for-Raspberry-Pi/ (ignoring the step to download from sourceforge.net)
  7. Install the plugins to /usr/local/lib with “sudo make install”. Copy the www directory to the same location.
  8. Start the webcam streamer: mjpg_streamer -o “/usr/local/lib/output_http.so -w /usr/local/lib/www” -i “/usr/local/lib/input_raspicam.so -x 640 -y 480”
  9. Start OctoPrint (“OctoPrint/run”)
  10. Test it by pointing your browser to your raspberry pi’s IP address, port 8080 for the mjpg-stream and port 5000 for OctoPrint
  11. When all that works, put some commands in your /etc/rc.local file to start them both up whenever your Pi boot sup. I used: su pi -c ‘/home/pi/OctoPrint/run’ & AND su pi -c ‘/usr/local/bin/mjpg_streamer -o “/usr/local/lib/output_http.so -w /usr/local/lib/www” -i “/usr/local/lib/input_raspicam.so -x 640 -y 480” ‘ &

My Thoughts: Everything works great on a wired (ethernet) connection, but my wifi adapter is performing extremely poorly for streaming video of the printer. Also, why can’t the camera board just have V4L support out of the box?

Fixing the problem where gparted (parted) won’t see a partition due to a mac partition table

I purchased an external HD that was “mac compatable” but I used it with a linux system and used fdisk to put two partitions on it.

Later on, I wanted to use gparted to easily resize one of the partitions, but it refused to see any partitions at all on the disk.

fdisk could still see them just fine, but reported “Partition type: mac”

It turns out that the problem was that the disk originally came with a mac partition table in addition to (right after) the regular MBR Master Boot Record.

I noticed that the first partition didn’t actually start until 63 sectors into the disk (at the beginning of the 2nd cylinder).

Device Boot Start End Blocks Id System
/dev/sdb1 63 1171893554 585946746 83 Linux

So I used DD to copy the first cylinder to a file:

sudo dd bs=512 count=62 if=/dev/sdb of=firstCyl.bin
62+0 records in
62+0 records out
31744 bytes (32 kB) copied, 0.000715733 s, 44.4 MB/s

Looking at that bin file in an editor, I saw the string “Apple_partition_map” which is a dead givaway of what the problem was.

So, I wrote out all zeros to the first cylinder:

sudo dd bs=512 count=62 if=/dev/zero of=/dev/sdb
62+0 records in
62+0 records out
31744 bytes (32 kB) copied, 0.00165608 s, 19.2 MB/s

And then I copied the first sector (512 bytes) back from the firstCyl.bin file I had made:

summetj@constantine:~$ sudo dd bs=512 count=1 if=firstCyl.bin of=/dev/sdb
1+0 records in
1+0 records out
512 bytes (512 B) copied, 0.00183878 s, 278 kB/s

And it worked! Now gparted is no longer confused by the apple (mac) partition table that I zeroed out, and sees my partition.

dyndns.org (dyn) ddclient configuration fix

I have been using ddclient to update my dynamic dns records for various servers and laptops for many years now. Around a month ago they all stopped updating the DNS server. I eventually tracked the error down to a line in the configuration file:

server=members.dyndns.org

It’s not like I had made up a random server name…this server had been working successfully for several years. And it is the server recommended by the ddclient automatic configuration script generator on the dyndns.org website even now. [https://account.dyn.com/tools/clientconfig.html] However, at least for me on Ubuntu 10.04 and ddclient 3.8.0 it had stopped working.

I changed it over to:

server=members.dyndns.com

And this fixed the problem.

Serial Shift Register MOSFET driver (version 1.1)

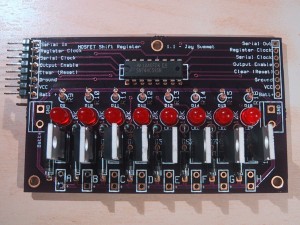
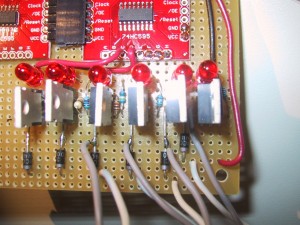
My BubbleDisplay project needed to control sixty DC motors or solenoids to control air injection into individual columns of liquid. Due to the large number of outputs needed, I am using a chain of (74HC595) serial shift registers so that three I/O pins can control all sixty outputs. As each serial shift register has 8 outputs, this requires eight chips (for a total of 64 outputs, four are unused). The 74HC595 can not source/sync enough current to drive the motors/solenoids directly, so I am using a TO-220 N-Channel MOSFET rated at 60 volts and 32 amps (digikey: FQP30N06L-ND) to drive the load, with an 1N4001 rectifier diode to handle current spikes. Because I had to make 8 (9 for a hot spare) copies of this circuit, I decided that fabricating a printed circuit board was the only way to go.

Circuit board with 8 LED's and 8 MOSFETS connected to a 74HC595 shift register

It only took me two tries (Moving from Version 1.0 to 1.1) before I was happy with the design, which you can see (populated for testing) above. Looks a lot nicer than the prototype, right?
protoboard with MOSFETS and LED's
Continue reading

Opening winmail.dat files in Thunderbird

Outlook will attach items and forwarded email embedded in a “winmail.dat” file. The winmail.dat file is a TNEF file and Mozilla Thunderbird does not process them natively. The LookOut plugin for Thunderbird will allow you to see the attachments embedded within the winmail.dat file and treat them like normal attachments.

Testing Glycerin as a bubble medium

The tube on the left is filled with Glycerin. I like how the bubbles float up much slower and are more defined. Also, because the Glycerin has a lot of “micro-bubbles” in it, the light from the RGB LED’s in the bottom of the tube diffuses out of the mixture much more, and gives the whole tube a colored glow effect.

One problem is that if I want to make larger bubbles (than in the video above) I need to increase the size of my nozzle. The current small nozzles will make “separated” bubbles if I run air through them for too long, demonstrated below in this video:

Of course, I had to try making bubbles really fast! (The upper limit in Glycerin is slower than in water…)

Glycerin is relatively safe (msds) as long as you don’t eat it, although it can cause skin and eye irritation if you don’t wash it off. Clean up is easy, as it dissolves in water, but it’s more messy than just plain water, and costs a lot more! Even buying in bulk, it takes $8 worth of Glycerin to fill a 6′ long 1″ square tube!

Bubble Display Videos

I have been playing around with the timing for how long to turn on the air pumps (as well as the delay time between bubbles). This video is my “favorite” so far for the solid bubbles (on the left) 30ms on-time, and 300ms delay. Obviously, the aquarium air stone tube (right side) needs a longer delay to separate the air pulses.

Of course, I also tried playing around with super fast bubbles!

And with the smallest bubbles I could make (the electronics can give a 1ms pulse, but the motor/air-pump needs at least 8ms of power to eject a bubble…)

Bubble Display Prototype 1

I have the physical structure, electronics, and pneumatic systems all integrated (for 2 of 6 channels) on my first prototype for the Bubble Display. The electronics are mounted on one side of the upright board, while the air pumps, check valves, LED lights and acrylic tubes are mounted on the other. (Click photos for larger versions)
The electronics for a bubble display prototype

Six air pumps, connected with check valves to the bottom of acrylic tubes filled with water

And here is a video of the system driving two channels (tubes of water). This is a 10ms bubble size, which is quite small. I will be experimenting with various lengths of time to drive the air pumps to make bubbles of different sizes, as well as experimenting to find out how small of a delay I can use without having the bubbles run into each other as they rise. (The length of the tube will affect that as well, so it’s just about time to make some six foot tubes!)

Acrylic Column #1 (Bubble Display testing)

I finished test column #1 today. I was able to cut the extruded acrylic tube using a miter saw with no major difficulties, and pulled it across a piece of sandpaper on a glass backing to try to ensure that the end was perfectly flat. I had to use a good amount of solvent to weld the 1″ square bottom plate to the bottom of the square extruded acrylic tube. Even after my initial weld, it had some pinhole leaks that would “weep” water. I fixed them by turning the tube sideways and wiping a liberal amount of solvent along each of the four seams, allowing it to seep into the gaps (and/or melt acrylic into the gaps.)

A 1" square tube of acrylic with a bottom plate cemented to it.

As far as I can tell Continue reading

Missed Schedule for wordpress posts due to .htaccess password protection blocking wp-cron.php

I recently set up a private blog that is fully password protected using an .htaccess file. (Users have to enter a username and password to view anything on the blog.) Everything was working well until we tried to set up posts scheduled to publish in the future. They would not post. The dashboard would show “Missed Schedule” and we would have to publish them manually.

After lots of head scratching, I finally figured out what was causing this. Apparently wordpress will call the wp-cron.php file every time a user views a page. HOWEVER, because the web server is doing this, and not the user’s browser, if the wp-cron.php file is protected by a .htaccess user authentication system it will not load (because wordpress doesn’t have the correct username/password!). So none of your scheduled actions will take place.

The solution is to allow (only) that file to be loaded without the normal username/password check in your .htaccess file like this:

#Require username and password for all files!
AuthName "Enter your username and password:"
AuthType Basic
AuthUserFile /home/yourdirectory/.htpasswd
Require valid-user

#Exclude the wp-cron.php file!
<files wp-cron.php>
Order Allow,Deny
Allow from all
Satisfy any
</files>

Of course, if your blog is password protected, the wp-cron.php file won’t get hit until somebody logs in to view the blog…but at that point any tasks that are pending will activate.