Disassembly and reassembly of my workbench

When I built a workbench out of plywood and 2×4’s   I designed it to unscrew so that I could move it out of the rental and into our next home.   It took a few hours and a lot of unscrewing, but I was able to transport it to the new house in a single load.


Re-assembly was much faster than the initial build as most of the screw holes lined up perfectly, although I did swap the position of two of the plywood side sheathing pieces based upon where it was going to be put up against a wall. I also chopped off the upper shelf overhang on the left side, and chopped a few inches off the height of the top shelf to accommodate the lower ceilings.

 
You can watch the video of the re-assembly process here:

Updating XML Google Maps plugin for newer versions of PHP

If you are using the XML Google Maps wordpress plugin (version 1.14.1 by Patrick Matusz), it has not been updated for a while, and won’t work quite right with newer versions of PHP.

If you are getting the following error message twice at the top of every page in your wordpress blog:
Warning: mysql_get_server_info(): No such file or directory in … on line 10

Change line 10 from:


if ( version_compare(mysql_get_server_info(), ‘4.1.0’, ‘>=’) ) {
to:
if ( version_compare($mysqli->server_info, ‘4.1.0’, ‘>=’) ) {

And that will make things work without the error messages.

Time to upgrade to LED Lights

LED lights are much more efficient than traditional incandescent bulbs, slightly more efficient than compact florescent (with much less mercury!), and have recently really dropped in price.

I just purchased a six pack of 11 watt LED bulbs designed to replace 65 watt flood lights for $27. When lit, together they use 66 watts. (And light up the kitchen better!)

Compared to the 390 watts used by the incandescent bulbs they replaced, this is a savings of 324 watts.     If they are lit for three hours a day the savings is substantial; 972 watt hours, or almost one kWh!   If we pretend the average cost of electricity is 0.10 a kWh (it’s actually closer to 0.117 for me) this works out to paying for the light bulbs in energy savings in less than a year (270 days!).     As long as the bulbs last for at least 810 hours, they have paid for themselves. (The rated life on the package claims 25,000 hours)

If we conservatively pretend the bulbs will only last 10,000 hours (9 years at 3 hours a day), they will continue to save   324 watts x 9190 hours after they have paid for themselves. This works out to 2,977 kWh, or $297 worth of electricity.   Not a bad return on investment for $27 of sunk costs.

In summary, it’s time to replace any incandescent bulbs you have with LED’s. (You may as well wait for the CF bulbs to burn out before you replace them.)

96 °F charging

I tested my 80% profile (limited to 25A) on a very hot 92 °F day. The chargers reached 65 °C but did not shut down due to overheating. (My 80% profile ends charging when the draw reaches 10A.)

A charger temp of 65 °C is still much hotter than I would like, so I don’t plan on charging in 90 °F heat very frequently.

25A_92F

How to convert a Denford / ScanTek 2000 Micromill to LinuxCNC / Mach3 control: Part 1 – 3 Axis control

How to convert a Denford   / ScanTek 2000 Micromill to LinuxCNC / Mach3 control

Part 1 – 3 Axis control
Video here, details below


My ScanTek 2000 ScanMill (A re-branded Denford Micromill 2000) has a dispatch date of 2005, which means that it’s main controller is a Baldor NextMoveST card. This card supports USB as well as RS232 control signals, and runs a custom (MINT) programming language that can offload machine control from the host computer.

Baldor NextMoveST

You can actually download the MintNC development tool from the Baldor website that allows you to upload custom Mint programs to the card, and could make it (for example) do some simple operations offline with no driving computer. However, I am not interested in writing Mint code to interpret g-code, so I’m going to set it up so that LinuxCNC (or Mach3) can control it via a parallel printer port.
Continue reading

Battery Bay Plan: Nissan Leaf Cells six group

SixGroup

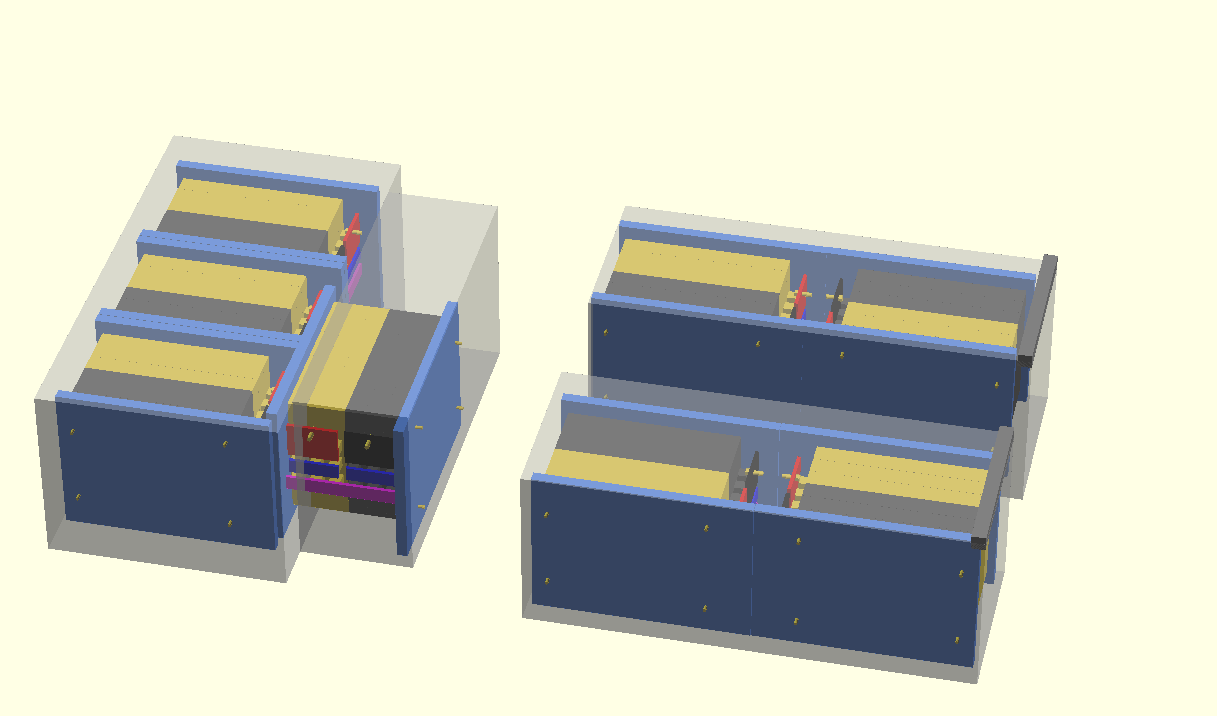
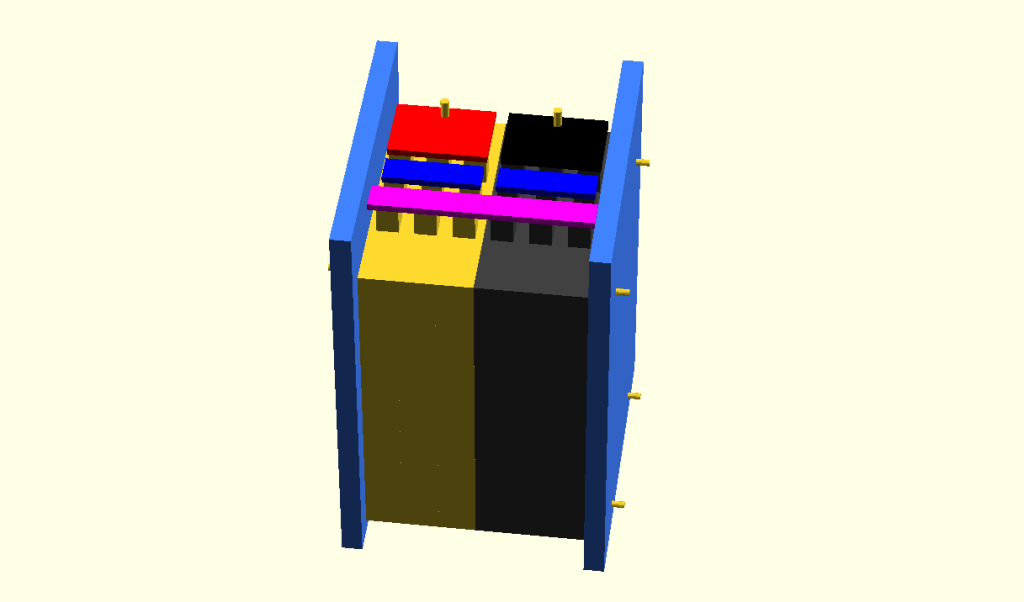
This is my current CAD mockup of how I will package a group of six Nissan Leaf modules. I have 48 total modules from a Leaf battery, so I will have eight of them to distribute throughout my truck’s battery bays. I also have a CAD model of that:
batteryBays

Unfortunately, my existing Lead Acid (golf cart battery) bays are not tall enough to mount them vertically, so I am having to lay them sideways. This results in terminals being relatively close together in the two side bays. (I’ll probably slide a sheet of plastic between the two batteries after I get them installed to make it more difficult to drop a wrench down there and short things out. It’s only 32 volts total potential, but a lot of Amps!)

If you would like to know the specifications of a single module (and some people have asked) here is what I know:

From: http://www.electricvehiclewiki.com/?title=Battery_specs
Confirmed by Jay with a 2013 Nissan Leaf module.

lm_width=223; // mm – 8.7795 inches (measured 222 – 8.75 inches)
lm_length = 303; // mm – 11.9291 inches (measured 298.45 or 11.75 inches)
lm_thickness = 34; // mm – 1.3779 inches (measured 34- 1.3333 when compressed)
lm_weight = 3.8; // kGrams, or 8.3775 lbs

The power “bolt blocks” are 20×20 mm in size, and I modeled them around 1 inch in height. But, this height includes the space for a bolt head and a busbar on the top. In the CAD model I made them one inch tall, but in real life they are slightly shorter than that. The “bolt blocks” for the sense terminals in the middle are slightly smaller (18×18 mm) but the same height. So if you download my CAD model (link below) keep in mind that the top of the bolt blocks on the module includes a little extra wiggle room. The CAD software I use is OpenSCAD, which you can download for free. The file itself is human readable text.

BatteryPacks.scad (You may have to rename it from BatteryPacks.scad.txt to BatteryPacks.scad )

UPC Barcelona Sodexo Unity cafeteria menus

The Sodexo “Unity” cafeteria at UPC in Barcelona offers a “complete menu” for 6.60 Euros that includes a starter, main, drink, bread and desert. You could typically choose between three different starters and main courses, mixing and matching.

The common vegetables were potatoes and artichokes. Ham, bacon and fish were the relatively common meats.


Below are photos of the ten meals I ate.

IMG_20150615_131037
Grilled fish, french fries, and kale.
Continue reading

Hexagonal wooden mirror frame

This is my finished hex frame mirror, which is the last piece of the downstairs bathroom we renovated.
hex_mirror_finished

frame_ready_to_stain

I built a hexagonal wood frame out of ceder planks for the new bathroom mirror. I had originally wanted to build an irregular three sided “triangular” mirror, but once I figured out that my compound miter saw wouldn’t make cuts sharper than 50 degrees I decided I needed more than 3 sides…and 8 pieces would have been a nightmare to assemble.

frame_assembly

I used a table saw to rip a groove in each piece to hold the glass, and then I used the flattest surface I had available (the mirror glass) to assemble and glue the pieces together. The mirror glass was original to the house, and has a 1961 date printed on the back.

glueing1

Once I had the frame built, I traced out a template so that I could mark the mirror glass exactly where it needed to be cut. (Due to a few holes I was avoiding in my scrap wood, the frame is not perfectly symmetrical….)

measuring_the_mirror

If I hadn’t already built the frame, I would have strongly considered making a “Superman” mirror at this point in the glass cutting phase.

SupermanMirror