Garage Door Insulation — Part 2 (Reflectix radiant heat barrier)

After installing the R-8 fiberglass batt with white vinyl backing, my garage doors were relatively well insulated, but I decided to add a layer of reflectix as a radiant heat barrier.

In this situation, with one side facing the open air of the garage, it adds about a 3 to the R factor. I also like the aesthetics of the silver bubblewrap more than the white puffy vinyl.

Unfortunately, unlike the Dow Corning fiberglass batt which is designed for garage doors and comes pre-cut at the factory to the correct height, I had to measure and cut the reflectix down from a 24 inch roll.

If you don’t have support bars, it’s relatively easy to install. Just make a few cuts to go around the upright bars and tuck the top and bottom inside the lips of the door panels. I was going to move the white plastic clips that hold the fiberglass in to outside the reflectix, but so far, a pure friction fit is holding it just fine.

The panels with support bars require more work. I guess it would be possible to remove the support bars and then re-install them on top of the reflectix, but I chose to measure and mark each bar location by cutting the edge of the reflectix, then taking it down and cutting the proper length. I installed the reflectix panel under the horizontal support bar, and made sure that the top lined up just under the height of the panel. Then I notched around the vertical bars so that I could get the top in place.

So far, they all stay in place with nothing more than a friction fit. The bottom panels that don’t have a horizontal support bar holding the reflectix bow the most when overhead and may pose a problem as they age, but if I run into issues, I’ll just take the plastic clips that hold the fiberglass on and move them to the outside of the reflectix to help hold it in place as well.

Next, I’m going to cut aluminum faced polyiso foam insulation for the spaces around the windows in the top panels.

Garage Door Insulation – Part 1 (Fiberglass door insulation)


My two car garage has four single wide doors. Two in the front, and two in the back, and they had no insulation. If you ever buy a new garage door, pay extra to get the insulated panels, otherwise, somebody may have to retrofit insulation later on.

I used 3 kits from Owens Corning that comes with R-8 fiberglass bat and plastic mounting clips. Because I’m only using it on the windowless bottom 3/4 of each door, I was able to   use 3 kits to insulate all 4 doors. I’ll be doing something different around the windows.


The other option is an R 4.8 Faced Polystyrene foam board kit, which is $20 cheaper per kit, but doesn’t offer as much insulation value, and would have required that I remove some support bars to install. Plus I hate cutting polystyrene as the beads get everywhere.

In addition to a pair of medium gloves, each kit came with two extra pieces of foam tape, 2 pairs of plastic clips, and a piece of vinyl repair tape.

I used acetone to remove the paint where I was going to be putting the foam stickers to mount the back half of the clips. I put up 12 foam squares at a time, and then put up 12 clips. You want to roughly center them in the openings. Where there were support bars, I centered into the remaining opening.

Then it’s just a matter of measuring each opening, and cutting your fiberglass batt’s about 1″ wider. The height comes pre-cut from the factory for standard garage door panels.

The kit includes a pair of medium plastic gloves, and you’ll also want a long sleeve shirt when handling the fiberglass. Then you just push the batt into the opening. After you are happy with how it is centered, you push down to find the end of the plastic clip, cut a small X in the vinyl with a razer knife, and push a mating clip onto it. The finished door is nice and white and puffy.


So far, friction and the plastic clips have held in all the fiberglass batts just fine. I’m probably going to be adding a layer of reflextix as a radiant barrier over the top of the   fiberglass. [I also plan on using foam insulation around the windows.]

There is a definite temperature difference between the insulated and non-insulated (top window) panels. Outside in the shade, the insulated panels were 99 degrees, and the uninsulated panels were 95 degrees, as they were being cooled more by the inside of my garage. (A bad thing…) Inside, the uninsulated panels were 94 degrees (a one degree difference from the outside) while the insulated panels were 88 degrees (an 11 degree difference).

Next up, wall and attic insulation.

Denford Micromill 2000 January 2003 dispatch date – SGR location

Cliff Burger is part of a makerspace ( http://www.tcmakerspace.com ) which had a Denford Micromill 2000 (January 2003 dispatch date) donated to them. When referring to my four part series( 1, 2, 3, 4)   about how I got mine working under CNC control, they noticed a few differences with their model and wanted to share that information.

Instead of having a custom made relay & power board, their mill has it’s relays mounted to a DIN rail (bottom left of the case in the image below).   The spindle go relay (SGR) is located in the 2nd from the right position.

A quote from Cliff:

On the DIN rail, the spindle activation relay is the second one in from the right. It’s a 12v relay with the ground for the coil being controlled by the C6 pin. However, currently the relay never sees a 12V signal either. Not sure if it’s something wrong with my board or it’s waiting for another command signal before it sends the 12V out as well. Either way, I’ll likely just get a 5V relay and switch it right off the BOB, but for the time being I’ve moved the orange wire from the “14” position to the “12” position to supply power to the board at all times.


Cliff also sent along his mach3 config file, which you can download here (note, you will have to remove the .txt extension from the file to use it.)   Denford.xml.txt

He has the following caveats:

Things to note about the mach3 config:
1) My limit switch are on different pin numbers due to me chopping 1 wire a bit shorter than I should have (oops!).
2) default units are in inches so the steps per INCH are correct, but may need slight tweaking for each application.
3) backlash settings will need to be measured for each mill, or disabled.
4) I’m running a UC100 UBS adapter board so Mach3 may give an error message the first time you open it with this config file.

How I powered my fridge through a multi-day outage from an electric vehicle

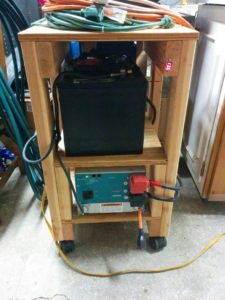
When hurricane Irma threatened Florida, I was not worried about the food in my fridge going bad or scrambling to buy ice, because I had an inverter in my garage hooked up to a 12 volt battery made up of two golf cart batteries. With new batteries, this setup would provide around 2 kWh of backup power, although I’m currently using 4 year old batteries that had previously seen 400 cycles of use in an electric vehicle, so the actual performance is closer to 0.6 kWh (600 Watt/Hours).

Our energy star fridge/freezer draws around 240 watts of power when running the compressor, although the average energy draw is lower as the compressor shuts off once it reaches temperature. So the golf cart batteries alone would be enough to power my fridge for 2.5 hours of continuous cooling, or 5-8 hours of typical usage assuming the fridge wasn’t having to work super hard to cool things off.

When Irma hit, we lost power at 1am on Monday were without power until 5pm on Wednesday, or around 64 hours. However, I only ran my backup system for 31 of those 64 hours. I first hooked the system up around 1pm on Monday, and ran it until 10pm. I shut it down overnight when I was sleeping and ran it around 11 hours each on Tuesday and Wednesday during the day. My fridge was easily able to keep things frozen/cold overnight and “catch up” during the days (I had loaded the freezer up with a lot of frozen water, and the fridge with a lot of chilled water well before our outage occurred).

Over the 31 hours I ran the system, we averaged 190 watts of draw per hour (or 5890 watt / hours or 5.89 kWh total), which is significantly larger than the 0.6 kWh the golf cart batteries could provide alone. This draw was primarily from our fridge, although we also used 20-50 watts of power to keep our DSL wifi-router running and charge personal electronics, as well as running the power hungry microwave for a few minutes at a time.

To augment the stored power in the golf cart batteries, I wired them in parallel with the 12 volt accessory battery on my electric truck (which has a 20-22 kWh battery pack). By leaving the ignition of my truck turned on, I enabled my 500 watt DC2DC converter which continuously charges the 12v accessory pack from the main (LiIon) battery pack. Because the 500 watt DC2DC converter was providing well more than the 190 watt average draw, the system worked well.

The golf cart batteries acted as a “buffer”, providing extra power to the (2000 watt) inverter if needed. [For example, when I used our 1300 watt microwave to heat up food for 5 minutes here and there.] And the golf cart batteries were topped up by the 12 volt system on the truck, ultimately powered by the main traction pack.

One big advantage is that the system is nearly silent, generating only a slight hum from a fan in the inverter that becomes inaudible as you walk away from it.   It also has no danger of producing deadly carbon monoxide, which has already killed several people in Orlando due to mis-using gas burning generators.

It took 8.34 kWh to recharge my truck after the outage was over, so my overall system efficiency (power provided / power required to re-charge) is 70%, which isn’t bad considering the parasitic losses from keeping all of the truck’s systems active, the losses from the DC2DC converter going from 120v DC to 12 vDC, and the inverter going from 12v DC to 120 v AC, heat losses, etc.

So it looks like I could easily ride out a 5-6 day power outage before needing to find a generator or EVSE to re-charge the truck (And we haven’t even tapped the Leaf’s battery pack yet….there are commercial offerings for that.).   One advantage of having your battery pack inside a vehicle is that you can drive it elsewhere to recharge. An EVSE located two miles away from me had power starting on Tuesday, so I wasn’t worried about being able to recharge my truck…

Disassembly and reassembly of my workbench

When I built a workbench out of plywood and 2×4’s   I designed it to unscrew so that I could move it out of the rental and into our next home.   It took a few hours and a lot of unscrewing, but I was able to transport it to the new house in a single load.


Re-assembly was much faster than the initial build as most of the screw holes lined up perfectly, although I did swap the position of two of the plywood side sheathing pieces based upon where it was going to be put up against a wall. I also chopped off the upper shelf overhang on the left side, and chopped a few inches off the height of the top shelf to accommodate the lower ceilings.

 
You can watch the video of the re-assembly process here:

Rolling Milk Crate organizer

I have a large number of these milk crates for storage. Although they stack well, it makes getting things out of the bottom of the stack unnecessarily complicated, and it also takes a lot of time to move the stack. I put a furniture moving dolly under the stack, which made it extra unsteady.

So I built this rolling organizer that lets me access any crate, move the stack around, and has some extra pegboard for hanging items. The final height rolls just under standard height garage doors.

Continue reading

Which toilet cleaner to use?

The local dollar general sells toilet cleaners with 3 different active ingredients. From right to left:

  1. 9.5% Hydrocloric Acid (Lysol POWER)
  2. 1.2% Hydrogen Peroxide (Lysol with HydrOgen perOxide)
  3. 2.4% Sodium Hypoclorite (Clorox Clinging Bleach Gel)


We get our water from a well, and it has enough iron in it that we build up rust deposits in the toilet, so that is the primary cleaning challenge. I didn’t clean the toilet for a month to make things stand out in photos better (“No Dear, I can’t clean the toilet because of SCIENCE!”) And then I gave each product a chance on 1/3 of the bowel. (NOTE: I was sure to rinse one product out of the bowl before testing a different one to avoid bad interactions! Both the hydrogen peroxide and acid specifically warn you to NOT mix with any type of bleach. I also ran the bathroom fan continuously and stayed well away from the room while letting them sit.)

Before cleaning

Presented in order of their effectiveness:
Continue reading