Ego 21″ Self Propelled 56 volt Power plus lawnmower review

In April of 2017 I purchased an Ego 21″ Self-propelled electric lawnmower (Model LM2100SP), and I have been somewhat happy with it despite two failures of the self propel drive unit that were both repaired/replaced under warranty.

I still believe that an EGO mower is the best option if you are going to be buying a cordless electric mower, but there are a lot of caveats you should know about if you are trying to decide between it and a traditional gas model.

Performance and “Range”:
The Ego has comparable performance (cutting power) to a gas mower (and an impressive ability to automatically ramp up the torque if needed), but it can’t compete on range with the energy density of gasoline. My mower came with the largest 7.5 Amp Hour (AH) battery, and I need to re-charge it once (winter) or twice (summer) to mow my 3/5 acre yard in two or three sections. I can usually mow for between 30-60 minutes at a charge depending upon conditions (cutting thick wet grass with a dull blade takes a lot more energy than cutting thin dry grass with a sharp blade).

As an example, I was able to mow this section of my lawn (from the foreground to just past the pine tree to the right of center) on a single charge (until the status light on the mower turned from green to red, leaving just enough power in the battery to use it in the leafblower to clean off the lawnmower and a short sidewalk). The section was 66′ long by 130′ wide, (8,500 sq ft, or just under 1/5 – 0.195 acres ). This was grass that needed mowing (mowed last about 9 days ago) but wasn’t quite overgrown yet. Time wise, this took me around 45 minutes running with the self propel set to maximum speed. As another data point, in the middle of summer, mowing thick overgrown grass, I was able to mow a 5,200 sq ft section ( 130′ x 40′) on a single charge of a new 7.5 AH battery.

With a gas mower you could mow my entire lawn with thick wet grass and a very dull blade and only notice that you needed to re-fill the gas can slightly more frequently. With an electric mower, you learn to keep your blade sharp, and to never mow wet grass (which is good for the lawnmower and your lawn) because it makes a significant difference in your mowers “range”.

My lawn is large, and most homeowners would probably buy a riding mower with a wide deck to mow it, so I don’t mind getting a break between each section. [Electric riding mowers were prohibitively expensive when I purchased my walk-behind Ego.] Recharging the battery takes an hour with the included fast charger, so I can mow one section, recharge while taking a lunch break and then knock out a second section. Usually though, I just mow 1/3 of it each day, so the battery charging speed doesn’t really matter. If you wanted to be able to mow almost continuously, you should buy two batteries so that one can be charging while you are using the other.

Cost:
The mower will cost more up-front than a comparable gas mower, due to the cost of the rechargeable battery (The battery and charger is warranted for 3 years, while the mower itself has a 5 year warranty). If the battery lasts a full 5 years, your total cost of ownership will probably be very similar to a gas mower + fuel and maintenance. However, if you were to purchase a used gas mower, you can save a significant amount of money. Purchasing a used electric mower was not yet a viable option for my lawn, as most used electric mowers on the market still make use of lead acid batteries and do not have the comparable performance to the Ego’s 56 volt lithium battery pack. If you have a very small yard (1/10th acre or less), an older used electric mower may still work for you.

Benefits of electrification

Once you accept that the energy density of a LiIon battery is significantly lower than gas, there are many benefits to an electric mower. First, it costs me about 5 cents to fully charge the battery (15 cents to mow my entire lawn), and I never have to travel to a gas station to purchase fuel. I will have to purchase a new battery at some point in the future. Currently, it is unclear exactly how quickly the battery will degrade over time. I have detected no degradation after the first four months. It is warranted for 3 years, and I hope it will actually last 5-10 years before I need a new one, but only time will tell. New batteries are expensive, but if technology improves and costs reduce over the next five years, I may just buy an electric riding mower once my Ego walk behind is 5 years old and the warranty expires.

Because the mower has no gas or oil, you can turn it to change the blade or fold the handle and stand it upright for storage without worrying about leaks or damage. This is a prime space saving benefit that I feel is one of the main benefits.

Because the motor is electric, starting and stopping the mower is as easy as pushing the start button and pulling the bail bar in.   No more pull starts, or dealing with a dead starter battery on an electric start model.

The mower is MUCH quieter than most gas mowers. Although it makes noise, it is much less disruptive than even a four stroke engine with a good muffler. And of course, you never have to walk through fumes or smoke from an internal combustion engine.

It also comes with headlights. This may sound like a gimmicky feature, but since the electric motor is so quiet, you can mow later in the evening without worrying about annoying your neighbors. Because the headlights are down low shining across your lawn, they do a very good job of highlighting the mowed/not-yet mowed division, making it even easier to overlap your tracks slightly than in the daytime.

Common Gripes

Reading the Ego community forums (after purchasing the mower) I found several common complaints.   First, it can leave   tufts of uncut grass near the edge of the mower, which can mostly be rectified by overlapping your passes a bit extra. So instead of a 21″ deck, you are really getting the performance of a 19-20″ deck. This may be related to the second common complaint, a lack of suction. Some people complain that it doesn’t always lift leaves or grass upwards enough to cut/mulch. Many of these complaints are from people who bag their clippings and want absolutely everything off of the lawn when they are finished. I use it almost exclusively in the mulching configuration, and am happy with it’s mulching performance. Ego does sell a “high-lift” blade that has more “uplift” specifically designed for bagging operation, which does improve the suction, but at the expense of extra energy usage (shorter runtime). I have the high lift blade and can confirm it does a good job increasing “pickup” when bagging, but I was happy enough with the mulching performance with the standard blade that I don’t use the high-lift blade and bag frequently.

Hardware failures

The third, and most concerning complaint I see on the community forums is failures of the hardware, combined with difficulty contacting customer support and a poor dealer network for repairs (of the mower). I have seen many posts by people who have had motor failures, battery failures, and charger failures. Without knowing how many units have been sold overall, I can’t estimate a failure rate, but they are happening often enough to show up in the community forums as a seriously sour note.   [It doesn’t help that EGO, and their system of Home Depot authorized repair centers some issues, keep reading.]

Repair Difficulties

To be clear, EGO stands behind their products and will replace batteries and chargers if they fail by sending out a new unit. However, their call center is very busy, and hold times of over an hour are reported frequently (and bitterly). The best advice seems to be to call early in the morning to reach a real person, and to never expect them to return a voice-mail. I have talked with two different customer support representatives (to register my mower, and to initiate a warranty repair on the self propel motor) and they were always very helpful (once you got through to them.)

If your battery or charger goes out under warranty, they will ship you a new one relatively quickly. However, if a piece of equipment needs repair, instead of outright replacement, you must take it to an authorized repair center. For most people, this will be the closest Home Depot that has a tool rental / repair center. [If you are lucky enough to have a local lawnmower dealer that is an authorized repair site for Ego anywhere near you, DRIVE YOUR MOWER TO THEM INSTEAD.] Unfortunately, the time to repair a piece of equipment at the home depot repair center is 3-4 weeks if they can do the repair in the store, and 6-10 weeks if they have to ship it to the repair depot in Atlanta.   Think about that, two months without your lawn mower!   (You can read about my repair experience at this other post…)

Update:   The self propel unit failed on my mower a second time after 9 more months of ownership, but I was much happier with how Ego handled the failure, as they shipped me a replacement mower so that I was quickly back in business. You can read about the 2nd failure and replacement at this post.

2nd update: The self propel unit stopped working on my replacement mower after about 11 more months of ownership, and Ego again offered to ship me a replacement mower so that I’ll be back to mowing in only 10-15 days.   However, when I went back out to push-mow the rest of my lawn, the self propel unit was again working (I assume it was some type of self resetting thermal fuse or circuit breaker) and the self propel unit was working again! (So I had to call Ego back and cancel the replacement shipment.)

So far I’m happy with Ego’s 5 year tool warranty (they only offer 3 years on the batteries/chargers), but there are some very important restrictions you must know about.

Important Warranty Restrictions

This isn’t a craftsman hand tool where you can buy a broken one at a garage sale and get it replaced. For warranty service, you need to be the original owner, have proof of purchase (if you have not already registered the product), and you MUST have bought the product new, from an Ego certified dealer (Mostly Home Depot, although they do sell on Amazon as well as through some local lawnmower shops.) Note that if you buy an EGO product on Amazon, you MUST make sure that it is “Sold by and shipped from Amazon” to be covered by Ego’s warranty. Many other sellers will sell via the Amazon Marketplace, but they are not Ego authorized dealers, only products purchased directly from Amazon itself are covered by the warranty.


Ego 21″ mower (LM2100SP) self propel motor failure & repair report

After four months of ownership, around 40 hours of usage, the self propel motor unit on my Ego 21″ Self-propelled electric lawnmower (Model LM2100SP) failed. Before this failure I was very happy with its performance, and although it was repaired under warranty, the procedure took longer than I think was reasonable.

Ever since I purchased the mower, I have been monitoring the Ego community forums, and I knew that reaching a customer support representative would sometimes take extended hold times, and I had heard that taking a mower to Home Depot for repair could be an extended procedure, so when my self propel motor failed, I was relatively well prepared on how to handle the situation.

August 29th, 2017 – The self propel motor fails. I finish mowing my front lawn pushing the mower by hand (which makes me realize that paying extra for the model with the self propel motor was the right choice.)

August 30th, 2017 Time to call customer support. After re-charging the battery, and letting the mower sit overnight to cool, I tested it again (yep, still no motion) and then called Ego customer support early in the morning (to avoid a long wait on hold.). I only had to wait a few minutes on hold, and then a helpful customer support representative walked me through a few simple questions (yes, my mower blade would turn on and spin, so the battery was good, and the folding handle interlocks were correctly latched, etc…) to verify that the drive motor had actually failed.   After that, she “made a note in my file” and told me to take it to Home Depot.

What I wish she had told me: 1. Home depot will charge you a $20 deposit, just to look at the mower (and you authorize up to $150 worth of repairs upon drop-off). They will refund this deposit to you if the work is covered under warranty (mine was).   2. You can only take the mower to a Home Depot that has a tool rental / repair clinic (call first to check). 3. The Home Depot repair clinic doesn’t have their own EGO batteries for testing, so be sure to leave your battery in the mower. [This makes sense in hindsight, but I was hesitant to leave 7.5 AH battery that costs $400 to replace at HD, so this required me to make a second trip back to HD with the battery a few days later.]

Also, after talking with her I received an email from Ego that stated my “case had been closed” (this is the case associated with the phone call to Ego only…but the wording of the message didn’t inspire confidence.)

Because I had heard horror stories about the Home Depot repair clinic taking a long time to repair EGO mowers, I made sure I called them every week to check on the status of my mower, just to make sure it hadn’t fallen into any cracks. I also posted an update every Monday on the ego customer forums, which may have also helped things behind the scenes.

Sep 18th 2017: They are still checking on the mower, but the HD technician felt that they could repair it locally instead of shipping the mower to Atlanta.

Sep 25th 2017: In progress, waiting on a part which usually takes a week or two (presumably the motor/gearbox unit).

October 2nd 2017: HD is still waiting on the part.   [After this update to the Ego community forum, April from EGO said that they were tracking the shipment and that the part should be arriving at the HD store within a few days.]

October 9th 2017: HD claims to still be waiting on the part.   [I mentioned this on the Ego community forum.]

Finally, on Thursday night (Oct 11th), Home Depot calls me to tell me the mower is ready for pickup. Because the home depot with the repair clinic   is 12 miles away from me, I delay pickup until Saturday.

So, it took Home Depot / Ego about five weeks to get my mower repaired, and this was with me keeping on top of Home Depot and making sure that Ego knew what was happening at each step. Reading several other reports on the ego community forum makes me believe that my experience was actually on the faster side of things, as 8-10 week delays are not unheard of if the mower gets shipped to Atlanta for repairs.   I paid $180 to a lawncare company and took a break from mowing my yard, but there are at least three other options to keep mowing if you find yourself in this situation.

Take advantage of Home Depot’s 90 day return policy

Many others in the Ego forums have bought another Ego lawnmower and used it while theirs was in for repair, returning it under HD’s 90 day return policy once their mower was repaired. I felt that this action would be ethically questionable, but after waiting five weeks for HD to repair my mower, my ethical resolve is beginning to weaken, and should the mower fail again, I will seriously consider this option.

Buy a second mower

I did consider buying a second Ego mower (and keeping it), mostly as a way to purchase a second 7.5 Ah battery (it is almost as cheap to buy the battery and mower together as to buy just the battery, plus you get a “hot spare” mower). Other than the fact that you have to store the 2nd mower, this does have certain advantages. If one mower fails, you can just switch over to using the second mower while the first is in for repair. And, you get the advantage of having twice as many batteries and chargers.   Unfortunately,   at the time Home Depot was not offering the same $50 discount on the mower as when I initially purchased mine, otherwise I may have done this.   [My wife points out the questionable logic of using the failure of a product to justify the purchase of a duplicate of the same product…]

Burn hydrocarbons

Of course, you could also buy a cheap used gas mower and several gallons of gas for less than the $180 that I paid for lawn care service, and probably be able to resell it at almost the same price you paid when finished.

Final Recommendation

Due to the fact that my self propel motor failed after 4 months of ownership, combined with a 5 week repair time, I can’t recommend the EGO electric mower to everyone. At least with a gas mower your options for repair are numerous and much faster. However, if you have decided that you will be going with an electric mower, I still think that the Ego line has the best performance. (I have also posted a review of the mower.) I also own the hand-held leaf blower and chainsaw from their Power+ line, and have been quite happy with them.

Update:
The new self propel unit installed by Home Depot   failed again (after 9 more months of usage) but I’m much happier with how Ego handled the warranty repair (via a direct replacement), which you can read about here.

2nd Update: Ego has started to produce updated 21″ SP models that have a new self propel unit that matches the one found in their dual battery (premium) mowers. Look for a picture of a phone on the box (see this video for details: https://www.youtube.com/watch?v=JtLkT5X4MQw )

3rd Update: My self propel unit failed a 3rd time, but this time the replacement I got looks different, so I think I may have the new model now!

Howto: Trim pegboard to exactly match a framed opening

I have this window in the wall I’m putting pegboard up on. Because of the holes, pegboard does let some air and light in, but I decided to cut out the window opening so that I could operate it.

You could carefully measure the opening, cut a big section out of your pegboard panel, and then install it. But, because this opening would make my pegboard panel into a giant “C” shape, it would make installing it by myself excessively difficult. (Also, you have to measure and cut very accurately.)

I found it much easier to just install the full panel and then cut out the opening. I’m using a trim router with a following bit. After I cut out along the top, I hung it up with wire so that the panel I was cutting out wouldn’t fall down later on.

And then I cut out the other two sides. The downside of this technique is of course the copious amounts of hardboard sawdust, which does require a shopvac to clean up.
And of course, depending upon how you install the pegboard your cutouts may go through a series of holes. But, the edges are very close to the edge of your framing members.

Garage Door Insulation — Part 2 (Reflectix radiant heat barrier)

After installing the R-8 fiberglass batt with white vinyl backing, my garage doors were relatively well insulated, but I decided to add a layer of reflectix as a radiant heat barrier.

In this situation, with one side facing the open air of the garage, it adds about a 3 to the R factor. I also like the aesthetics of the silver bubblewrap more than the white puffy vinyl.

Unfortunately, unlike the Dow Corning fiberglass batt which is designed for garage doors and comes pre-cut at the factory to the correct height, I had to measure and cut the reflectix down from a 24 inch roll.

If you don’t have support bars, it’s relatively easy to install. Just make a few cuts to go around the upright bars and tuck the top and bottom inside the lips of the door panels. I was going to move the white plastic clips that hold the fiberglass in to outside the reflectix, but so far, a pure friction fit is holding it just fine.

The panels with support bars require more work. I guess it would be possible to remove the support bars and then re-install them on top of the reflectix, but I chose to measure and mark each bar location by cutting the edge of the reflectix, then taking it down and cutting the proper length. I installed the reflectix panel under the horizontal support bar, and made sure that the top lined up just under the height of the panel. Then I notched around the vertical bars so that I could get the top in place.

So far, they all stay in place with nothing more than a friction fit. The bottom panels that don’t have a horizontal support bar holding the reflectix bow the most when overhead and may pose a problem as they age, but if I run into issues, I’ll just take the plastic clips that hold the fiberglass on and move them to the outside of the reflectix to help hold it in place as well.

Next, I’m going to cut aluminum faced polyiso foam insulation for the spaces around the windows in the top panels.

Garage Door Insulation – Part 1 (Fiberglass door insulation)


My two car garage has four single wide doors. Two in the front, and two in the back, and they had no insulation. If you ever buy a new garage door, pay extra to get the insulated panels, otherwise, somebody may have to retrofit insulation later on.

I used 3 kits from Owens Corning that comes with R-8 fiberglass bat and plastic mounting clips. Because I’m only using it on the windowless bottom 3/4 of each door, I was able to   use 3 kits to insulate all 4 doors. I’ll be doing something different around the windows.


The other option is an R 4.8 Faced Polystyrene foam board kit, which is $20 cheaper per kit, but doesn’t offer as much insulation value, and would have required that I remove some support bars to install. Plus I hate cutting polystyrene as the beads get everywhere.

In addition to a pair of medium gloves, each kit came with two extra pieces of foam tape, 2 pairs of plastic clips, and a piece of vinyl repair tape.

I used acetone to remove the paint where I was going to be putting the foam stickers to mount the back half of the clips. I put up 12 foam squares at a time, and then put up 12 clips. You want to roughly center them in the openings. Where there were support bars, I centered into the remaining opening.

Then it’s just a matter of measuring each opening, and cutting your fiberglass batt’s about 1″ wider. The height comes pre-cut from the factory for standard garage door panels.

The kit includes a pair of medium plastic gloves, and you’ll also want a long sleeve shirt when handling the fiberglass. Then you just push the batt into the opening. After you are happy with how it is centered, you push down to find the end of the plastic clip, cut a small X in the vinyl with a razer knife, and push a mating clip onto it. The finished door is nice and white and puffy.


So far, friction and the plastic clips have held in all the fiberglass batts just fine. I’m probably going to be adding a layer of reflextix as a radiant barrier over the top of the   fiberglass. [I also plan on using foam insulation around the windows.]

There is a definite temperature difference between the insulated and non-insulated (top window) panels. Outside in the shade, the insulated panels were 99 degrees, and the uninsulated panels were 95 degrees, as they were being cooled more by the inside of my garage. (A bad thing…) Inside, the uninsulated panels were 94 degrees (a one degree difference from the outside) while the insulated panels were 88 degrees (an 11 degree difference).

Next up, wall and attic insulation.

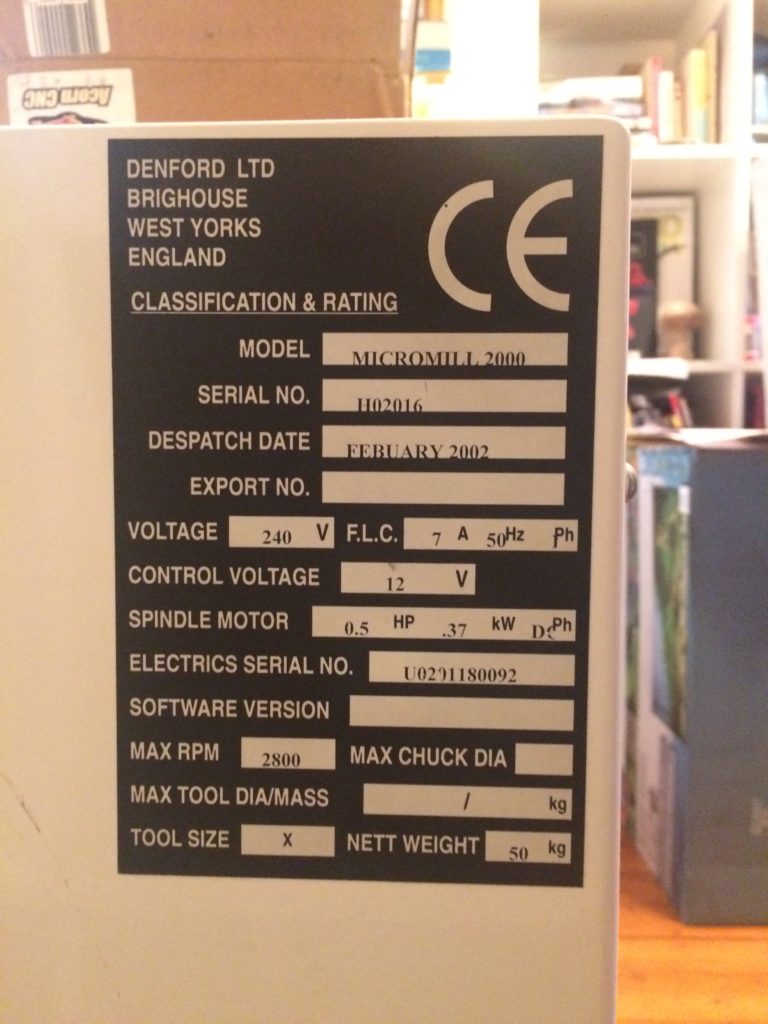
Denford Micromill 2000 January 2003 dispatch date – SGR location

Cliff Burger is part of a makerspace ( http://www.tcmakerspace.com ) which had a Denford Micromill 2000 (January 2003 dispatch date) donated to them. When referring to my four part series( 1, 2, 3, 4)   about how I got mine working under CNC control, they noticed a few differences with their model and wanted to share that information.

Instead of having a custom made relay & power board, their mill has it’s relays mounted to a DIN rail (bottom left of the case in the image below).   The spindle go relay (SGR) is located in the 2nd from the right position.

A quote from Cliff:

On the DIN rail, the spindle activation relay is the second one in from the right. It’s a 12v relay with the ground for the coil being controlled by the C6 pin. However, currently the relay never sees a 12V signal either. Not sure if it’s something wrong with my board or it’s waiting for another command signal before it sends the 12V out as well. Either way, I’ll likely just get a 5V relay and switch it right off the BOB, but for the time being I’ve moved the orange wire from the “14” position to the “12” position to supply power to the board at all times.


Cliff also sent along his mach3 config file, which you can download here (note, you will have to remove the .txt extension from the file to use it.)   Denford.xml.txt

He has the following caveats:

Things to note about the mach3 config:
1) My limit switch are on different pin numbers due to me chopping 1 wire a bit shorter than I should have (oops!).
2) default units are in inches so the steps per INCH are correct, but may need slight tweaking for each application.
3) backlash settings will need to be measured for each mill, or disabled.
4) I’m running a UC100 UBS adapter board so Mach3 may give an error message the first time you open it with this config file.

How I powered my fridge through a multi-day outage from an electric vehicle

When hurricane Irma threatened Florida, I was not worried about the food in my fridge going bad or scrambling to buy ice, because I had an inverter in my garage hooked up to a 12 volt battery made up of two golf cart batteries. With new batteries, this setup would provide around 2 kWh of backup power, although I’m currently using 4 year old batteries that had previously seen 400 cycles of use in an electric vehicle, so the actual performance is closer to 0.6 kWh (600 Watt/Hours).

Our energy star fridge/freezer draws around 240 watts of power when running the compressor, although the average energy draw is lower as the compressor shuts off once it reaches temperature. So the golf cart batteries alone would be enough to power my fridge for 2.5 hours of continuous cooling, or 5-8 hours of typical usage assuming the fridge wasn’t having to work super hard to cool things off.

When Irma hit, we lost power at 1am on Monday were without power until 5pm on Wednesday, or around 64 hours. However, I only ran my backup system for 31 of those 64 hours. I first hooked the system up around 1pm on Monday, and ran it until 10pm. I shut it down overnight when I was sleeping and ran it around 11 hours each on Tuesday and Wednesday during the day. My fridge was easily able to keep things frozen/cold overnight and “catch up” during the days (I had loaded the freezer up with a lot of frozen water, and the fridge with a lot of chilled water well before our outage occurred).

Over the 31 hours I ran the system, we averaged 190 watts of draw per hour (or 5890 watt / hours or 5.89 kWh total), which is significantly larger than the 0.6 kWh the golf cart batteries could provide alone. This draw was primarily from our fridge, although we also used 20-50 watts of power to keep our DSL wifi-router running and charge personal electronics, as well as running the power hungry microwave for a few minutes at a time.

To augment the stored power in the golf cart batteries, I wired them in parallel with the 12 volt accessory battery on my electric truck (which has a 20-22 kWh battery pack). By leaving the ignition of my truck turned on, I enabled my 500 watt DC2DC converter which continuously charges the 12v accessory pack from the main (LiIon) battery pack. Because the 500 watt DC2DC converter was providing well more than the 190 watt average draw, the system worked well.

The golf cart batteries acted as a “buffer”, providing extra power to the (2000 watt) inverter if needed. [For example, when I used our 1300 watt microwave to heat up food for 5 minutes here and there.] And the golf cart batteries were topped up by the 12 volt system on the truck, ultimately powered by the main traction pack.

One big advantage is that the system is nearly silent, generating only a slight hum from a fan in the inverter that becomes inaudible as you walk away from it.   It also has no danger of producing deadly carbon monoxide, which has already killed several people in Orlando due to mis-using gas burning generators.

It took 8.34 kWh to recharge my truck after the outage was over, so my overall system efficiency (power provided / power required to re-charge) is 70%, which isn’t bad considering the parasitic losses from keeping all of the truck’s systems active, the losses from the DC2DC converter going from 120v DC to 12 vDC, and the inverter going from 12v DC to 120 v AC, heat losses, etc.

So it looks like I could easily ride out a 5-6 day power outage before needing to find a generator or EVSE to re-charge the truck (And we haven’t even tapped the Leaf’s battery pack yet….there are commercial offerings for that.).   One advantage of having your battery pack inside a vehicle is that you can drive it elsewhere to recharge. An EVSE located two miles away from me had power starting on Tuesday, so I wasn’t worried about being able to recharge my truck…

Disassembly and reassembly of my workbench

When I built a workbench out of plywood and 2×4’s   I designed it to unscrew so that I could move it out of the rental and into our next home.   It took a few hours and a lot of unscrewing, but I was able to transport it to the new house in a single load.


Re-assembly was much faster than the initial build as most of the screw holes lined up perfectly, although I did swap the position of two of the plywood side sheathing pieces based upon where it was going to be put up against a wall. I also chopped off the upper shelf overhang on the left side, and chopped a few inches off the height of the top shelf to accommodate the lower ceilings.

 
You can watch the video of the re-assembly process here:

Rolling Milk Crate organizer

I have a large number of these milk crates for storage. Although they stack well, it makes getting things out of the bottom of the stack unnecessarily complicated, and it also takes a lot of time to move the stack. I put a furniture moving dolly under the stack, which made it extra unsteady.

So I built this rolling organizer that lets me access any crate, move the stack around, and has some extra pegboard for hanging items. The final height rolls just under standard height garage doors.

Continue reading

Which toilet cleaner to use?

The local dollar general sells toilet cleaners with 3 different active ingredients. From right to left:

  1. 9.5% Hydrocloric Acid (Lysol POWER)
  2. 1.2% Hydrogen Peroxide (Lysol with HydrOgen perOxide)
  3. 2.4% Sodium Hypoclorite (Clorox Clinging Bleach Gel)


We get our water from a well, and it has enough iron in it that we build up rust deposits in the toilet, so that is the primary cleaning challenge. I didn’t clean the toilet for a month to make things stand out in photos better (“No Dear, I can’t clean the toilet because of SCIENCE!”) And then I gave each product a chance on 1/3 of the bowel. (NOTE: I was sure to rinse one product out of the bowl before testing a different one to avoid bad interactions! Both the hydrogen peroxide and acid specifically warn you to NOT mix with any type of bleach. I also ran the bathroom fan continuously and stayed well away from the room while letting them sit.)

Before cleaning

Presented in order of their effectiveness:
Continue reading