MythWelcome Menu / GUI slowness

On my 0.21-release-fixes codebase, MythWelcome would pause for a long time (2-3 seconds) after I pressed the “MENU” key before making the menu pop up. This was because a call to “mythshutdown –status” was taking several seconds to return, and MythWelcome waited for the return value of that message before drawing the menu (It wanted to know if it should draw a “unlock” or a “lock” button.)
Continue reading

MythTV power conservation

Our MythTV entertainment system uses a decent amount of electricity. While watching TV, the television, DVD/Amplifier and computer (plus misc other items) use 335 watts of power. However, as we only average an hour or two of TV a day, this isn’t as large as the continuous power draw from the system when it is not in use. Even though we turn the TV and DVD/Amplifier off when not in use, the computer, HD Tuner, external HD, antenna preamplifier, printer, etc take up 141 watts when idle, and around 160 when recording, trans-coding, or detecting commercials in a television show. As the MythTV computer runs 24/7, this adds up to just over $10 a month of electricity (101 kW/h).

In an effort to save power, I have configured the MythTV system to shut itself off when idle, and wake up automatically five minutes before the next television show it is scheduled to record. This saves power, but has the major downside that the computer is not running and instantly ready whenever we want to watch TV. If the MythTV box isn’t already awake recording a show, you have to manually push the power button and then wait for two minutes while it boots up and gets itself ready. We are no longer able to press the TV-Power button and start watching TV five seconds later. However, this saves about 105 watts whenever the system is off (about 20-22 hours a day), or about $75-$84 a year.

We still have a constant drain of 36 watts, even when the system is turned off due to various peripherals and parasitic power drains.

  • The UPS & Computer, even when turned off, takes 10 watts (Mostly the UPS keeping its battery charged).
  • The external USB Hard Drive takes 8 watts.
  • The printer takes 6 watts when in standby mode.
  • The DVD/Amplifier, even when turned off (in standby mode) takes 5 watts of power.
  • The HDTuner (Silicon Dust HDHomerun) takes 5 watts of power even when idle.
  • Various other items (PDA charger, External Antenna pre-amp power injector, TV when off) take a watt each.

With the exception of the 10 watts from the UPS/Computer, the other power draws could be eliminated by using a “master-controlled” power-strip (such as the APC P7GT), which automatically turns off the controlled outlets when the computer (plugged into the master outlet) is turned off. This would save 26 watts whenever the computer was turned off, and would save about $20 worth of electricity in a year, paying for the fancy power saving power-strip in less than two years. Also, if I replaced the UPS with a “green” version, it would take less than 10 watts to keep the battery topped-up, but that cost savings would take longer to pay for itself.

How much do our CF bulbs save?

We recently replaced most of our incandescent bulbs with instant-on CF light-bulbs. I cheated by upgrading our light output (using 100 watt equivalent bulbs to replace 60 watt incandescent bulbs) but each bulb should still save 34 watts.

I loosely estimated our daily light usage (over weekdays and weekends) on the newly CF fixtures as the following:

Bedroom (1 bulb): 1 hour
Bathroom (3 bulbs): 2 hours
Hallway (2 bulbs): 6 hours
Sewing Room (2 bulbs): 1.5 hour
Living Room (5 bulbs): 7 hours

We are saving (57 bulb hours * 34 watts) 1938 watts a day, approximately 2 KWh a day, or 60 KWh a month, or $6 a month (at $0.10 a KWh). We should pay for the CF light bulbs in seven months.

Instant On: Not all CF bulbs are created equal

I bought a six pack of GE “General Purpose” (as opposed to “Cool natural light”) compact florescent light bulbs [item number: 71285, bulb model number FLE 26HT3/2/SW 26watt, equivalent to 100watt incandescent light bulbs] at Wallmart and was pleasantly surprised. In addition to having a warm color temperature (no harsh blue-white light here!) the bulbs turned on practically instantly! No more waiting for a half second for the CF bulb to flicker while “charging up”.

I needed a few more, so I bought a two pack of “General Purpose” GE bulbs [item number 72877] at Wallmart a week later. Unfortunately, these bulbs were slightly different, and did not have the immediate “instant-on” ability of the bulbs that came in the six-pack. The “slow startup” bulbs had the following serial/model number: Helical 26 W 102VAC 60Hz 400mA FLE 26HT2/2/XL/SW
Physically, their helical glass coil is just slightly smaller than the “instant-on” versions.

Both types of GE 100 watt bulbs are slightly too large for some fixtures. I have found an alternative 23W (75W equivalent) CF bulb by Sylvania (the CF23EL/Micromini 3000K) that also has very nice “instant-on” behavior, and is a good inch shorter than the GE 26W bulbs. (As it’s a 3000K color temp, it is also very “normal” looking.)

At Kroger I found a rare 3-way CF bulb (50/100/150 equivalent) from GE with model number “FLE32HLX/2/D/SW”. Unfortunately, it had a full second delay before it produced any light at all.

To summarize, the following model number CF bulbs turn on instantly:
Sylvania 23 watt: CF23EL/Micromini 3000K
GE 26 watt: FLE 26HT3/2/SW

And if you want an instant-on experience, you should avoid the following:
GE: FLE 26HT2/2/XL/SW
GE: FLE 32HLX/2/D/SW

Adding Attic Storage Space

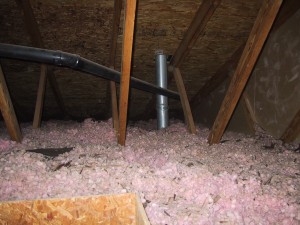
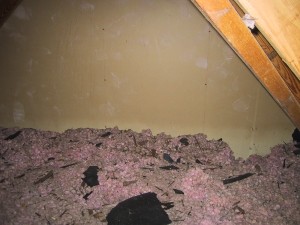
In an attempt to free up more of the spare bedroom for quilting supplies (“the stash”), we built some storage space into our attic. As you can see from the pictures below, our attic consisted mostly of blown fiberglass insulation (about 8-10″ deep, which is almost adequate).

Blown Fiberglass insulation plus random construciton debris

Blown Fiberglass insulation plus random construciton debris


Insulation level before atic storage space

Continue reading

Z-axis cart and adjustment assemblies

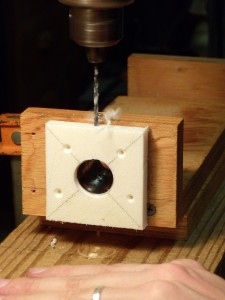
Drilling the holes for the adjustment screw

Drilling the holes for the adjustment screw


I cut out the parts for my Z-axis assembly using a jigsaw, and while butting the machine edges worked fine the other edges were a bit sloppy. I took advantage of an in-law’s shop to finish them up with a table saw and now the edges are much nicer. The base dimensions of my Z-axis are 11 inches by 10 and 1/2 inch, and the sides are 2 and 1/2 inches high. My 12 inch black pipes are mounted with their centers 7 and 1/2 inches apart using adjustment assemblies made out of an old plastic cutting board. My Z-axis cart is just slightly over 5 inches square.
Continue reading

Angle-Iron bearings and Z-axis

Angle Iron's with skate bearings mounted using bolts

Angle Iron's with skate bearings mounted using bolts

I decided that a full set of 3 bearings at 120 degree intervals would take too much alignment and precision so I fell back to the tried and true home-brew DIY pipe and bearing system that uses 90 degree angle iron with skate bearings bolted to it. I used steel angle iron that is 1/8 inch thick and 3/4 inches wide. It cost me $11.23 for a four foot length at my local (over-priced) hardware store. I also purchased eight 1/4 inch bolts, nuts, and nylon lock nuts to hold my bearings for $8.48. (If you purchased bulk boxes the hardware cost would be much cheaper!) Continue reading

Canon S410 viewfinder problem

Our Canon S410 camera recently exhibited some strange behavior. When using the LCD display on the back as a viewfinder, it would display a shimmering curtain of pink and purple pixels instead of the correct view. The problem was not with the image sensor, because pictures could be taken normally, and it was not with the display, because when in playback mode the camera would display photos correctly. My best guess is that the camera CPU was using the wrong mode when moving the data from the image sensor to the LCD display when in viewfinder mode. (Icons would correctly display overlayed on top of the purple curtain). This error survied through multiple on/off cycles and removing the battery. Finally, I tried to shoot a video using the camera (which resulted in a video of the purple curtain that you see here), but when I switched away from video mode and back to video mode a second time the viewfinder started to work correctly! I’m not sure if it was specifically the video mode switch that caused it to fix itself, or just a large amount of mode shifts, but it’s working correctly again.

Motofone F3 working with AT&T Voicemail

A reader has reported that he purchased a Motofone F3 from “Monster-Cellular-Store” on ebay that came with a Cingular branded pleather case and it is set up to work correctly with the AT&T voicemail indicator system. The one I purchased however is still not working, so it appears that some setting or configuration is needed to make them work on the AT&T system. A picture of Neil’s phone and Cingular branded case is below:

Motofone F3 with Cingular branded case

Motofone F3 with Cingular branded case

I would love to know if some type of user configuration can be done with the keypad to make the voicemail work with AT&T.