Testing Glycerin as a bubble medium

The tube on the left is filled with Glycerin. I like how the bubbles float up much slower and are more defined. Also, because the Glycerin has a lot of “micro-bubbles” in it, the light from the RGB LED’s in the bottom of the tube diffuses out of the mixture much more, and gives the whole tube a colored glow effect.

One problem is that if I want to make larger bubbles (than in the video above) I need to increase the size of my nozzle. The current small nozzles will make “separated” bubbles if I run air through them for too long, demonstrated below in this video:

Of course, I had to try making bubbles really fast! (The upper limit in Glycerin is slower than in water…)

Glycerin is relatively safe (msds) as long as you don’t eat it, although it can cause skin and eye irritation if you don’t wash it off. Clean up is easy, as it dissolves in water, but it’s more messy than just plain water, and costs a lot more! Even buying in bulk, it takes $8 worth of Glycerin to fill a 6′ long 1″ square tube!

Getting rid of extra UI elements in Google Reader!

My wife complained about all of the extra stuff at the top of Google reader. You know, the links to all of the other Google products in the black bar, the humongously big “Search Reader” bar and Google logo. I had never really minded them before, but it does take up around 150 pixels before you get down to your actual content!

Default Google Reader UI with lots of stuff at the top

So I searched around and found out that other people also dislike all the extra clutter and have designed scripts that will allow you to give the Google User Interface a haircut. If you are using Mozilla firefox, you can install the Stylish plugin and then the Google Reader Absolutely Compact style to get the following effect:

Google Reader after Stylish script to give the UI a haircut

Of course, the Stylish modification is a “one size fits all” super compact view. I actually like having access to the “Entry Actions” (keep unread, Email link, Plus One, etc…), so I ended up using the Google Reader Absolutely Customizable script for the Greasemonkey add-on, as it allows you to fully customize which elements are shown/hidden from within the Google Reader GUI (click on the “Subscriptions” drop down menu, select “Customize…” at the bottom.). Here is my final view of Google Reader:

Final customized google reader view

Bubble Display Videos

I have been playing around with the timing for how long to turn on the air pumps (as well as the delay time between bubbles). This video is my “favorite” so far for the solid bubbles (on the left) 30ms on-time, and 300ms delay. Obviously, the aquarium air stone tube (right side) needs a longer delay to separate the air pulses.

Of course, I also tried playing around with super fast bubbles!

And with the smallest bubbles I could make (the electronics can give a 1ms pulse, but the motor/air-pump needs at least 8ms of power to eject a bubble…)

Bubble Display Prototype 1

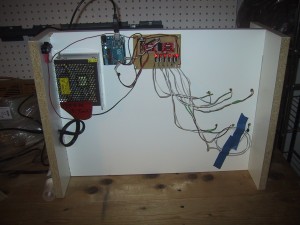
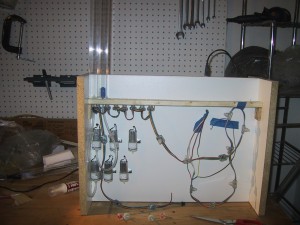
I have the physical structure, electronics, and pneumatic systems all integrated (for 2 of 6 channels) on my first prototype for the Bubble Display. The electronics are mounted on one side of the upright board, while the air pumps, check valves, LED lights and acrylic tubes are mounted on the other. (Click photos for larger versions)
The electronics for a bubble display prototype

Six air pumps, connected with check valves to the bottom of acrylic tubes filled with water

And here is a video of the system driving two channels (tubes of water). This is a 10ms bubble size, which is quite small. I will be experimenting with various lengths of time to drive the air pumps to make bubbles of different sizes, as well as experimenting to find out how small of a delay I can use without having the bubbles run into each other as they rise. (The length of the tube will affect that as well, so it’s just about time to make some six foot tubes!)

Cell phone door refusing to close? Check for a bulging battery!

Have you noticed that the back of your smartphone won’t stay on? The battery door no longer latches? The problem may be as simple as an old battery that has began to bulge. If it’s been a year or two since you bought your phone, it’s likely that you need a new battery.

Modern Smartphones can burn through all the energy stored in their LiIon batteries in only a few hours of GPS map viewing, YouTube Downloading, Web Browsing activity. And LiIon batteries will start to degrade over time and multiple charge/discharge cycles. The typical LiIon battery is at only 50% of it’s rated capacity 18 months after it is manufactured. This means that your SmartPhone will run it down twice as fast. The faster you discharge these batteries the more likely they are to physically deform.

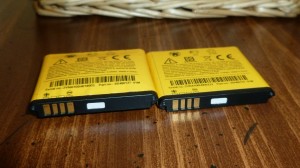
The photos below show two identical HTC Aria batteries. The battery on the left is two years older than the battery on the right, and has been used daily in the phone. As you can see, at the end of it’s life, the battery in the left has deformed so badly that it would no longer fit in the phone.

two liion batteries, one bulging and old, the other new

Addressable RGB LED string

This string of 20 Red-Green-Blue LED lights is addressable via SPI interface. Each LED has an WS-2801 LED driver IC and they are daisy chained in a long string. The plan is that each column in the bubble display will have it’s own LED at the base. I can even plug more strings of 20 end-to-end to expand to 40 or 60 addressable color controlled columns.

Aquarium Air Stone nozzle test

This is the 2nd test chamber I built, this time using an aquarium air stone as the air injection nozzle. The cloud of small bubbles it releases have a very different appearance when compared to the single larger bubble produced by the 1/8″ hose coupler nozzle.

I am getting more experienced using the acrylic welder to seal the bottom of the square extruded acrylic tube, but I still had some water weeping out the bottom when I tested it the first time. Adding more solvent fixed that issue.

Acrylic Column #1 (Bubble Display testing)

I finished test column #1 today. I was able to cut the extruded acrylic tube using a miter saw with no major difficulties, and pulled it across a piece of sandpaper on a glass backing to try to ensure that the end was perfectly flat. I had to use a good amount of solvent to weld the 1″ square bottom plate to the bottom of the square extruded acrylic tube. Even after my initial weld, it had some pinhole leaks that would “weep” water. I fixed them by turning the tube sideways and wiping a liberal amount of solvent along each of the four seams, allowing it to seep into the gaps (and/or melt acrylic into the gaps.)

A 1" square tube of acrylic with a bottom plate cemented to it.

As far as I can tell Continue reading

Acrylic Welding Solvent – Bubble Display Nozzle Test 1

IPS Corporation (Weld-on) acryilic welding solvent cement
This is an industrial acrylic welding solvent. Highly volatile industrial solvents have the ability to unscrew their own lids and escape into the atmosphere during shipping, so they are shipped inside a sealed metal can. It is assumed that you will have something to “cut this out” when you open the solvent and want to use it.

Can sealed by metal

I’m not going to post a picture of the warnings on the side of the can, because, well, this blog is publicly available on the Internet, possibly read by children, and man, are they scary! Cancer, infertility, death, and skin irritation. Lets just say that when you open this can, your liver pokes you in the side to remind you to put on your   nitrile   gloves.

So, what am I trying to weld together? Continue reading